background image


TVT500PVR User Guide 

Introduction 

Thank you for purchasing this product which has been designed and manufactured to give you many 
years of trouble-free service. Before use please ensure that you have read all of the following 
instructions. 

About This User Guide  

This user guide contains all the information you need to know about how to setup, watch and record 
available DVB-T Free-to-Air channels using your PVR.  

Safety is Important  

To ensure your safety and the safety of others, please ensure you read the Safety Instructions before 
you operate this product.  


Keep this information in a safe place for future reference.  

Safety Considerations  

Position the cables so that they cannot be walked on or pinched by items placed on or against them.  

  Do not use the PVR in humid or damp conditions (for example in a bathroom or kitchen).  

  Do not allow the PVR to get wet.  

  Do not expose the PVR to dripping or splashing.  

  Do not place water filled objects such as vases on top of the PVR.  

  Do not place naked flame sources, such as candles, on top of the PVR.  

  Always ensure the PVR is positioned so that there is space around the PVR to allow ventilation. 

Cleaning  

  ALWAYS unplug the PVR before you clean it.  

  Do not use liquid or aerosol cleaners.  

  Clean the PVR with a soft, damp (not wet) cloth.  

Servicing  

  There are no user serviceable parts in this PVR.  

  When servicing, refer to qualified service personnel.  

  Consult your dealer if you are ever in doubt about the installation, operation or safety of this PVR.  


Содержание TVT500PVR

Страница 1: ...TVT500PVR User Guide 1 TVT500PVR Twin Tuner Digital Tapeless Video Recorder User Guide ...

Страница 2: ...Using the PVR 13 Navigating the OSD 13 Changing channels 14 I Bar Record I Bar 15 Channel list 16 Favourites 17 Guides EPG 18 Timers 19 Timeshift 21 Recordings list 22 Setting the audio volume 22 Configuration 23 System Settings 23 System Information 25 Channel search 26 Technical Specification 28 Basics 28 Input Output specification 28 STB mode functionality 28 PVR mode functionality 28 Power Sup...

Страница 3: ...TVT500PVR User Guide 3 Quick Guide Connecting to a TV set ...

Страница 4: ...ons Position the cables so that they cannot be walked on or pinched by items placed on or against them Do not use the PVR in humid or damp conditions for example in a bathroom or kitchen Do not allow the PVR to get wet Do not expose the PVR to dripping or splashing Do not place water filled objects such as vases on top of the PVR Do not place naked flame sources such as candles on top of the PVR A...

Страница 5: ...wer consumption please switch the PVR to standby when not in use If you will not be using the PVR for a long period of time we recommend unplugging it from the mains outlet This symbol indicates that the PVR is double insulated and does not require an earth connection This symbol indicates that the PVR is for indoor use only This symbol indicates that the PVR conforms to CE regulations Environment...

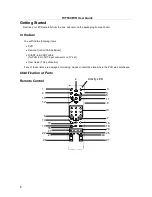
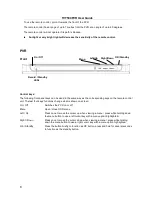
Страница 6: ...g items PVR Remote Control AAA batteries SCART to SCART cable for PVR to SCART input connector on TV set User Guide This publication If any of these items are damaged or missing please contact the place where the PVR was purchased Identification of Parts Remote Control v 6 7 Activity LED 1 4 2 3 5 8 9 10 11 12 13 14 15 16 17 18 19 20 21 22 23 24 25 26 27 ...

Страница 7: ...rent channel Press repeatedly to set record duration Whilst viewing the EPG set a timer to record the currently highlighted programme 15 Play Display the previous recording list Commence playback 16 Pause Pause playback Enter timeshift mode for details see page 21 17 Rewind Search backwards rewind at high speed 18 Stop Stop playback recording 19 Fast Forward Search forwards fast forward at high sp...

Страница 8: ...control unit The last four keys functions change what is shown on screen On Off Switches the PVR on or off Menu Open close OSD menu Left Up Press once to move the cursor up when viewing a menu press while holding down the menu button to use a left cursor key with a menu option highlighted Right Down Press once to move the cursor down when viewing a menu press while holding down the menu button to ...

Страница 9: ... an external audio device e g stereo via RCA phono cable 4 Video OUT RCA phono connect to an external video device via RCA phono cable 5 Digital Audio OUT RCA phono connect to an external audio device e g surround decoder via RCA phono cable 6 Digital Audio OUT Coaxial connect to an external audio device via coaxial cable 7 VCR SCART SCART connect to VCR DVD Recorder 8 TV SCART SCART connect to yo...

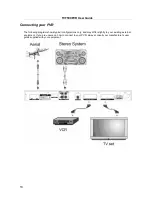
Страница 10: ...PVR The following diagram shows typical configurations only and may differ slightly to your existing external equipment If you are unsure on how to connect to your PVR always consult your manufacturer s user guide supplied with your equipment ...

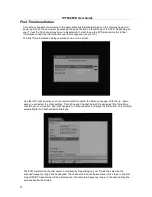
Страница 11: ... screen Use the left right arrow keys on the remote control to select the Menu Language With the up down keys you can select the other settings Time Zone and Channel Search Please select the Time Zone according to your location After that navigate to Channel Search and press the OK button This will start automatically the Channel Search Dialogue The PVR will start the channel search automatically ...

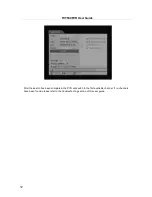
Страница 12: ...VT500PVR User Guide 12 After the search has been completed the PVR will switch to the first available channel If no channels have been found please refer to the troubleshooting section of this user guide ...

Страница 13: ...keys Move one item up or down Move one channel up or down Left Right arrow keys Move one item left or right Change the setting of a configurable item OK key Confirm the current action Exit key Abort the current action Close the active OSD window Colour keys Functions differ depending on the current OSD window please see the I Bar at the bottom of the screen for details i key Show help guide for OS...

Страница 14: ...hannels 1 Use the up down arrow keys or the P keys to advance one channel up or down 2 Enter a channel number with the number keys Each number can be composed of up to 3 digits 3 Use the Swap key to change back and forth between the current and the most recently viewed channel ...

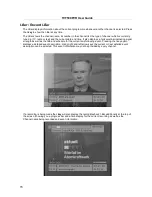
Страница 15: ...bar indicating signal strength as well as the title and schedule for the current and following event Pressing the I key again displays a detailed event description Using right and left arrow keys the current or next detailed event description can be selected This event information may not be provided by every channel If a recording is being made the i key will also display the record playback I Ba...

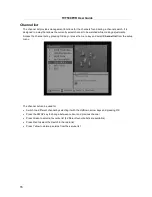
Страница 16: ... by pressing OK key or press the menu key and select Channel list from the setup menu The channel list can be used for Switch to a different channel by selecting it with the Up Down arrow keys and pressing OK Press the SWAP key to change between current and previous channel Press Green to select a favourite list 4 different favourite lists are available Press Red to select the Switch to the radio ...

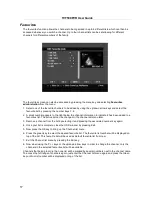
Страница 17: ...e channel list menu later 3 Remove a channel from the list by selecting it and pressing the associated number key again 4 Once your list is complete close the OSD window by pressing Exit 5 Now press the OK key to bring up the Channel list menu 6 Press the green key to select the desired favourite list The favourite list number will be displayed on top of the list This favourite list will be used a...

Страница 18: ...ctive use the arrow keys to advance time and days forward or backward The currently selected day is shown next to the time period above the programme information In that way you can get programme information for up to 7 days A recording timer for a future programme can be directly set from this list by pressing the record key The chosen event will be indicated by a clock icon and will be taken ove...

Страница 19: ...own if the i key is pressed In order to set a timer the following steps are performed 1 Press menu and select the Timer administration option 2 Press the Blue key to create a new timer The Create a timer menu will be displayed 3 Select the channel by pressing the right left keys The service list will be opened 4 Press OK to select the service and to close the service list 5 Select Date Start und E...

Страница 20: ...tton was pressed the channel number being recorded will be shown in the display on the front panel to the right of the channel being viewed and also the record I Bar will be shown when the i key is shown The main tuner can then be controlled as normal and the second tuner will continue to record in the background on the channel selected when the record button was pressed allowing you to watch a di...

Страница 21: ... continue watching after the interruption has been dealt with Press the pause key The image freezes and record playback I bar will be displayed The record playback I bar s time shows the time since pressing stop Press play to resume watching the programme from the stopped position In the record playback I bar a second time will be displayed that indicates the played time from time shift buffer The...

Страница 22: ...l remaining record time may differ from this value The recordings list also provides the following functions Open the Recordings list by pressing the play key Select a recording and press OK to start watching that recording from the beginning To delete a file simply select the file using the up down cursor keys and press the yellow coloured key A pop up will shown asking to confirm this action bef...

Страница 23: ...nctions that can be configured to suit your personal preferences In order to access the configuration menu press the menu key on the remote control System Settings Select the System settings menu using the up down cursor keys and press OK This opens the setting menu ...

Страница 24: ...ralized Position vertical Fine tuning of the TV picture in vertical direction This function allows the adjustment of the TV picture to get it well centralized Front display Display brightness This function allows the adjustment of the front display brightness Antenna type passive active Turning on off voltage feed of your antenna If you have an active antenna this function has to be activated If y...

Страница 25: ...n the system information OSD device specific and reception specific information can be displayed To get the device information press the red button Software version number and some information to the used hardware will appear To get the reception information press the green button Beside the number of services aome information to the current active service will be displayed ...

Страница 26: ...t append then all new services will be added to the current service list The complete search process may take several minutes to complete The progress bar at the bottom shows how much of the search has already been completed Press the menu button to cancel the search for new channels If the manual channel search is selected then you can directly modify the frequency range or the channel number for...

Страница 27: ... available Perform automatic channel search see page 27 Lost aerial connection Check aerial connection No image or bad reception SCART connector not fully plugged in Check SCART connector Aerial incorrect Replace the aerial Channel parameters have changed Perform automatic channel search see page 27 No image audio OK Channel parameters have changed Perform automatic channel search see page 27 SCAR...

Страница 28: ...udio o VCR SCART out CVBS Audio o VCR SCART in pass to TV SCART CVBS Audio o Switching signal at PIN8 0 6 12 V at PIN16 0 1 3 V Loop Through of RF signals STB mode functionality DVB terrestrial TV reception Integrated Hard Disk Drive for Recording and Playback support PVR functionality Electronic Program Guide EPG PVR mode functionality Time shift recording One Touch Recording Timer programmable b...

Отзывы: