background image

18

V

ISIONEER

 S

TROBE

 XP 200 S

CANNER

 I

NSTALLATION

 G

UIDE

The stack option is only for the PaperPort format. Multiple scanned 
pages appear as a stack of documents on the PaperPort desktop.

Options

—The Options button opens a dialog box for selecting options 

related to the selected destination application for the scanned image. 
Each destination application has its own options dialog box. 

S

ELECTING

 N

EW

 S

ETTINGS


FOR

 A

UTO

S

CAN

You can select a new destination application, scanning configuration, 
and image format for the AutoScan feature.

To select new settings for AutoScan:

1. From the Select Destination list, select the application where you 

want scanned images sent.

2. From Select Configuration list, select a scan configuration.

To scan in color:

 select one of the configurations indicated by the 

small color icon, such as the Scan Magazine configuration.

The configuration list is for the application that you select in the 
Select Destination list. If you select a different application, the 
configurations are for that application.

3. Select a Format and Page(s) option.

4. Click 

OK

.

Now the AutoScan feature uses the new configuration, and the 
scanned image appears in the new destination application.

Note

:  If you select a word processing program such as Microsoft 

WordPad or Microsoft Word and a configuration for OCR, the text 
in scanned images is automatically converted to word processing text 
by the optical character recognition (OCR) software that you receive 
with the scanner. The converted text then appears in the selected 
destination application. 

Содержание RoadWarrior Strobe XP 200

Страница 1: ...Visioneer Strobe XP 200 USB Scanner Installation Guide F O R W I N D O W S...

Страница 2: ...nsible for complying with all such laws and regulations Technical Support Visit Visioneer s web site at www visioneer com for technical support including help during installation driver updates spare...

Страница 3: ...r Return Options 11 Scanner Settings 12 Scanning using the AutoScan Feature 14 Configuring the AutoScan Feature 15 About the Configuration Dialog Box 16 Selecting New Settings for AutoScan 18 Creating...

Страница 4: ...F CONTENTS Step 1 Uninstalling the Visioneer OneTouch Software 42 Step 2 Uninstalling the ISIS Driver 43 Step 3 Uninstalling the PaperPort Software 43 Visioneer Strobe XP 200 Scanner Specifications 45...

Страница 5: ...electronic images on your computer WHAT S IN THE BOX Before starting the installation check the contents of the box to make sure that all parts are included If any items are missing or damaged contac...

Страница 6: ...the document you re scanning Page feed Automatically feeds documents through the scanner when it s sensors detect the presence of a document Paper return Can be positioned to feed a document either s...

Страница 7: ...it Set the resolution to at least 800 by 600 pixels To set your monitor s colors and resolution open the Windows Control Panel double click Display and then click the Settings tab DOCUMENTATION Your s...

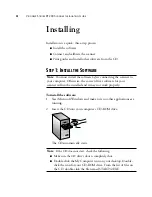
Страница 8: ...ing 2 Insert the CD into your computer s CD ROM drive The CD automatically starts Note You must install the software before connecting the scanner to your computer Otherwise the correct driver softwar...

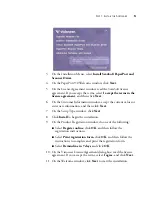
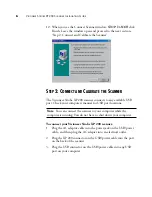
Страница 9: ...information and then click Next 7 On the Setup Type window click Next 8 Click Install to begin the installation 9 On the Product Registration window do one of the following Select Register online clic...

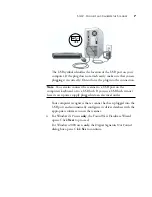
Страница 10: ...t Check your computer s manual for USB port locations To connect your Visioneer Strobe XP 200 scanner 1 Plug the AC adaptor cable into the power jack on the USB power cable and then plug the AC adapte...

Страница 11: ...ged into the USB port and automatically configures its driver database with the appropriate software to run the scanner 4 For Windows XP users only the Found New Hardware Wizard opens Click Next to pr...

Страница 12: ...ed face up The scanner grabs the paper and feeds it through the scanner Wait until calibration is finished before proceeding 3 For Windows XP users only click Finish on the Found New Hardware Wizard w...

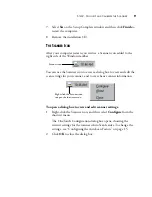
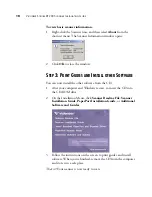
Страница 13: ...a dialog box to view and edit the scan settings for your scanner and to view basic scanner information To open a dialog box to view and edit scanner settings 1 Right click the Scanner icon and then se...

Страница 14: ...You can now install the other software from the CD 1 After your computer and Windows restart re insert the CD into the CD ROM drive 2 On the Installation Menu click Scanner Readme File Scanner Instal...

Страница 15: ...ng predefined settings See Scanning using the AutoScan Feature on page 14 PaperPort software When you start a scan from the PaperPort software you can select scanning options and preview the scanned i...

Страница 16: ...the back of the scanner indicate the positioning of the paper return for each option SCANNER SETTINGS The Strobe XP 200 Properties window contains advanced settings that apply to the scanner itself r...

Страница 17: ...lick the Strobe XP 200 icon and select Properties from the menu 2 On the Strobe XP 200 Properties window select the Advanced tab 3 In the Settings section set the scanner options as follows Paper inse...

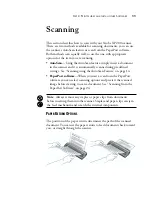
Страница 18: ...up into the paper feed slot The scanner grabs the top edge of the paper and automatically begins to scan and feed the paper through the scanner The item is scanned using predefined settings such as c...

Страница 19: ...ptions from the Configuration dialog box To open the Configuration dialog box 1 Use one of the following three methods On the Windows taskbar click Start point to Programs point to ScanSoft PaperPort...

Страница 20: ...ion is set to scan in the PaperPort image format The icons next to each Configuration indicate the type of scanning The options on the Configuration dialog box are Select Destination This is the list...

Страница 21: ...he format options are bitmap and PaperPort Use the PaperPort format for scanning any item The bitmap format is usually used for photos and artwork and is available when you select a destination applic...

Страница 22: ...lect Configuration list select a scan configuration To scan in color select one of the configurations indicated by the small color icon such as the Scan Magazine configuration The configuration list i...

Страница 23: ...tch To create a new configuration 1 Scroll the applications in the Select Destination list and click the application for which you want to create a new configuration 2 Do one of the following Click th...

Страница 24: ...olution is 600 dpi the minimum is 100 dpi The higher the dpi setting the sharper and clearer the scanned image However higher dpi settings take longer to scan and produce larger files for the scanned...

Страница 25: ...n is selected The DeScreen option does not apply to the Black White mode 6 Click OK to save the new configuration 7 To set the new configuration for use by the AutoScan feature select the configuratio...

Страница 26: ...iguration dialog box SETTING PREFERENCES You can set preferences for the Select Destination list and whether or not to display a Scan Progress window The settings apply to the configurations you selec...

Страница 27: ...of destination applications Check the boxes for each type of application you want to include Show Scan Progress Window Select this option to display a progress window of the document during scanning 3...

Страница 28: ...vailable A Note About Your Scanner and the TWAIN standard TWAIN is a widely recognized procedure that computers use to receive images from scanners digital cameras and other digital devices The PaperP...

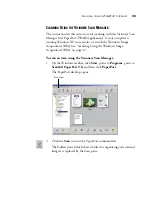
Страница 29: ...with the Windows Image Acquisition WIA See Scanning Using the Windows Image Acquisition WIA on page 32 To scan an item using the Visioneer Scan Manager 1 On the Windows taskbar click Start point to Pr...

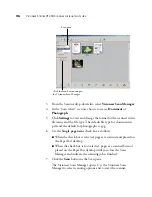
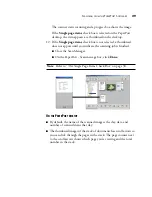
Страница 30: ...photographs is jpg 6 Use the Single page items check box as follows When the check box is selected pages are scanned and placed on the PaperPort desktop When the check box is not selected pages are s...

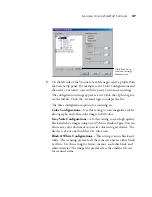
Страница 31: ...g to scan magazine articles photographs and other color images in full color Gray Scale Configurations Use this setting to scan high quality black and white images using up to 256 true shades of gray...

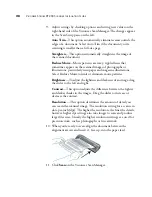
Страница 32: ...Select Reduce Moire to limit or eliminate moire patterns Brightness To adjust the lightness and darkness of an image drag the slider to the left and right Contrast This option adjusts the difference...

Страница 33: ...you indicate the scanning job is finished Close the Scan Manager On the PaperPort Scan message box click Done ON THE PAPERPORT DESKTOP By default the name of the scanned image is the day date and num...

Страница 34: ...eviously scanned pages This option is only available once Click Done if you are finished scanning The scanned items are placed on the PaperPort desktop To learn more about the PaperPort software pleas...

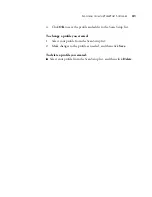
Страница 35: ...and add it to the Scan Setup list To change a profile you created 1 Select your profile from the Scan Setup list 2 Make changes to the profile as needed and then click Save To delete a profile you cre...

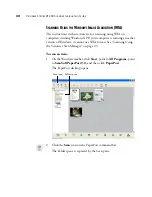
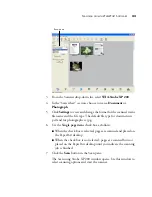
Страница 36: ...ter is running an earlier version of Windows it cannot use WIA to scan See Scanning Using the Visioneer Scan Manager on page 25 To scan an item 1 On the Windows taskbar click Start point to All Progra...

Страница 37: ...pe for documents is pdf and for photographs is jpg 6 Use the Single page items check box as follows When the check box is selected pages are scanned and placed on the PaperPort desktop When the check...

Страница 38: ...gnment arrows and insert it face up into the paper feed 10 Click the Scan button If the Single page items check box is selected on the Scan pane the scanned item appears as a thumbnail on the PaperPor...

Страница 39: ...t new settings before you scan an item to fine tune exactly how you want to scan a particular item To select the scanner settings before you scan 1 On the Scan using Strobe XP 200 window click Adjust...

Страница 40: ...ist and choose the dots per inch dpi of the resolution The maximum resolution is 600 dpi the minimum is 100 dpi The higher the dpi setting the sharper and clearer the scanned image However higher dpi...

Страница 41: ...ind that scanned images may not be a sharp and clear as when you began using the scanner In that case recalibration may solve the problem The procedure to calibrate your scanner is slightly different...

Страница 42: ...dvanced tab 5 Click Calibrate on the Strobe XP 200 Properties window 6 Place the calibration paper in the scanner face up and then click OK to start the calibration 7 When calibration is finished clic...

Страница 43: ...nd Cameras window right click the Strobe XP 200 icon and select Calibrate from the menu 4 Insert the calibration paper face up into the scanner and then click OK to start the calibration 5 When finish...

Страница 44: ...ed in securely Is the AC adapter plugged in Make sure the AC adapter is securely plugged into a working electrical outlet Problem The scanner won t scan What s wrong Check for one of these possible pr...

Страница 45: ...al operations What do I do Close any other active applications so that additional memory is available If you click Continue PaperPort moves the file to the PaperPort data directory and renames the fil...

Страница 46: ...w opens Make sure the Change or Remove option is selected 3 From the list of programs select Visioneer Strobe XP 200 Windows 98SE or ME Click the Add Remove button Windows 2000 or XP Click the Change...

Страница 47: ...XP Click the Change Remove button 4 On the Confirm File Deletion window click Yes remove it 5 On the Shared File Warning window click Yes 6 On the Remove Shared File window click No to all 7 On the R...

Страница 48: ...our computer To uninstall PaperPort 9 0 from Windows 2000 or XP 1 On the Windows taskbar click Start point to Settings and then click Control Panel 2 Click the Add or Remove Programs icon The Add or R...

Страница 49: ...nal 4096 shades of gray Output Bit Depth 24 bit color 8 bit grayscale 1 bit black and white Scan Method Fast Sheet fed Interface USB Scanner dimensions Height 2 0 inches 5 08 cm Width 2 5 inches 6 40...

Страница 50: ...46 VISIONEER STROBE XP 200 SCANNER INSTALLATION GUIDE...

Страница 51: ...destination software 14 document length 13 documentation 3 dots per inch dpi 20 36 G gray scale configuration 27 I icons paper return 2 installation 4 ISIS 8 M moire pattern 28 monitor 3 P page skew 1...

Страница 52: ...ecifications 45 computer 3 monitor 3 straighten image 20 28 Strobe XP 200 Properties 12 system requirements 3 T thumbnail 29 troubleshooting 40 TWAIN standard 24 U uninstall 42 V Visioneer Scan Manage...

Отзывы: