background image

Exchanging Messages and Using Outlook  111

  Filter the list by categories. In the contact list, click 

Menu >

Filter

. Then click a category you have assigned to a contact. 

To show all contacts again, select 

All Contacts

.

Locate the contact by company. In the contact list, click 

Menu >

View By

, and click 

Company

. Click the company to see the 

contacts who work there.

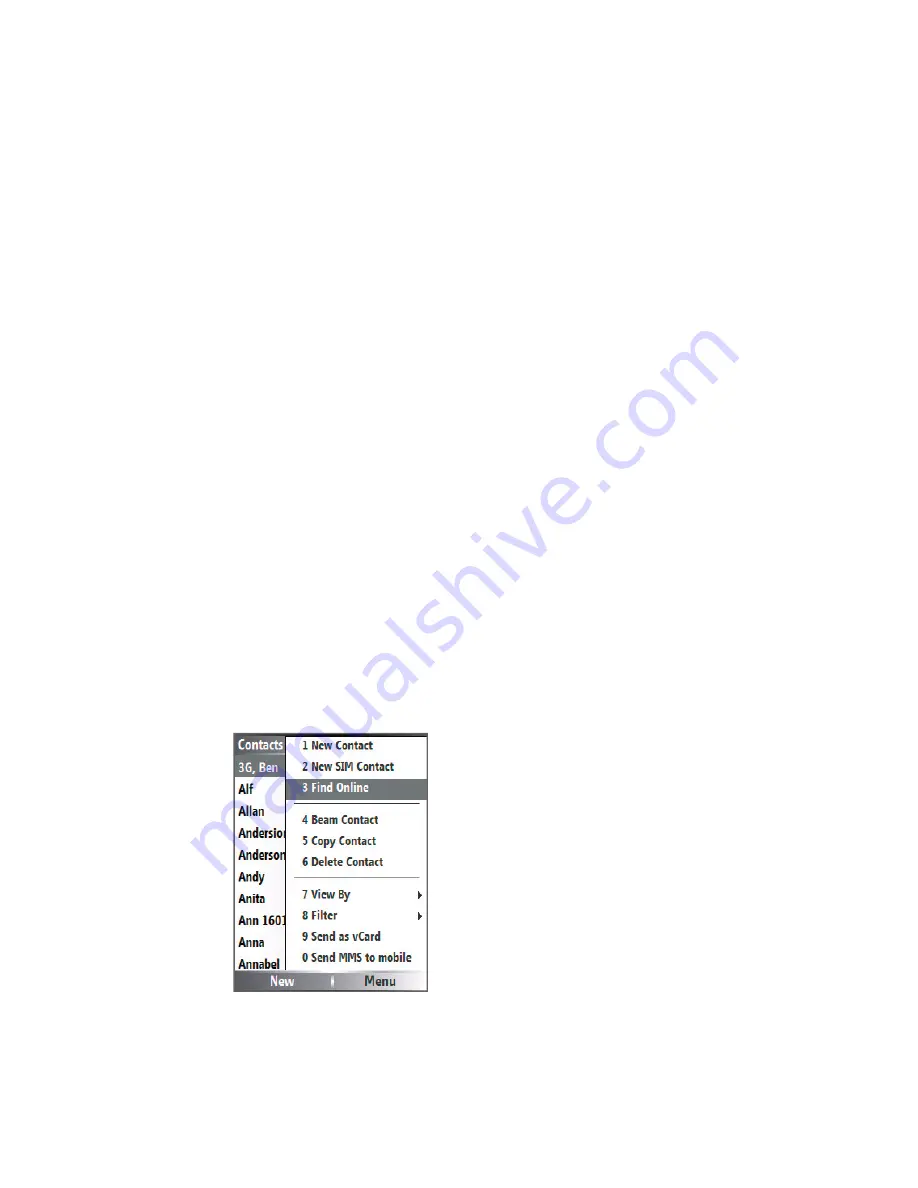
 To fi nd a contact online

In addition to having contacts on your Lobster 700TV, you can also 

access contact information from your organisation’s Global Address 

List (GAL). GAL is the address book that contains all user, group, and 

distribution list e-mail addresses of your organisation, and it is stored 

on the Exchange Server. By having direct online access to it from your 

Lobster 700TV, it is quick and easy for you to plan a meeting and e-

mail a meeting request immediately to anyone in your organisation.
Access to the GAL is available if your organisation is running Microsoft 

Exchange Server 2003 SP2 and you have completed your first 

synchronisation with the Exchange Server. 

1. 

Synchronise with Exchange Server if you have never done so.

2. 

Click 

Start > Contacts > Menu > View By > Name

.

3. 

Do either of the following:

• 

In Contacts, click 

Menu > Find Online

.


Содержание Lobster 700TV

Страница 1: ...Lobster User Manual ...

Страница 2: ...whom you are speaking that the conversation is being recorded Always obey the relevant laws and regulations of your country when using the recording feature of your phone COPYRIGHT INFORMATION Microsoft MS DOS Windows Windows NT Windows Server Windows Mobile ActiveSync Excel Internet Explorer MSN Outlook PowerPoint and Word are either registered trademarks or trademarks of Microsoft Corporation in...

Страница 3: ...hed before connecting this product to the computer The desk top or notebook computer is equipped with a power supply cord having an equipment grounding conductor and a grounding plug The plug must be plugged into an appropriate outlet which is properly installed and grounded in accordance with all local codes and ordinances SAFETY PRECAUTIONS FOR POWER SUPPLY UNIT Use the correct external power so...

Страница 4: ... the temperature may exceed 60 C 140 F such as on a car dashboard window sill or behind a glass that is exposed to direct sunlight or strong ultraviolet light for extended periods of time This may damage the product overheat the battery or pose a risk to the vehicle SAFETY PRECAUTIONS OF HEARING LOSS CAUTION Permanent hearing loss may occur if earphones or headphones are used and prolonged listeni...

Страница 5: ...ions and are reminded of the need to observe restrictions on the use of radio equipment in fuel depots chemical plants or where blasting operations are in progress Areas with a potentially explosive atmosphere are often but not always clearly marked These include fueling areas below deck on boats fuel or chemical transfer or storage facilities and areas where the air contains chemicals or particle...

Страница 6: ...ed in the suggested normal condition only to ensure the radiative performance and safety of the interference As with other mobile radio transmitting equipment users are advised that for satisfactory operation of the equipment and for the safety of personnel it is recommended that no part of the human body be allowed to come too close to the antenna during operation of the equipment General Precaut...

Страница 7: ...n power Avoid pushing objects into product Never push objects of any kind into cabinet slots or other openings in the product Slots and openings are provided for ventilation These openings must not be blocked or covered Mounting Accessories Do not use the product on an unstable table cart stand tripod or bracket Any mounting of the product should follow the manufacturer s instructions and should u...

Страница 8: ...rs and Programme Icons 21 1 6 Using the Start Menu 24 1 7 Using the Quick List 24 1 8 Entering Information 25 1 9 Battery Information 28 Chapter 2 Using Lobster 700TV Features 29 2 1 Using your Lobster 700TV 30 2 2 Making a Call 31 2 3 Receiving a Call 35 2 4 In Call Options 35 2 5 Additional Dialling Information 37 Chapter 3 Synchronising Information and Setting Up E mail Security 39 3 1 About Ac...

Страница 9: ... Programmes 57 4 3 Using Task Manager and Managing Memory 59 4 4 Managing and Backing Up Files 60 4 5 Protecting your Lobster 700TV 63 4 6 Restarting your Lobster 700TV 65 4 7 Resetting your Lobster 700TV 65 Chapter 5 Getting Connected 67 5 1 Connecting to the Internet 68 5 2 Using Internet Explorer Mobile 72 5 3 Using Wireless Modem 74 5 4 Using Comm Manager 78 5 5 Using Bluetooth 79 Chapter 6 Ex...

Страница 10: ...periencing Multimedia 117 7 1 Using Camera and Video Recorder 118 7 2 Using Pictures Videos 127 7 3 Using Windows Media Player 132 7 4 Using MIDlet Manager 140 Chapter 8 Using Other Applications 145 8 1 Using ClearVue Suite 146 8 2 Using Speed Dial 150 Appendix 153 A 1 Regulatory Notices 154 A 2 PC Requirement to Run ActiveSync 4 x 159 A 3 Specifications 160 Index 163 ...

Страница 11: ...obster 700TV and its Accessories 1 2 Inserting the SIM Card 1 3 Installing the Micro SD Card 1 4 The Home Screen 1 5 Status Indicators and Programme Icons 1 6 Using the Start Menu 1 7 Using the Quick List 1 8 Entering Information 1 9 Battery Information ...

Страница 12: ...12 Getting started 1 1 Getting to Know your Lobster 700TV and its Accessories 1 2 3 4 5 6 7 9 8 10 11 12 13 ...

Страница 13: ...ess to dial a phone number answer a call or use in call options such as switching to another call or putting a call on hold Press and hold to activate deactivate speakerphone 7 Navigation Control ENTER Use to scroll left right up or down Or press straight down to use as the ENTER button 8 Key Press and switch to different input modes or press and hold to choose an input mode or symbols from the li...

Страница 14: ...14 Getting started 14 15 16 17 18 19 20 21 22 24 23 ...

Страница 15: ... Lens 1 3 Mega pixel CMOS lens 18 Car Antenna Connector Allows you to attach your Lobster 700TV to the car antenna for better network signal reception Simply peel off the rubber cap and connect the antenna jack Replace the rubber cap if unused 19 Back Cover Remove to install or remove battery SIM card and Micro SD card 20 Cover Latch Pull it down to open the Lobster 700TV back cover 21 Microphone ...

Страница 16: ... ActiveSync to synchronise with a PC Flashing green Connected to the network Flashing red Battery very low less than 4 Flashing amber Battery temperature is hotter or colder than the functional limits of 0 to 48 degrees Celsius and has stopped charging Amber Green LED off Battery fault The Battery Fault indicator is displayed In this case the flashing green LED can be recovered by unplugging the A...

Страница 17: ... 2 USB cable Connect your Lobster 700TV to a PC and synchronise data 3 Stereo Band III antenna headset Provide a volume control jog dial and a Send End button You can use the button to pick up and hang up incoming and outgoing calls Plug into Earphone Sync connector to listen to audio files The headset also has a built in Band III antenna to run TV Radio programme ...

Страница 18: ...front panel facing down in the palm of your hand With the other hand pull down the cover latch to remove the battery cover and remove the battery by lifting it up from the bottom end 2 Insert the SIM card Insert the SIM card Insert the SIM card into the SIM card slot with its gold plated contacts facing down When completed replace the battery and its cover To take the SIM card out press the bottom...

Страница 19: ... have installed 3 Lift up the Micro SD card metal socket and insert the Micro SD card 4 Push the metal socket down 5 Replace the SIM card battery and battery cover Note Micro SD card is an optional accessory and not included in the box Lift up the socket Insert the Micro SD card The Micro SD card in place ...

Страница 20: ...sed programme and open it directly from the Home screen 2 Click to view Comm Manager screen 3 Click to view details of a missed call 4 Click to see the time of your next appointment 5 Displays the current profile Click to change the profile 6 Click to open the Messages folder 7 Click to launch TV Radio programme 8 Click to display all programme icons 9 Displays notifications such as missed calls o...

Страница 21: ...xt input mode uppercase Calls forwarded Multipress text input mode caps lock Call on hold T9 text input mode lowercase Missed call T9 text input mode uppercase Dialling while no SIM card installed T9 text input mode caps lock Speakerphone on Numeric input mode Battery level Ringer off Low battery Vibrate call alert Very low battery Microphone muted Battery charging Bluetooth No battery or battery ...

Страница 22: ...rom Application CD ClearVue PDF Lets you view PDF files on your Lobster 700TV This application can be installed from Application CD ClearVue PPT Lets you view PowerPoint files on your Lobster 700TV This application can be installed from Application CD ClearVue Worksheet Lets you view Excel worksheets on your Lobster 700TV This application can be installed from Application CD Comm Manager Lets you ...

Страница 23: ... create speed dial entries for dialling frequently called phone numbers or for opening frequently accessed programmes SIM Manager Lets you manage the contacts that are stored on your SIM card You can also use this programme to copy SIM contents to Contacts on your Lobster 700TV STK SIM Tool Kit Service Allows you to access information and other services offered by your wireless service provider Ta...

Страница 24: ...d Disc or from the Internet or purchase mobile phone software from retail stores and install them on your Lobster 700TV 1 7 Using the Quick List The Quick List offers convenient access to a list of functions such as locking your Lobster 700TV or keypad choosing a different profile and so on For more information about profiles see Chapter 4 To access the Quick List 1 Briefly press press and quickly...

Страница 25: ...mode lowercase Multipress text input mode uppercase Multipress text input mode caps lock T9 text input mode lowercase T9 text input mode uppercase T9 text input mode caps lock Numeric input mode To change the input mode 1 Press and hold the key 2 On the menu click the input mode you want Use Multipress mode In Multipress mode you can enter a character by pressing the numeric key on which the chara...

Страница 26: ...rs by pressing the keys on which the letters appear Press a key only once for each letter If there is more than one choice in the T9 dictionary for your entry a list of available words is displayed Press the key to enter a space after the word is entered or click one of the available words with which a space is added automatically If you do not see the desired word click Add Word from the list and...

Страница 27: ... lowercase and caps lock within a text input mode To delete characters To backspace and delete a single character in any input mode press BACK To backspace and delete an entire text or numeric field in any input mode press and hold BACK To enter a space In Multipress or T9 mode press the key To enter a symbol 1 Press and hold the key 2 On the menu click Symbols to display the Symbol page 3 Select t...

Страница 28: ...ternal contacts or dispose of in fire or water Do not expose to temperatures above 60 C 140 F Replace only with the battery pack designated for this product Recycle or dispose of used battery as stipulated by local regulation The Power Management screen On the Home screen click Start Settings Power Management to access the Power Management screen You can check the battery power from the Main batte...

Страница 29: ...Chapter 2 Using Lobster 700TV Features 2 1 Using your Lobster 700TV 2 2 Making a Call 2 3 Receiving a Call 2 4 In Call Options 2 5 Additional Dialling Information ...

Страница 30: ...nter your PIN Most Subscriber Identity Module SIM cards are preset with a personal identification number PIN that is provided by your wireless service provider You need to enter the PIN whenever you use your Lobster 700TV 1 On the Home screen click Start Settings Security Enable SIM PIN 2 Enter the preset PIN provided by your wireless service provider 3 Click Done Note If your PIN is entered incor...

Страница 31: ...TV side panel Adjusting the volume at any other time can affect the ring notification and MP3 sound levels 2 2 Making a Call With your Lobster 700TV you can make calls from the Phone screen from Contacts Speed Dial Call History or SIM Contacts contacts stored on your SIM card Make a call from the Phone screen 1 On the Home screen access the Phone screen by pressing TALK or pressing numeric keys on...

Страница 32: ...e to dial the associated number To specify the number to dial By default the mobile telephone number m of a contact is dialed when you make a call from Contacts however you can choose to dial a different phone number 1 On the Home screen click Start Contacts 2 Select the contact 3 Press NAVIGATION left or right The letter representing the number changes to m mobile w work or h home Tip You may als...

Страница 33: ...message to the selected name or number E mail Send an e mail to the selected name or number View Timers Find the duration of the selected call Delete Remove the selected call or number from Call History Delete List Remove all the calls and numbers from Call History Save to Contacts Save the selected name or number in Contacts Filter Categorise the call or number into various call types Note You ca...

Страница 34: ...34 Using Lobster 700TV Features ...

Страница 35: ...end a call Press END 2 4 In Call Options Your Lobster 700TV offers various options for managing multiple calls at the same time You are notified when you have another incoming call and you have the choice of ignoring or accepting the call If you are already on a call and accept the new call you can choose to switch between the two callers or set up a conference call between all three parties To an...

Страница 36: ...er for details To turn on and off the speakerphone The built in speakerphone allows you to talk hands free or lets other people listen to the conversation During a call click Menu Speakerphone On The speakerphone icon appears at the top of the screen To turn off the Speakerphone during the call click Menu Speakerphone Off Tip The speakerphone can be toggled on and off by simply pressing and holdin...

Страница 37: ...one number includes country code area code without the leading zero if any and phone number Insert a pause in a dialling sequence Some international calls require a pause in the dialling sequence in order for the calls to process successfully 1 On the Home screen click Start Contacts 2 Select the contact entry that contains the phone number into which you want to insert a pause and press ENTER to ...

Страница 38: ... click Menu Edit 4 Position the cursor on the phone number where you want to insert a longer pause then click Menu Insert Wait The letter w will appear in the number to indicate where the longer pause wait will occur in the dialling sequence 5 Click Done Note When you call a number that contains a longer pause you must press TALK to continue dialling SIM Tool Kit STK A SIM card must be installed o...

Страница 39: ...sing Information and Setting Up E mail Security 3 1 About ActiveSync 3 2 Setting Up ActiveSync 3 3 Synchronising Information 3 4 Synchronising via Bluetooth 3 5 Synchronising Music and Video 3 6 Setting Up E mail Security ...

Страница 40: ...bster 700TV directly with Exchange Server so that you can stay up to date even when your PC is turned off Copy files between your Lobster 700TV and your PC Select the types of information to be synchronised and specify amount of information to be synchronised For example you can choose how many weeks of past calendar appointments to synchronise Add and remove programmes on your Lobster 700TV For de...

Страница 41: ...er running Microsoft Exchange Server check box then click running Microsoft Exchange Server check box then click running Microsoft Exchange Server Next 5 On the Exchange server credentials screen enter the Exchange server address your user name and password and the domain name If you do not know what the Exchange server address and domain name are you can check with your network administrator or y...

Страница 42: ...ormation types to synchronise between your Lobster 700TV and the computer If you are going to synchronise your Lobster 700TV with both your computer and Exchange Server do the following For the Contacts Calendar E mail and Tasks items choose whether to synchronise them with the computer or with the Exchange Server These items cannot be synchronised to both Select the check boxes of the other infor...

Страница 43: ...k or you can synchronise over a cellular connection without connecting to the PC 2 In ActiveSync click Sync To end synchronisation before it completes click Stop Synchronise Outlook information with PC If you have set up a synchronisation relationship between your Lobster 700TV and the PC synchronisation keeps Outlook information up to date on both of them You can also set up your Lobster 700TV to...

Страница 44: ... by performing the following steps Note Before changing synchronisation settings on your Lobster 700TV disconnect it from your PC 1 On the Home screen click Start ActiveSync 2 In ActiveSync click Menu Options 3 Do one or more of the following Select the check box for the items you want to synchronise If you cannot select a check box you might have to clear the check box for the same information ty...

Страница 45: ... Configure Server will be replaced by Configure Server will be replaced by Configure Server Add Server Source 2 On the Edit Server Settings screen enter the name of the server running Exchange Server in the Server address box and click Next 3 On the User Information screen enter your user name password and domain name 4 If you want the Lobster 700TV to save your password so that you do not need to en...

Страница 46: ...w e mails on your Lobster 700TV as soon as they arrive in your Inbox on Exchange Server With this feature items such as contacts calendar and tasks are also immediately updated on your Lobster 700TV as and when these are changed or appended on Exchange Server To make Direct Push work you need to set up a GPRS connection on your Lobster 700TV The Direct Push feature works for your Lobster 700TV if ...

Страница 47: ... connect your Lobster 700TV to the PC to synchronise using Bluetooth This technology has similar but slightly different requirements To synchronise with a PC via Bluetooth 1 Follow the instructions in ActiveSync Help on the PC for configuring Bluetooth on your PC to support ActiveSync 2 On the Home screen click Start ActiveSync 3 Click Menu Connect via Bluetooth Ensure that your Lobster 700TV and t...

Страница 48: ...bster 700TV is currently connected using Bluetooth you must end that connection before media can be synchronised Insert a 32 MB or larger storage card into your Lobster 700TV Set up a sync partnership between the storage card and Windows Media Player Change Media synchronisation settings Once you select the Media information type in ActiveSync to be synchronised any of your favourite music and vid...

Страница 49: ...without a certificate However to decrypt and read encrypted e mail messages you need a valid certificate Note S MIME encryption and digital signatures for Windows Mobile based devices are available only with Exchange Server 2003 Service Pack 2 or a later version that supports S MIME If you aren t using one of these products or have not yet synchronised these options are unavailable Digitally sign ...

Страница 50: ...ges so that the contents of your messages are protected from being viewed by anyone other then the intended recipients select Encrypt messages 5 Click Menu Choose Certificate to select a certificate for signing or encrypting outgoing e mail messages You can select certificates to sign or encrypt e mail messages individually if you do not choose to sign or encrypt all outgoing e mails For information ...

Страница 51: ...ersonalising your Lobster 700TV 4 2 Adding and Removing Programmes 4 3 Using Task Manager and Managing Memory 4 4 Managing and Backing Up Files 4 5 Protecting your Lobster 700TV 4 6 Restarting your Lobster 700TV 4 7 Resetting your Lobster 700TV ...

Страница 52: ...three ways to set up the background image Use ActiveSync to copy your favourite picture file to the directory in your Lobster 700TV My Device Application Data Home Then you can select the picture as the background image through Start Settings Home Screen Background image Capture a photo using the Lobster 700TV s camera When viewing the photo in the Review screen click Menu Use as Home Screen and t...

Страница 53: ...ime zone 3 In Date edit the month day or year 4 In Time edit the hour minute and second 5 Click Done Choose how to be notified about events or actions A profile is a group of settings that determine how your Lobster 700TV will alert you to incoming calls events such as e mail receipt notifications alarms or system events A number of different preset combinations of these settings are included with...

Страница 54: ...Note For ring tones you can use sounds in either wav mid wma or mp3 file format For notifications or reminders you can use wav or mid files Tip When you select a sound the sound plays To hear it again select Menu Play To set sound for the keypad 1 On the Home screen click Start Settings Sounds 2 In Keypad control select a sound Select None if you do not want to hear any sound while pressing a key ...

Страница 55: ...owing Off to turn the alarm off Off to turn the alarm off Off On to turn the alarm on 3 In Alarm time enter the time for the alarm to go off 4 Click Done Note The alarm will not work in case your Lobster 700TV is turned off Set personal information Entering and displaying owner information is the best practice recommended it allows one to return the Lobster 700TV to you in case it is lost To enter...

Страница 56: ... Click Done To change power management settings You can use Power Management to check the battery and configure settings that prolong battery life 1 On the Home screen click Start Settings Power Management 2 Adjust the following In Backlight time out on battery select the amount of time for the Lobster 700TV to be idle before the backlight turns off In Backlight time out on AC select the amount of...

Страница 57: ...ings Error Reporting 2 In Error Reporting select Enable or Disable to turn on or off error reporting 3 Click Done 4 2 Adding and Removing Programmes Before you purchase additional programmes for your Lobster 700TV you should note the name of your Lobster 700TV the version of Windows Mobile software running on it and the type of processor This information will help you select a programme that is co...

Страница 58: ...ile is an installation wizard follow the instructions on the screen Once the programme has been installed on your PC the wizard will automatically transfer the programme to your Lobster 700TV If an installation wizard does not start you will see an error message stating that the programme is valid but that it is designed for a different type of computer You will need to copy this programme to your...

Страница 59: ...Manager you can switch to activate or terminate any currently running programme It also allows you to view your Lobster 700TV memory status and battery information To start Task Manager Click Start Task Manager Task Manager The Task Manager Menu contains the following options Option Allows you to Go To Switch to the selected programme Refresh Refresh the Task Manager screen to reflect a list of cu...

Страница 60: ...le Explorer installed on your Lobster 700TV Using Microsoft ActiveSync you can copy or move information from the PC to your Lobster 700TV and vice versa Changes you make to the information on one computer will not affect the information on the other computer If you want to automatically update information on both your Lobster 700TV and PC synchronise the information instead For more information ab...

Страница 61: ...k Paste Use File Explorer File Explorer provides many easy to use features for file and folder management To start File Explorer On the Home screen click Start File Explorer File Explorer operates in the following two views List View Icons View File Explorer displays the entire file structure in your Lobster 700TV s memory The functions focus primarily on folder management When initially started F...

Страница 62: ...e View Switch between the Icons and List views Sort By Sort files or folders by Name Date Size or Type My Device View the files and folders at the root directory of your Lobster 700TV My Documents View the files and folders of My Documents folder To send a file as an e mail attachment 1 In File Explorer select a file 2 Click Menu Send 3 On the Messaging screen select Outlook E mail or a custom e mai...

Страница 63: ...3 Enter your PIN and click Done Note To cancel without enabling the SIM PIN press HOME To disable the SIM PIN 1 On the Home screen click Start Settings Security 2 Click Disable SIM PIN 3 Enter your PIN and click Done To change the SIM PIN Be sure to make a note of your personal identification number PIN When the SIM PIN is enabled you must provide this PIN to unlock your Lobster 700TV 1 Click Star...

Страница 64: ...vice Lock 3 Select the Prompt if device unused for check box Prompt if device unused for check box Prompt if device unused for and select the amount of time for Lobster 700TV to be inactive before automatic locking 4 Select the password type Simple SIM or Strong alphanumeric 5 Enter and confirm your password 6 Click Done 7 To disable Device Lock click Start Settings Security Device Lock to enter th...

Страница 65: ...obster 700TV Warning If the Lobster 700TV is restarted while a programme is running any unsaved work will be lost 4 7 Resetting your Lobster 700TV Resetting your Lobster 700TV removes all personalised data from its memory which include contacts tasks calendar appointments etc and restores the Lobster 700TV back to its factory default settings To reset your Lobster 700TV 1 Click Start Accessories C...

Страница 66: ...66 Managing your Lobster 700TV ...

Страница 67: ...5 1 Connecting to the Internet 5 2 Using Internet Explorer Mobile 5 3 Using Wireless Modem 5 4 Using Comm Manager 5 5 Using Bluetooth Chapter 5 Getting Connected ...

Страница 68: ...e following information from your Internet Service Provider ISP or the company whose intranet you are trying to access ISP server phone number User name Password Access point name required for GPRS connection Domain name required for accessing a corporate network or an intranet Set up a GPRS connection GPRS is a non voice value added service that allows information to be sent and received across a...

Страница 69: ... provider 7 Click Done 8 To start browsing the Internet click Start Internet Explorer Note For information about setting up and sending MMS see Using MMS Messages in Chapter 6 Set up a Dial up connection When you use your Lobster 700TV to dial up to your ISP and connect to the Internet or to your corporate network you will be billed by the number of minutes that you use To establish a dial up conn...

Страница 70: ...plorer To set up a dial up connection to your corporate network 1 On the Home screen click Start Settings Connections Dial up 2 Click Menu Add 3 In Description enter a name for the connection 4 In Connects to select Work 5 Enter the appropriate information in the remaining fields 6 Click Done Note You can also add and set up the following connections VPN A VPN connection is used to access your corp...

Страница 71: ... service provider for each connection by default 4 Click Menu Options 5 Choose the appropriate information in the remaining fields 6 Click Done Add a URL exception Some URLs for Web pages on your company intranet may use periods for example intranet companyname com To view these pages in Internet Explorer Mobile you must create a URL exception 1 On the Home screen click Start Settings Connections 2...

Страница 72: ...ange Web page display options 1 While on a Web page click Menu View 2 Select one of the following One Column Arranges the content into one column that is as wide as the screen This means that you will rarely have to scroll horizontally Default Maintains a layout similar to what you see on a desktop computer but makes items smaller and arranges the content so that you can see most of it without hav...

Страница 73: ...u want to add click Menu Address Bar enter the address and click Go 2 Click Menu Add to Favourites 3 Confirm or change the name and Web page address 4 In Folder select a folder for the favourite 5 Click Add Tip A quick way to add favourites to your Lobster 700TV is to synchronise with your PC using ActiveSync For more information see ActiveSync Help on your PC To view a favourite 1 While on a Web p...

Страница 74: ...mputer Note Make sure your Lobster 700TV has a GPRS SIM card installed and you have set up a GPRS or dial up modem connection on your Lobster 700TV For information about setting up GPRS on your Lobster 700TV see Set up a GPRS connection in this chapter Also make sure you have connected your Lobster 700TV to a computer via Bluetooth or USB For information about setting up a dial up connection see S...

Страница 75: ...ically detect that your Lobster 700TV has been connected The Found New Hardware dialogue box will then appear on your computer 8 In the Found New Hardware dialogue box select Install from a list or specific location Advanced and click Next 9 Select Search for the best drivers in these locations 10 Insert the Getting Started Disc into your CD drive Select the Include this location in the search chec...

Страница 76: ...Internet 1 On your notebook click Start Settings Control Panel 2 Double click Network Connections 3 Click File New Connection 4 In the New Connection Wizard click Next 5 Click Connect to the Internet then click Next 6 Select Set up my connection manually and then click Next 7 Select Connect using a dial up modem and then click Next 8 Select the modem that you previously installed then click Next 9...

Страница 77: ...ouble click Network Connections then double click the modem connection Note To dial up to the Internet you can also use the dialer programme USBModem_Dialer exe which is included in the Getting Started Disc On the CD you can find the file in the OEM APPS Drivers GSM USB Modem directory To end the modem session 1 On the Wireless Modem screen click Menu Stop 2 Finally click Done to exit Wireless Mod...

Страница 78: ...ster 700TV See Using Bluetooth for details 3 Click to toggle between turning on and off Microsoft DirectPush For more information see To receive e mails and synchronise other information instantly in Chapter 3 4 Click to disconnect active data services e g GPRS You cannot reconnect data services in Comm Manager 5 Click to toggle between turning on the Lobster 700TV s ringer and setting the Lobster...

Страница 79: ...an locate and use any of the services available on that device Use your Lobster 700TV as a Bluetooth modem for a computer Bluetooth modes Bluetooth on your Lobster 700TV operates in three different modes 1 On Bluetooth is turned on Your Lobster 700TV can detect other Bluetooth enabled devices but not vice versa 2 Off Bluetooth is turned off In this mode you can neither send nor receive information...

Страница 80: ...t will be shown on another Bluetooth enabled device when it searches and detects your Lobster 700TV 4 Click Done Note Selecting the Discoverable option on the Bluetooth screen also turns on Bluetooth Bluetooth partnerships A Bluetooth partnership is a relationship that you create between your Lobster 700TV and another Bluetooth enabled device in order to exchange information in a secure manner Cre...

Страница 81: ... Lobster 700TV and another Bluetooth enabled device or phone the receiving party needs to enter the same passkey that you specified If you are creating a Bluetooth partnership between your Lobster 700TV and computer a balloon message will appear at the bottom right of the computer screen prompting your computer to accept the partnership Click the message and then enter the passkey 8 On your Lobste...

Страница 82: ...he paired device is then displayed You may edit and enter a new name for that device then click Next 7 Select the check boxes of services that you want to use from the paired device 8 Click Done You can now exchange information with another device To change the display name of a Bluetooth device 1 On the Home screen click Start Settings Connections Bluetooth 2 Click Menu Devices 3 Select a detecte...

Страница 83: ...obster 700TV check for the proper passkey in the manufacturer s documentation To connect a Bluetooth hands free or stereo headset 1 Make sure that both your Lobster 700TV and the Bluetooth headset are turned on and within close range and that the headset is discoverable Refer to the manufacturer s documentation to find out how to set the headset in discoverable mode 2 On the Home screen click Start...

Страница 84: ...tooth adapter is supported by Windows XP SP2 do the following steps On your computer open Bluetooth Devices from the Control Panel and then click the Options tab Select the Turn discovery on and the Allow Bluetooth devices to connect to this computer options devices to connect to this computer options devices to connect to this computer Create a Bluetooth partnership between your Lobster 700TV and...

Страница 85: ...me to which you want to beam 6 Click Beam 7 If you beam a calendar task or contact item to your computer and it is not automatically added to Outlook click File Import and Export to import it to Microsoft Outlook on your computer To beam information to a Bluetooth enabled device such as another phone create a Bluetooth partnership and then do steps 3 through 6 in the above procedure Notes If the c...

Страница 86: ... on the Control Panel and System Tray 3 In the Bluetooth Devices window click Add 4 The Add Bluetooth Device Wizard opens Select the My device is set up and ready to be found check box then click Next 5 The wizard then detects your Lobster 700TV as a new device and displays its name in the dialogue box Select the device name then click Next 6 Select Let me choose my own passkey then enter a passke...

Страница 87: ...rol Panel Phone and Modem Options 2 Click the Modems tab Check if there is a Bluetooth modem Generic Bluetooth Modem or Standard Modem over Bluetooth Link listed If there is skip to step 6 3 If there is no Bluetooth modem listed on the Modems tab click Add 4 In the Add Hardware Wizard click Next 5 On the Select Bluetooth Device screen select the phone name and then click OK 6 On the Modems tab sel...

Страница 88: ...88 Getting Connected ...

Страница 89: ...sing E mail and Text Messages 6 2 Using MMS Messages 6 3 Using Pocket MSN Messenger 6 4 Using Calendar 6 5 Using Contacts 6 6 Using Tasks 6 7 Using Voice Notes Chapter 6 Exchanging Messages and Using Outlook ...

Страница 90: ...d and receive Outlook e mail For information about the Synchronisation Setup Wizard see To install and set up ActiveSync on the computer in Chapter 3 If you have not set up a synchronisation relationship yet do the following to set up your Lobster 700TV to synchronise Outlook e mail 1 To set up and connect to an over the air connection GPRS or ISP dial up to synchronise remotely follow the procedu...

Страница 91: ...count that you access using a VPN server connection typically a work account before you can send and receive e mail 1 On the Home screen click Start Messaging and click any item on the Messaging screen 2 Click Menu Options New Account 3 In Your name enter your display name for e mail messages 4 In E mail address enter the e mail address for this account 5 Select Attempt to obtain e mail settings f...

Страница 92: ...u select this and your ISP does not support an SSL connection you will not be able to connect to receive e mail Outgoing server Enter the name of your outgoing e mail server SMTP Outgoing server requires authentication Select this if your outgoing e mail server SMTP requires authentication Your user name and password from above will be used Outgoing server settings Your outgoing e mail server may ...

Страница 93: ...he Outbox folder and will be sent the next time you connect Text messages are sent immediately Tips To set the priority of an e mail message click Menu Message Options To cancel any message click Menu Cancel Message If you are sending a text message and want to know if it is received before sending the message click Menu Message Options Select Request message delivery notification To reply to or f...

Страница 94: ... Options 3 Select Email and click Settings 4 Click Menu Advanced 5 In the Primary e mail address text box enter your e mail address 6 Click Done To add an attachment to an e mail message 1 In a new message click Menu Insert and then click Picture Voice Note or File 2 Browse and select the file or picture you want to attach or record a voice note To download attachments In an open message with an at...

Страница 95: ...ur service provider until you turn off flight mode To download messages from the server To send and receive e mail messages for an e mail account that you have with an Internet Service Provider ISP or that you access using a VPN server connection typically a work account you first need to connect to the Internet or your corporate network depending on the account 1 On the Home screen click Start Mes...

Страница 96: ...that the message is from you and not from an imposter or a hacker and that the message has not been altered To digitally sign and encrypt a new message 1 In the message list select Outlook E mail 2 Click New 3 Click Menu Message Options 4 In the Security field select the Encrypt message and Sign message check boxes Then click Done Verify the digital signature on a signed message you receive To veri...

Страница 97: ...folders You can also create additional folders within each hierarchy Folders for e mail accounts behave differently depending on the type of e mail account you have If you set up an Outlook e mail account to sync with Exchange Server or a computer PC e mail messages in the Inbox folder in Outlook will be synchronised automatically with your Lobster 700TV You can select to synchronise additional fo...

Страница 98: ...u anytime you connect to your e mail server whether it is from your Lobster 700TV or PC This synchronisation of folders occurs whenever you connect to your e mail server create new folders or rename delete folders when connected You can also set different download options for each folder If you set up an account to send receive mail using a POP3 e mail server e mail messages you move to the Delete...

Страница 99: ...saging account to send the picture along with the message From the Camera programme capture a photo and then click the Send icon select Send via MMS and click Send You can also record an MMS video clip and click the Send icon to send via MMS To access MMS message folders Click Start Messaging MMS then click Menu Folders MMS Message Folders Edit MMS settings When you send an MMS message an SMS noti...

Страница 100: ...Menu Options Account Options MMS to open the Preferences screen 2 Select or clear the provided check boxes according to your needs You can choose to keep track of your MMS messages retrieve messages immediately accept or reject messages and request a delivery or read receipt You can also specify a resolution for images you send and message delivery attempts 3 On the Preferences screen click Menu M...

Страница 101: ...will then be added as an entry on the MMS Configuration screen Note If you add several MMS service providers to the MMSC Settings screen you can choose one as your default MMS provider Select the MMS provider s name in the list then click Menu Set as Default Create and send MMS messages You can compose MMS messages in a combination of various slides where each slide can consist of a photo audio or ...

Страница 102: ...ideo Video to select a photo or video clip from the Select Media screen and insert it 5 Enter text and insert audio clips by clicking the respective fields 6 Click Send to send the message Note To send a copy of this message to others access Cc and Bcc by clicking Menu Send Options In these fields enter the recipient s phone number or e mail address or click Menu Recipients Add to add from Contacts...

Страница 103: ...elect a photo or video clip by using NAVIGATION and click Select or Menu Select to insert it On the Select Media screen you can view the thumbnails in list view open an item to view it or delete an item by clicking Menu and choosing the appropriate option You can even discard this photo or video clip by pressing BACK To capture a new photo or video clip and send it immediately with the message cli...

Страница 104: ...hen click Record to start recording and Stop to stop recording Click Play to listen to the new audio clip you captured then click Done The new audio clip is then added to your MMS message To set options for an MMS message While composing an MMS message you can set the following options for the message by clicking Menu Option Allows you to Recipients Specify the phone number or e mail address of th...

Страница 105: ...sage folder screen click Menu Send Receive By default messages are automatically downloaded to your Lobster 700TV To view an MMS message You can view MMS messages in several ways Press ENTER to view and play the message on your Lobster 700TV Click Pause or Menu Stop to pause the playback of the message Click Menu Object View to see a list of files included in the message To open a file select it and...

Страница 106: ...Important Note You must have either a Microsoft NET Passport or a Hotmail account to use MSN Messenger If you have a Hotmail com or MSN com e mail address you already have a Passport To get a Passport account go to http www passport com To get a Hotmail account go to http www hotmail com To start MSN Messenger 1 On the Home screen click Start Pocket MSN 2 Click MSN Messenger To sign in or out On t...

Страница 107: ...ck To change your own Messenger status 1 Click your own name at the top of the screen Your current status is indicated by a bullet point in the displayed list 2 Select a status such as Out To Lunch from the list To change your display name 1 Click Menu Options 2 In My display name enter the name you want to display to others in MSN Messenger 3 Click Done 6 4 Using Calendar Use Calendar to schedule...

Страница 108: ...2 Click the appointment and click Edit 3 Scroll to Occurs and click one of the recurrence options 4 Click Done To view your schedule You can view your schedule in three different views Month Week and Agenda 1 On the Home screen click Start Calendar 2 Do one of the following Click Menu Month View Click Menu Week View Click Menu Go to Today or from Week or Month view click Menu Agenda View To send a...

Страница 109: ...tact 1 On the Home screen click Contacts New or Start Contacts New 2 Enter information for the new contact 3 Click Done Tips If someone who isn t in your list of contacts calls you or sends you a message you can quickly create a contact from Call History or from the message by clicking Menu Save to Contacts In the list of contact information you ll see where you can add a picture or assign a ring ...

Страница 110: ...reen click Contacts or Start Contacts 2 Click the contact 3 Click the e mail address 4 Select the e mail account to use 5 Enter a subject compose your message and click Send To send a text message to a contact 1 On the Home screen click Contacts or Start Contacts 2 Click the contact and click Menu Send Text Message 3 Compose your message and click Send To find a contact 1 On the Home screen click C...

Страница 111: ...lobal Address List GAL GAL is the address book that contains all user group and distribution list e mail addresses of your organisation and it is stored on the Exchange Server By having direct online access to it from your Lobster 700TV it is quick and easy for you to plan a meeting and e mail a meeting request immediately to anyone in your organisation Access to the GAL is available if your organ...

Страница 112: ...act name and click Find Select one contact in the result list and click Select Notes Your Lobster 700TV must be set up with a data connection You can search on the following information as long as that information is included in your organisation s GAL First name Last name E mail name Display name E mail address or Office location ...

Страница 113: ...lick Contacts or Start Contacts 2 Click the contact you want to assign a ring tone to 3 Click Menu Edit 4 Click Custom ring tone and select the ring tone you want 5 Click Done To assign a picture to a contact 1 On the Home screen click Contacts or Start Contacts 2 Click the contact 3 Click Menu Edit 4 Click Picture 5 Click the picture you want to add To send a contact s details You can send a cont...

Страница 114: ...you create a new task with a reminder on your PC and then synchronise tasks with your Lobster 700TV the reminder will play at the time that was set on your PC To delete a task 1 On the Home screen click Start Tasks 2 Select the task and click Menu Delete Task To locate a task 1 On the Home screen click Start Tasks 2 In the task list do one of the following To sort the list click Menu Sort by and c...

Страница 115: ...ing a voice note To delete a voice note 1 On the Home screen click Start Voice Notes 2 Select the voice note to delete 3 Click Menu Delete 4 Click Yes Tip If you delete a voice note that has a default name such as Recording1 this name becomes available for a new voice note To listen to a voice note 1 On the Home screen click Start Voice Notes 2 Select the voice note to play and press ENTER Tip To ...

Страница 116: ...116 Exchanging Messages and Using Outlook ...

Страница 117: ...7 1 Using Camera and Video Recorder 7 2 Using Pictures Videos 7 3 Using Windows Media Player 7 4 Using MIDlet Manager Chapter 7 Experiencing Multimedia ...

Страница 118: ...art recording a video clip and then click Stop to end the recording Press the CAMERA button once to take a still image or to start recording a video clip When capturing video you can also stop video recording by pressing this button Alternatively you can press the ENTER button on the NAVIGATION control to take a picture when you are capturing a still image Press this button to start recording a vi...

Страница 119: ...still image suitable for assigning as an identification photo to a contact Picture Theme Captures still images and places them within frames Sports Captures a sequence of still images 3 or 5 frames automatically for a short duration at a defined frequency Using the above capture modes the camera captures files in the following formats Capture type Format Still Image JPEG Video Motion JPEG AVI avi ...

Страница 120: ...here the captured images and video clips will be saved The icon indicates the Lobster 700TV s main memory the icon indicates the storage card 5 Remaining number Indicator In Photo Contacts Picture Picture Theme and Sports this shows the remaining available shots of pictures that you can take based on current settings In Video and MMS Video modes this shows the remaining duration that can be record...

Страница 121: ...tting Menu Self timer to select the Self timer setting Menu Self timer Off 2 seconds or 10 seconds The Camera Video screen The Recording Status indicator shows a red blinking indicator while video recording is in progress Recording Status The Camera Picture Theme screen Template Status The Template Status displays the current and total number of photos that can be taken using the selected template...

Страница 122: ...e Click to remove the captured image or video clip Send Click to send the captured image or video clip to someone via e mail or MMS View Click to switch to Pictures Videos programme to show the still image or switch to Windows Media Player to play back the video clip Assign to Contacts Click to associate the photo to a selected contact Browse After you have taken photos in Sports mode the total nu...

Страница 123: ...your Lobster 700TV to start recording a video clip with audio if desired To stop recording click Stop or press either the ENTER button or the CAMERA button again Your Lobster 700TV displays the first frame of the captured video clip by default on the Review screen Before you capture a video clip click Menu Advanced Capture Format on the Camera screen to specify the file format You can set the enco...

Страница 124: ...e capturing a still image or a video clip you can first zoom in to make the object in focus move closer and you can zoom out to make the object move farther away In all capture modes press NAVIGATION up on your Lobster 700TV to zoom in NAVIGATION down to zoom out Alternatively click Menu Zoom to select a zoom ratio The camera zoom range for a picture or a video clip depends on the capture mode and...

Страница 125: ...ns in the Menu Option Allows you to Self timer Select the Self timer option for capturing images Off 2 seconds or 10 seconds Selecting 2 seconds or 10 seconds delays the capturing by the specified time after you press CAMERA or ENTER Template Select a template while using the Picture Theme mode Sports Settings Choose settings while using the Sports mode The Capture Speed option decides the capturi...

Страница 126: ...lips Review Duration Set a time length for displaying the captured image video on the Review screen before automatically saving it and returning to the live Camera screen Select No Limit if you do not want to impose a time limit Flicker Adjustment When taking indoor shots flicker on the camera screen may be caused by inconsistencies between the vertical scan rate of the camera display and the flicke...

Страница 127: ...eme only Template Folder Picture Theme only Template Folder By default templates are stored in the My Documents Templates folder on the Lobster 700TV s Main Memory If you transferred some templates to the storage card set this option to Main Card to specify that templates are located in both the main memory and the storage card Adjust This option allows you to adjust the camera display properties ...

Страница 128: ...lick Start Pictures Videos The images in the My Pictures folder appear as thumbnails by default 2 Select a picture and click View If you cannot find a picture in the default My Pictures folder If you cannot find a picture in the default My Pictures folder If click Menu Folders My Device to go to other folders To play GIF animation files 1 On the Home screen click Start Pictures Videos 2 Select the ...

Страница 129: ... crop and adjust the brightness colour and contrast of your pictures 1 On the Home screen click Start Pictures Videos 2 Select the picture you want to edit click View 3 Click Menu Edit and do any of the following To rotate a picture 90 degrees click Menu Rotate To crop a picture click Menu Crop Then drag the cursor to position it on the first corner of the cropping area and click Next Select the s...

Страница 130: ...ages 2 On the Pictures Videos screen select the item you want to send 3 Click Menu Send 4 On the Messaging screen select Outlook E mail and click Select A new message is created with the item attached A new message is created with the item attached A 5 Enter the recipient name and subject and click Send The message will be sent the next time you synchronise your Lobster 700TV Note Pictures and vid...

Страница 131: ...the contact and click Select To customise picture options 1 On the Home screen click Start Pictures Videos 2 Select the picture for which you want to configure advanced options 3 Click Menu Options 4 Select General or Slide Show on the Options screen then press ENTER Selecting General on the Options screen allows you to do the following Decrease the picture size so that photos can be sent faster vi...

Страница 132: ...led the desktop Player and the version for Lobster 700TV is called the device Player Open Windows Media Player To open Windows Media Player on your Lobster 700TV do the following Click Start Windows Media These are the following file formats that are supported by this version of Windows Media Player Mobile Formats Supported File Extensions Video Windows Media Video MPEG4 Simple Profile H 263 Motio...

Страница 133: ...us Windows Media Player has three primary screens Playback screen The default screen that displays the playback controls such as Play Pause Next Previous and Volume and the video window You can change the appearance of this screen by choosing a different skin Now Playing screen The screen that displays the Now Playing playlist This special playlist indicates the current file being played and files...

Страница 134: ...About Display information about Windows Media Player Mobile such as the version number Now Playing screen menu When you are viewing the Now Playing screen these options appear on the Menu Option Allows you to Library Display the Library screen so you can choose a file to play Move Up Move the selected item up in the playlist order Move Down Move the selected item down in the playlist order Remove ...

Страница 135: ...net CD tracks and videos have associated licences that protect them from being unlawfully distributed or shared Licences are created and managed by using digital rights management DRM which is the technology for securing content and managing its access rights Some licences may prevent you from playing files that have been copied to your Lobster 700TV Files that have licences associated with them a...

Страница 136: ...c select the Customize the playlists that will be synchronized check box and then select the playlists that you want to synchronise 5 Click Finish 6 The files begin synchronising to your Lobster 700TV The next time you connect your Lobster 700TV to your PC while the desktop version of Windows Media Player is running synchronisation will start automatically To synchronise and copy content manually t...

Страница 137: ...y level for audio files copied to your Lobster 700TV For more information see the desktop Player Help The desktop version of Windows Media Player 10 is only available for computers running Windows XP If you are not running Windows XP on your PC use the Copy to CD or Device feature of Windows Media Player 9 Series to copy your audio files and video files to your Lobster 700TV The desktop version of...

Страница 138: ...card Tap Menu Update Library to manually update the library list 4 Select a category for example My Music or My Playlists select the item that you want to play such as a song album or artist name and then click Play Note To play a file that is stored on your Lobster 700TV but is not in a library on the Library screen click Menu Open File Select the item that you want to play such as a file or a fo...

Страница 139: ...bmp files to your Lobster 700TV such as to the location Smartphone Program Files Windows Media Player on the Lobster 700TV To ensure that skins appear on the Skins tab do not store skin files in the Windows folder on your Lobster 700TV Troubleshooting If you encounter any difficulty while using Windows Media Player Mobile a number of resources are available on the Web to help you troubleshoot the ...

Страница 140: ...rowse to open Internet Explorer Mobile 3 Locate the MIDlet MIDlet suite while connected to the Internet 4 Select the MIDlet MIDlet suite to download 5 To start installing the MIDlet MIDlet suite click Yes 6 Click Done to confirm the installation Notes You can cancel the installation at any time Downloaded MIDlets will be automatically saved in the My Documents folder To install MIDlets from a PC Yo...

Страница 141: ...e My MIDlets folder Click Recent to view the MIDlets or a MIDlet suite used recently on your Lobster 700TV 3 Select the MIDlet MIDlet suite from the list by using the NAVIGATION control 4 Click Menu Install 5 Click Yes to install 6 Click Done to confirm the installation Note To remove the MIDlet files from the default folder click Menu Delete To run MIDlets on your Lobster 700TV 1 On the Home scree...

Страница 142: ...mise the display settings 1 On the Home screen click Start MIDlet Manager The Java Apps screen appears 2 Click Menu Settings 3 On the Settings screen select Display Options by using the NAVIGATION control 4 Press the ENTER button 5 In View Options choose to display the MIDlets either in groups or all at once 6 In Sort Options choose to sort by Name or by Size 7 Click Done To change the display nam...

Страница 143: ...n the Java Apps screen click Menu Settings 4 On the Settings screen select System Info by using the NAVIGATION control 5 Press the ENTER button to see how much storage space on your Lobster 700TV is used by the MIDlet 6 Click OK To select a network type 1 On the Java Apps screen click Menu Settings 2 Select Choose Network Type by using the NAVIGATION control 3 Choose a network type from the list 4...

Страница 144: ...messages that you may receive while managing and using MIDlets MIDlet suites on your Lobster 700TV Error Message Description Either RAM shortage or insufficient space on the file system There is insufficient memory on your Lobster 700TV Network out There is no network connection available The jar size does not match that specified in the jad The installation information provided by the MIDlet manu...

Страница 145: ...Chapter 8 Using Other Applications 8 1 Using ClearVue Suite 8 2 Using Speed Dial ...

Страница 146: ...rVue Presentation is a complete PowerPoint viewer solution with the ability to view native PowerPoint presentations With ClearVue Presentation you will see the original presentation complete with animations and transitions Note ClearVue Presentation only supports Powerpoint files created in Office 97 or later versions To open a presentation file 1 Click File Open and then locate the ppt or pps file ...

Страница 147: ...usly to loop the presentation You need to manually stop the presentation To learn how to stop the presentation see To view your presentation 3 Select the Orientation when viewing the presentation 4 Click Black slide at end to add a blank slide after the last slide in the presentation To set up a custom show 1 Click View Custom Show 2 In Show List select the slide you want to edit and then click Me...

Страница 148: ...in an AutoShape Worksheet cannot open files that have been password protected using the Save Options password setting in Microsoft Excel To open a worksheet file 1 Click File Open and then locate the xls file 2 Click Open To change the zoom ratio Click View and select a magnification To view another sheet in your worksheet file Click View Sheet and select the sheet you want to view ClearVue Document C...

Страница 149: ...he NAVIGATION buttons on your Lobster 700TV ClearVue PDF ClearVue PDF lets you view PDF files on your Lobster 700TV To open a PDF file 1 Click File Open and then locate the pdf file 2 Click Open After you open a file in ClearVue PDF it initially displays using the default Page Width setting This means that the page is sized to fit within the available area of your Lobster 700TV screen Click Zoom to ...

Страница 150: ...Menu Cancel Note Speed dials can be created only for numbers that are stored in Contacts To create a speed dial entry for an item 1 On the Home screen click Start and choose just highlight the desired item 2 Click Menu Add Speed Dial 3 Enter details in Name Value and Keypad assignment 4 Click Done To quit at any time during this process click Menu Cancel Note The first speed dial location is gener...

Страница 151: ...en you say the voice tag your Lobster 700TV automatically dials the associated phone number opens an e mail message using the associated address or goes to the associated Web page To create a voice tag for a phone number e mail address or URL in Contacts 1 On the Home screen click Start Contacts 2 Select the desired contact and press ENTER to open the contact card 3 Select the item to which you wa...

Страница 152: ...e screen click Start Speed Dial Select the desired voice tag from the list Do any of the following To change the voice tag click Edit and make changes then click Done To delete the voice tag click Menu Delete To play back an existing voice tag at any time click Menu Play Voice Tag To make a call or launch a programme using the voice tag 1 On the Home screen press and hold the VOLUME down button on...

Страница 153: ...A 1 Regulatory Notices A 2 PC Requirement to Run ActiveSync 4 x A 3 Specifications Appendix ...

Страница 154: ... Compliance with these directives implies conformity to the following European Norms EN 60950 1 IEC 60950 1 Safety of InformationTechnology Equipment ETSI EN 300 328 Electromagnetic compatibility and Radio spectrum Matters ERM Wideband Transmission systems data transmission equipment operating in the 2 4 GHz ISM band and using spread spectrum modulation techniques ETSI EN 301 511 Global System for...

Страница 155: ...ctions To reduce the risk of bodily injury electric shock fire and damage to the equipment observe the following precautions Safety precautions for RF exposure Use only original manufacturer approved accessories or accessories that do not contain any metal Use of non original manufacturer approved accessories may violate your local RF exposure guidelines and should be avoided Heed service markings...

Страница 156: ...P Report 86 1986 International Commission on Non Ionising Radiation Protection ICNIRP 1996 Ministry of Health Canada Safety Code 6 The standards include a substantial safety margin designed to assure the safety of all persons regardless of age and health The exposure standard for wireless mobile phones employs a unit of measurement known as the Specific Absorption Rate or SAR The standard incorpor...

Страница 157: ...maker to minimise the potential for interference If you have any reason to suspect that interference is taking place turn your phone OFF immediately Hearing Aids Some digital wireless phones may interfere with some hearing aids In the event of such interference you may want to consult your service provider or call the customer service line to discuss alternatives Other Medical Devices If you use a...

Страница 158: ...ecified collection point for recycling of such hazardous waste Isolated collection and proper recovery of your electronic and electrical waste equipment at the time of disposal will allow us to help conserving natural resources Moreover proper recycling of the electronic and electrical waste equipment will ensure safety of human health and environment For more information about electronic and elec...

Страница 159: ...Microsoft Windows Server 2003 x64 Edition Service Pack 1 Microsoft Windows XP Professional Service Packs 1 and 2 Microsoft Windows XP Home Service Packs 1 and 2 Microsoft Windows XP Tablet PC Edition 2005 Microsoft Windows XP Media Center Edition 2005 Microsoft Windows XP Professional x64 Edition Microsoft Outlook 98 Microsoft Outlook 2000 and Microsoft Outlook XP and Microsoft Outlook 2003 messag...

Страница 160: ... white LED back light Resolution 240 x 320 pixels at 64K colours GSM GPRS Tri band module GSM 900 880 915 925 960 MHz GSM 1800 1710 1785 1805 1880 MHz GSM 1900 1850 1910 1930 1990 MHz Camera module Type 1 3 mega pixel Colour CMOS Resolution SXGA 1280 x 1024 VGA 640 x 480 QVGA 320 x 240 QQVGA 160 x120 Connection I O port Standard 5 pin Mini USB port for signals for USB and power and headphones Blue...

Страница 161: ...amme buttons TV front right side and CAMERA right side Volume Up button left upper side Quick press to adjust volume up Long press to launch Voice Record Volume Down button left lower side Quick press to adjust volume down Long press to launch Voice Command Two SOFT KEYs HOME button BACK button TALK button start call answer call speakerphone END button end call end programme lock keypad 12 button ...

Страница 162: ...pendix Expansion slot Micro SD slot Micro SD memory card Power supply Battery 1150mAh Lithium Ion removable rechargeable battery AC adapter AC input frequency 100 240 VAC 50 60Hz Rated output 5VDC 1A typical ...

Страница 163: ...Index ...

Страница 164: ...performance 28 performance 28 Beam information 84 pictures 130 Bluetooth beaming 84 beam pictures 130 Bluetooth modem 86 discoverable mode 79 hands free headset 83 modes 79 overview 79 partnerships 80 stereo headset 83 synchronise 47 C Calculator 22 Calendar 22 107 Call History 22 Camera CAMERA button 118 icons and indicators 120 introduction 22 main menu 125 zoom 124 Capture formats 119 Capture m...

Страница 165: ...ge 72 Delete pictures and videos 129 Desktop view Web page 72 Dial up connection 69 Digitally sign messages 49 96 Digital Rights Management DRM 135 Digital signature sign 96 verify 96 Direct Push 46 Discoverable Bluetooth 80 Display time out 56 Download Agent 22 Download messages 95 E E mail attachments 94 Outlook 90 overview 90 POP3 IMAP4 91 security 49 96 send and receive 93 Edit picture 129 Eme...

Страница 166: ...rnet Explorer 23 72 K Keypad lock 64 sound 54 L Language locale setting 52 Launch camera from Pictures Videos 129 LED indicator lights 16 Licenced and protected media 135 Lock keypad 64 phone 64 M Make call from Call History 33 from Contacts 32 from Home Screen 31 from Speed Dial 33 Manage low battery 28 Media synchronisation settings 48 Memory 59 Message folders 97 Messaging 23 90 MIDlet Manager ...

Страница 167: ...me capture mode 119 123 PIN 30 63 Play media 138 Pocket MSN 23 106 POP3 91 Power management 56 Profile 53 Programmes ActiveSync 22 40 Calculator 22 Calendar 22 107 Call History 22 Camera 22 118 ClearVue Document 22 ClearVue PDF 22 ClearVue PPT 22 ClearVue Worksheet 22 Clear Storage 22 Comm Manager 22 Contacts 22 109 Download Agent 22 Games 22 Internet Explorer 23 72 Messaging 23 90 MIDlet Manager ...

Страница 168: ... 37 SMS 90 93 Sounds 53 Speakerphone 35 Speed Dial create entry for an item 150 create entry for a contact 150 introduction 23 make a call from Speed Dial 33 manage voice tags 151 retrieve a voice mail message 150 Sports capture mode 119 123 Start menu 24 Status indicators 21 Still image capture modes 123 Stop programmes 59 Swap Switch calls 35 Synchronise information types 44 music and video 48 O...

Страница 169: ...15 Voice tag create voice tag for phone number e mail address or URL in Contacts 151 create voice tag for programme 152 edit delete and play voice tags 152 W Web browser 72 Web page display options 72 Windows Media Player file formats 132 introduction 23 menus 133 synchronise 48 troubleshooting 139 Windows Mobile software version 57 Wireless Modem Bluetooth modem 76 86 introduction 23 USB modem 74 ...

Страница 170: ......

Отзывы: