background image

V3.3.3

7

USING YOUR TELEPHONE

CONNECTING YOUR PHONE

The Virgin Broadband Modem is very easy to use with your telephone handset. Just follow our simple tips.

DO

Plug your telephone directly into the Virgin 
Broadband Modem.

Use Cordless phones if you want more than 
one telephone on the service.

DON’T

Plug your modem into telephone wall sockets.

Have any ADSL fi lters connected to the 
telephone cable. 

Use fax machines with this service. 
They will not work.

GENERAL PHONE USE

This section is for the general use of your telephone handset such as Making Calls, Voicemail 
and Call Waiting.

MAKING CALLS

As with a standard telephone line, you should hear a dial tone when you pick up your telephone 
handset. If you hear a dial tone, you’re ready to make calls!

Note:

 You may notice a short delay before the number you have dialled rings. This is normal for calls 

made through a mobile phone network. If you wish, you can speed up the dialling process by pressing 
the # key after the desired number.

SETTING UP VOICEMAIL 

To activate your free Virgin Voicemail service, just dial 

212

 from your phone. You will be guided 

through the setup process, including recording your personal Voicemail message. To disable your 
Virgin Voicemail service, refer to the Call Forwarding section on Page 9 of this guide.

RETRIEVING VOICEMAIL 

Whenever you receive a new Voicemail message, the dial tone on your phone will be changed to a 
stuttered sound. If you have this stuttered dial tone, simply dial 212 to retrieve your new messages, 
and the dial tone will be reset to normal.

CALL WAITING 

When someone tries to call you whilst you are already on a call, you will hear a Call Waiting tone (two 
short beeps) in the background on your call. 

To end your current call and answer the new one, press the following combination of buttons 
on your phone: 

Recall, 1, #

To put your current call on hold and answer the new one, press the following combination of buttons 
on your phone: 

Recall, 2, #

This combination can also be used to switch back to your original call.

Содержание Home Modem

Страница 1: ...V3 3 3 A virginbroadband com au virginbroadband com au HOME MODEM ...

Страница 2: ...3 CONNECTION BUTTON Press to connect or disconnect from the Internet 4 YOUR SIM CARD INSIDE THE SIM CARD SLOT Please do not remove this or your service will not work 5 TELEPHONE PORT Plug your home telephone into this 6 ETHERNET PORT LAN This connects your computer to the Modem 7 POWER ADAPTER Please only use the supplied power pack 8 FACTORY RESET BUTTON This is hidden underneath the Modem This m...

Страница 3: ...THERNET NETWORK ADAPTOR 12 WINDOWS XP 12 WINDOWS VISTA 13 APPLE 14 CONFIGURING YOUR INTERNET BROWSER 15 FOR FIREFOX 16 FOR SAFARI 16 QUICK SET UP WIZARD 17 SPECIFY A PASSWORD 17 SETTINGS 17 YOUR FIRST TIME ONLINE 23 CONFIGURING YOUR EMAIL 23 OUTLOOK EXPRESS 23 OUTLOOK 2003 23 OUTLOOK 2007 24 WINDOWS MAIL VISTA 24 APPLE MAIL 25 CHECKING YOUR USAGE 25 CONFIGURING YOUR WIRELESS CONNECTION 26 USING WI...

Страница 4: ...wall and supports Network Address Translation NAT This network service hides the computers in your network so they cannot be easily accessed from outside your network the Internet until a request is made ADDITIONAL SECURITY The Modem supports both Wired Equivalent Privacy WEP and WiFi Protected Access WPA and WPA2 security encryption to protect your network Security logs keep you aware of potentia...

Страница 5: ...ection method HSDPA is a very fast connection UMTS is fast GPRS is slower around dial up speeds If you can only get GPRS try moving the modem to another area in your home or closer to a window How many computers are connected wirelessly Connection status When this says Connected you have an internet connection available Signal strength Like a mobile phone the more bars the better Clock coming call...

Страница 6: ...sed call from that phone number You can clear the missed calls using the Modem Management Console See Using Your Telephone on Page 7 for more information THE DISPLAY SCREEN SAVER A screen saver feature is included in the Modem to preserve the quality of the Main Display When the Main Display is inactive for a short time the Screen Saver activates showing the current time The time will automaticall...

Страница 7: ...ordless home telephone 3 For your first time internet setup please use the Ethernet Cable Plug one end into the middle socket on the Modem and the other into a spare Ethernet LAN port on your computer POSITIONING THE MODEM Position the Modem to ensure the following 1 Strong Mobile network signal The Modem s display will show your network signal strength You may find that placing the Modem near a win...

Страница 8: ...onnection type is consistently reported as GPRS despite your repositioning efforts please contact Virgin Broadband Support on 1300 555 100 for further assistance 3 Strong Wireless WLAN signal For best results make sure the Modem is in a central position in your home within a relatively equal distance of all wireless devices The Modem should not be closer than 30cm from any one wireless device 4 A ...

Страница 9: ...can speed up the dialling process by pressing the key after the desired number SETTING UP VOICEMAIL To activate your free Virgin Voicemail service just dial 212 from your phone You will be guided through the setup process including recording your personal Voicemail message To disable your Virgin Voicemail service refer to the Call Forwarding section on Page 9 of this guide RETRIEVING VOICEMAIL Whe...

Страница 10: ...he modem INCOMING CALLS This is the area where you can see and clear any Incoming Calls Simply click on the CLEAR LOG button to clear the log OUTGOING CALLS This is the area where you can see and clear any Incoming Calls Simply click on the CLEAR LOG button to clear the log TELEPHONE SETTINGS This is the area where you can change the way in which the telephone dials numbers International Dialling ...

Страница 11: ...vate all will deactivate all diversions Clear all numbers will deactivate all diversions and clear all numbers from the fields Check all will query the network for the current settings Refresh will tell the modem to make sure it is displaying the most current information Each individual type of diversion is used as follows To activate a diversion enter the number you wish to forward calls to then c...

Страница 12: ...ng using the telephone handset 2 short beeps will indicate a successful change or 3 short beeps will indicate that there has been a problem and no change has been made After the beeps the dial tone will return as normal By default voicemail is already set up on your Virgin Broadband service If you activate an alternative diversion and you wish to reactivate voicemail simply enter 212 as the divers...

Страница 13: ...ton on the top right of the Modem to connect 3 Open your Internet web browser e g Internet Explorer You should be online and ready to surf the web See Your First Time Online on page 23 CONFIGURING YOUR HOME NETWORK We recommend you do your first time setup using the Ethernet cable Remember the WiFi is turned off by default USING THE ETHERNET CABLE 1 Plug the supplied Ethernet cable into your comput...

Страница 14: ...t the name Network Connections then click Switch to Classic View on the left of the Control Panel screen 2 Right click on your Local Area Network Adaptor and choose Properties from the menu that appears 3 Select the item Internet Protocol and click on the Properties button 4 Make sure the following are selected a Obtain an IP address automatically b Obtain a DNS server automatically 5 Click on OK ...

Страница 15: ...onnections 3 Right click on your Local Area Network Adaptor and choose Properties from the menu that appears 4 Select the item Internet Protocol Version 4 and click on the Properties button 5 Make sure the following are selected a Obtain an IP address automatically b Obtain a DNS server automatically 6 Click on OK to close the Internet Properties 7 Click on OK to close the Local Area Network Conne...

Страница 16: ... here 5 In the Show drop down 2nd from the top box select Network Port Configurations 6 Untick everything except Built in Ethernet Airport 7 Click APPLY NOW 8 In the SHOW drop down box click BUILT IN ETHERNET and ensure the following options are correct 9 In TCP IP tab ensure that Configure IPv4 USING DHCP 10 In ETHERNET tab ensure that Configure AUTOMATICALLY 11 Click APPLY NOW if you have made chan...

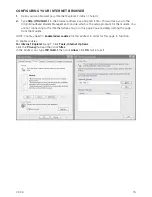
Страница 17: ...e which is the setup program for the modem You are not connecting to the Internet when you go to this page You are simply getting the page from the modem NOTE You may need to enable allow cookies for this address in order for this page to function To enable cookies For Internet Explorer 6 and 7 Click Tools Internet Options Click the Privacy tab and then click Sites In the Address box type 192 168 ...

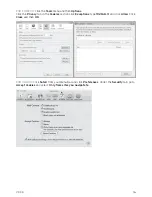
Страница 18: ...k the Privacy tab in the Cookies section click Exceptions type 192 168 1 1 and click Allow Click Close and then OK FOR SAFARI Click Safari from your Menu Bar and click Preferences Under the Security tab go to Accept Cookies and select Only from sites you navigate to ...

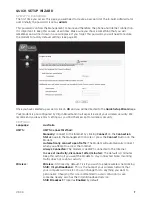
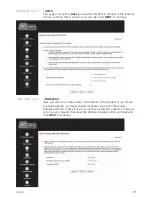
Страница 19: ...m except for wireless security SETTINGS Language Australia UMTS UMTS Connect Method Manually connect to the Internet by clicking Connect on the Connection Status page in the Management Console or press the Connect Button on the Modem Automatically connect upon traffic The Modem will automatically connect when you attempt to access the Internet Always Connected The modem is ALWAYS connected to the I...

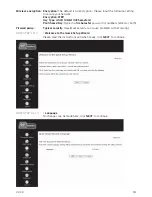
Страница 20: ...t 13Characters Pre Shared Key Type in a 13 character password of numbers letters or both Firewall policy Typical security maximum security can cause problems with browsing QSW STEP 1 of 7 Welcome to the Quick Setup Wizard Please read the instructions and when ready click NEXT to continue QSW STEP 2 of 7 Language No changes can be made here click NEXT to continue ...

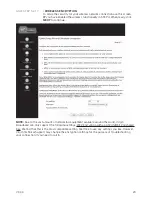
Страница 21: ...EXT to continue QSW STEP 4 of 7 WIRELESS Here you can turn on the wireless functionality of the modem If you choose to enable wireless you really should configure security for the wireless network after this in Step 5 If you do not have a wireless adaptor or network card in your computer then leave the Wireless Enabled option un ticked and click NEXT to continue ...

Страница 22: ...OTE Due to the vast amount of networking equipment available around the world Virgin Broadband can only support the following settings WEP Encryption with an ASCII 128bit Pre shared Key We find that this is the most compatible setting Feel free to use any settings you like However Virgin Technical Support may change the encryption settings for the purpose of troubleshooting your connection if you n...

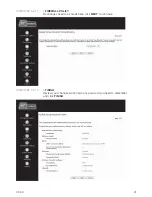
Страница 23: ...V3 3 3 21 QSW STEP 6 of 7 FIREWALL POLICY No changes need to be made here click NEXT to continue QSW STEP 7 of 7 FINISH Review your changes write down any password you need to remember and click FINISH ...

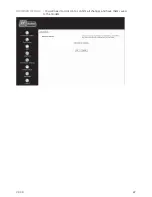
Страница 24: ...V3 3 3 22 BROWSER RELOAD You will need to click OK to confirm all changes and have them saved to the modem ...

Страница 25: ...d select Accounts 2 Click the Add button and select Mail 3 Enter the Display Name you would like to be displayed to others when you send them an email then click Next 4 Enter the email address you created when you activated your broadband service then click Next 5 On the E Mail Server Names screen enter the following settings and click Next a My incoming mail server is a POP3 b Incoming Mail Serve...

Страница 26: ... com au c Outgoing mail server SMTP smtp virginbroadband com au d User Name Your full email address you created during signup e Password The password you created with your first email address 6 Click Next to continue 7 Click Finish to save the settings You have now completed setting up your mailbox and are ready to start sending and receiving e mail WINDOWS MAIL VISTA To setup Windows Mail follow t...

Страница 27: ...ll Virgin Broadband email address c Password Your Virgin Broadband Email password then click Continue 4 Leave the default settings and click Continue 5 Enter the following Outgoing Mail Server smtp virginbroadband com au and click Continue 6 Leave the default settings and click Continue 7 Confirm that the settings are correct and click Continue 8 Click Done You have now completed setting up your ma...

Страница 28: ...u consider using Wireless Security Settings Please see the Configuring your Broadband Modem instructions on page 12 WINDOWS XP Click Start choose Control Panel then Network Connections Look for your wireless network connection 1 Right click over this and select View Wireless Networks 2 Select the network Virgin Broadband and click Connect If you have enabled wireless security you will be prompted t...

Страница 29: ... a network 2 Select the network Virgin Broadband and click Connect If you have enabled wireless security you will be prompted to enter your password 3 You computer will then ask you what type of network this new connection will be Choose Public and then Close 4 Close any open windows and open your Internet web browser e g Internet Explorer You should be online and ready to surf the web ...

Страница 30: ...lise this 6 In the Show drop down 2nd from the top box select Network Port Configurations 7 Untick everything except Built in Ethernet Airport 8 Click APPLY NOW 9 In the SHOW drop down box click Airport and ensure the following options are correct 10 In TCP IP tab ensure a Configure IPv4 USING DHCP 11 Click APPLY NOW if you have made changes and close the window 12 Click back to the APPLE MENU and e...

Страница 31: ...agement Console http 192 168 1 1 Remember The default username for the Management Console is admin and the password is the one you set during the Quick Setup Wizard CONNECT DISCONNECT To connect to the Internet click Connect or press the connect button on the top of the Modem To disconnect from the Internet click Disconnect or press the connect button on the top of the Modem When the connection is...

Страница 32: ... is displayed and the left sidebar shows the options available SMS SCREEN This feature is currently not available TELEPHONE SCREEN From the telephone screen you will be able to setup and manage the features for your Virgin Broadband telephone CONNECTIONS SETTINGS This area contains important network connection settings SYSTEM SETUP This area contains the general setup sections for the modem ADVANC...

Страница 33: ... Modem Management Console http 192 168 1 1 2 Click on System Setup in the left hand menu 3 Find and click on the Date and Time icon 4 Where it says Time Zone select your local time zone 5 Click Apply then log out I AM UNABLE TO MAKE AND OR RECEIVE PHONE CALLS A Check the physical connections of your phone and Modem 1 Make sure the Modem is connected to a power point using the supplied power adapte...

Страница 34: ... Telephone settings in the Modem s management console 1 Make sure you have connected the Modem to your computer 2 Open a web browser such as Internet Explorer Firefox or Safari 3 Type 192 168 1 1 into the address bar of your browser and press the enter key to load that address 4 If this is the first time you have accessed the Modem management console you will be prompted to create a password Otherw...

Страница 35: ...ernet cable to ensure that the wireless setup is not at fault C Check the connection settings in the Modem management console 1 Open a web browser such as Internet Explorer Firefox or Safari 2 Type 192 168 1 1 into the address bar of your browser and press the enter key to load the address 3 If this is the first time you have accessed the Modem management console you will be prompted to create a pa...

Страница 36: ...e All again to confirm 6 Click Done and close the Preferences window E Check the settings in your web browser Your web browser should be set up to establish a direct connection to the Internet through the Virgin Broadband service Any remaining settings from a previous Internet provider may prevent you from accessing web sites To ensure your settings are correct follow the steps on pages 12 16 F Res...

Страница 37: ...utton on the top of the Modem C Delete Temporary Internet Files Cookies and History Sometimes temporary files stored locally on your computer can become corrupt and cause problems viewing web pages or can slow your connection clearing them can help See page 35 for instructions D Check the settings in your web browser Your web browser should be setup to establish a direct connection to the Internet ...

Страница 38: ...m is easier to remember than 202 139 186 150 Dynamic DNS Dynamic Domain Name System Provides assignment of dynamic IP addresses to fixed domain names So if the server which is hosting the website is using DHCP it may have varying IP s this will point the changing IP to the fixed website Ethernet The most widely used local area network LAN access method defined by the IEEE as the 802 3 standard Firewa...

Страница 39: ...the computer Port Describes an interface between the operating system applications and the Internet Think of a Port as if it s a part of a Highway different Ports are like different specialised lanes on that highway that handle certain traffic eg Email webpages file transfer plus many many more SSID Service Set Identifier network name in WLAN which allows stations computers in the WLAN to find the cor...

Страница 40: ...hours minutes clock synchronization over the Internet NTP Signal strength Number of WLAN connections Screen saver Buttons On Off Connect disconnect UMTS Display information Restore factory defaults Connectors Power connector RJ 45 Ethernet RJ 11 POTS telephone SIM card holder External antenna connector GSM UMTS User Interface Device configuration with local web browser no software installation requ...

Страница 41: ...e reliable operation of the device and to protect it from overheating so these openings must not be blocked or covered The openings should never be blocked by placing the product on a bed sofa rug or other similar surface This product should never be placed near or over a radiator or anything that generates heat This product should not be placed in a built in installation such as a bookcase or rac...

Страница 42: ... number ________________________ 6 digit PIN ________________________________ YOUR MODEM S MANAGEMENT CONSOLE Default username admin E MAIL ADDRESS 1 Primary use this to access your usage information ___________________ virginbroadband com au E MAIL ADDRESS 2 ___________________ virginbroadband com au E MAIL ADDRESS 3 ___________________ virginbroadband com au E MAIL ADDRESS 4 ___________________ ...

Страница 43: ...V3 3 3 41 ...

Страница 44: ...virginbroadband com au virginbroadband com au WARNING THIS EQUIPMENT WON T WORK IF THERE IS A MAINS POWER FAILURE Please recycle me DY9055 DEC 07 ...

Отзывы: