background image

9

Section 6:  Basic Operation

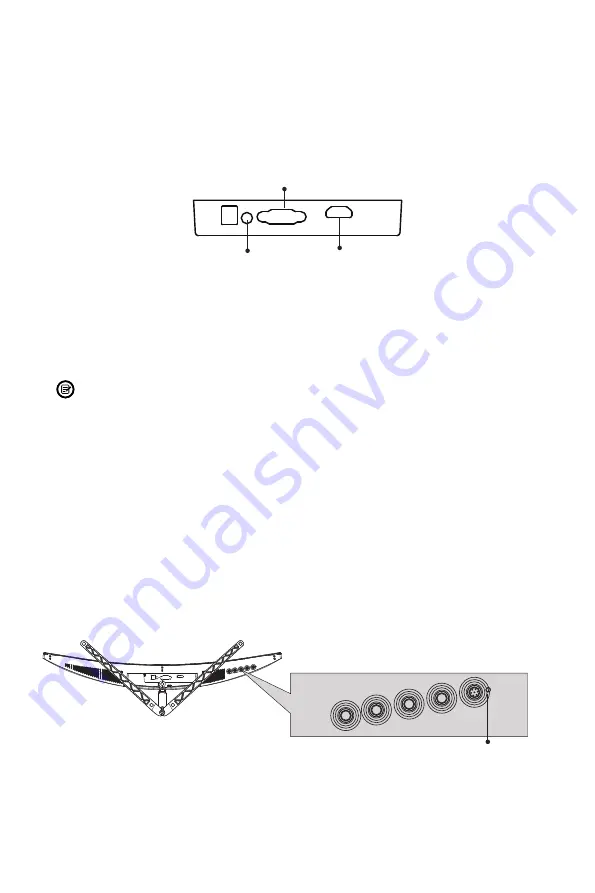
1.   Insert one end of the HDMI cable (included) into your PC’s graphics card. A VGA 

cable (not included) may also be used. 

2.   Connect the other end of the cable to the corresponding port on your monitor. 

HDMI Port

Audio Out

VGA Port

3.   Connect the power cable to your monitor, then connect the other end to your 

power source. It is recommended that you use a surge protector with adequate 

voltage if a wall outlet cannot be reached directly.

4.   Locate the power button on the monitor and press it to turn the monitor on.

If you cannot locate the power button, please refer to Section 3.1.

AMD FreeSync

The feature itself is off by default. In order to use this feature, please note you must 

have hardware with FreeSync capability, an HDMI cable, and the latest graphic 

drivers. To use this feature, connect your computer and monitor with an HDMI 

cable. After connecting, you may receive a prompt to enable the feature on your 

computer. If you do not receive the prompt, you may need to enable the function in 

your graphics card menu. See your graphics card manufacturer’s documentation for 

instructions on how to turn on and/or enable FreeSync.

Section 7:  Indicator Light

Indicator Light

Solid blue light indicates power is on and the monitor is operating normally. Flashing 

blue light indicates no video source, no horizontal or vertical signal has been 

detected or voltage is low. Please ensure your computer is on and all video cables 

are fully inserted and/or connected.

Содержание NBV27CB

Страница 1: ...rving our customers and providing the best products our product information including our user manuals may receive updates from time to time Please check our website for the latest user manuals and pr...

Страница 2: ......

Страница 3: ...6 3 2 Monitor Ports 6 Section 4 Stand Installation 7 Section 5 Mount Installation 8 Section 6 Basic Operation 9 Section 7 Indicator Light 9 Section 8 OSD 10 8 1 OSD Menu Functions 11 Section 9 ECO Mod...

Страница 4: ...art of the monitor 6 Do not insert anything into any part of the monitor especially the ventilation openings 7 Always make sure your monitor is placed on a secure level surface to prevent it from fall...

Страница 5: ...e x 1 Power Cable x 1 AC 100 240V 50 60Hz NO 2 Screws x 4 for Mounting NO 1 Screws x 4 for Stand Installation HDMI Cable x 1 Screwdriver x 1 User Manual x 1 The screws come in different sizes NO 1 11m...

Страница 6: ...VGA output and connect the other end to the monitor s VGA port 10 HDMI Connector Insert one end of the HDMI cable into the computer s HDMI output and connect the other end to the monitor s HDMI port 7...

Страница 7: ...Screw x 1 Stand Stem Base 3 Remove the foam covering the bottom of the monitor then remove the adapter from the back of monitor Use two NO 1 screws to fasten adapter onto the stem Adapter Screws x 2...

Страница 8: ...parts and the foam covering the monitor If the monitor is already attached to the stand remove the stand Button 2 Press the button to remove the adapter on back of monitor then tighten the included fo...

Страница 9: ...off by default In order to use this feature please note you must have hardware with FreeSync capability an HDMI cable and the latest graphic drivers To use this feature connect your computer and monit...

Страница 10: ...dard configuration settings 1 Press any one of the buttons M E to activate the navigation window eco 2 Press M button to enter the OSD menu BRIGHTNESS BRIGHTNESS CONTRAST ECO DCR STANDARD OFF 3 Press...

Страница 11: ...0 50 Customize RGB components Green 0 50 Blue 0 50 OSD SETTING Language English Espa ol Fran ais Portugu s Deutsch T rk e Polski Italiano Nederlands Set OSD language OSD H POS 0 100 Adjust the OSD ho...

Страница 12: ...normally Check if the indicator light is flashing If so this indicates there is no signal from your video source If your source is a notebook or laptop be sure that its settings are in mirror or exten...

Страница 13: ...the interface are not curved Dim image Adjust the brightness and contrast ratio Image jitter moire pattern Nearby electric equipment may interfere with the monitor Light indicator is on or ashing but...

Страница 14: ...rchase and lasts for one year the Warranty Period The Warranty Period is not extended if the Product is repaired or replaced We may change the availability of this limited warranty at our discretion b...

Страница 15: ...rt 15 of the FCC Rules Operation is subject to the following two conditions 1 This device may not cause harmful interference and 2 this device must accept any interference received including interfere...

Страница 16: ...COPYRIGHT 2020 VIOTEK ALL RIGHTS RESERVED...

Отзывы: