


User Manual
Espace Walk-in Cellar
13
Installing your cellar (cont'd)
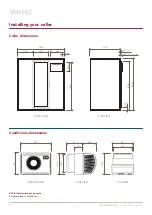
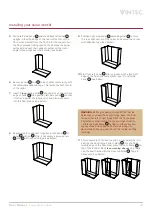
12 Complete the front side of the cellar by slotting the front
right (conditioner) panel
into the front right edge of
the floor. Tape if necessary (see below).
13 Insert an joining strip into the slot on the vertical
edge of panel
then position right side panel
so
that it not only marrys against the joining strip and slots
down into the floor groove, but also nests its metal angle
frame around front right panel
. Secure the corner
with adhesive tape (see below). This completes the
walls of the cellar.
14 Use a short joining strip to connect the two roof
panels
and
.
15 Secure panels and together through the metal
frame with
screws
16 Once and are connected, lift the roof up on top
of the walls and position carefully until the angled metal
frame drops down snugly over all four sides. Walk inside
the cellar and inspect the ceiling seams on all sides to
ensure a snug fit with minimal gaps. If gaps are visible,
carefully adjust the sides and apply pressure to the roof
to ensure it is pressed down firmly (see below).
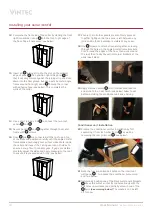
17 Ensure that all other panels are also firmly pressed
together tightly so that no space is left between any
joins and no foam insulation is visible at any seam.
18 Use screws to attach all panels together, screwing
through the holes in the angled metal frame brackets.
Start around the edges of the floor, then work around
the roof, then finally the vertical corner brackets of the
walls (see below).
19 Apply silicone sealant to all internal panel seams
and smooth to a neat finish (see below). Allow to set
before installing the conditioner unit and shelving.
Conditioner unit installation
20 Prepare the conditioner unit for installation by first
separating it from its timber frame
, as well as
removing the rear grill cover
(see below).
21 Note the four pre-drilled bolt holes on the interior of
wall panel
– two above the conditioner cutout void
and two below.
22 Temporarily position one of the black metal angle brackets
above the cutout so that its top holes line up with the
bolt holes on wall panel, and partially screw in two of the
bolts
(see warning below). The washers can be left
off for now.
Содержание ESPACE Series
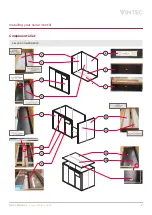
Страница 9: ...User Manual Espace Walk in Cellar 8 Installing your cellar cont d Components list CELLAR COMPONENTS...
Страница 10: ...User Manual Espace Walk in Cellar 9 Installing your cellar cont d ASSEMBLY COMPONENTS A1 A3 A4 A6 A5 A7 A8 A2...
Страница 21: ...User Manual Espace Walk in Cellar 20 Notes...
Страница 22: ...User Manual Espace Walk in Cellar 21 Notes...


