background image

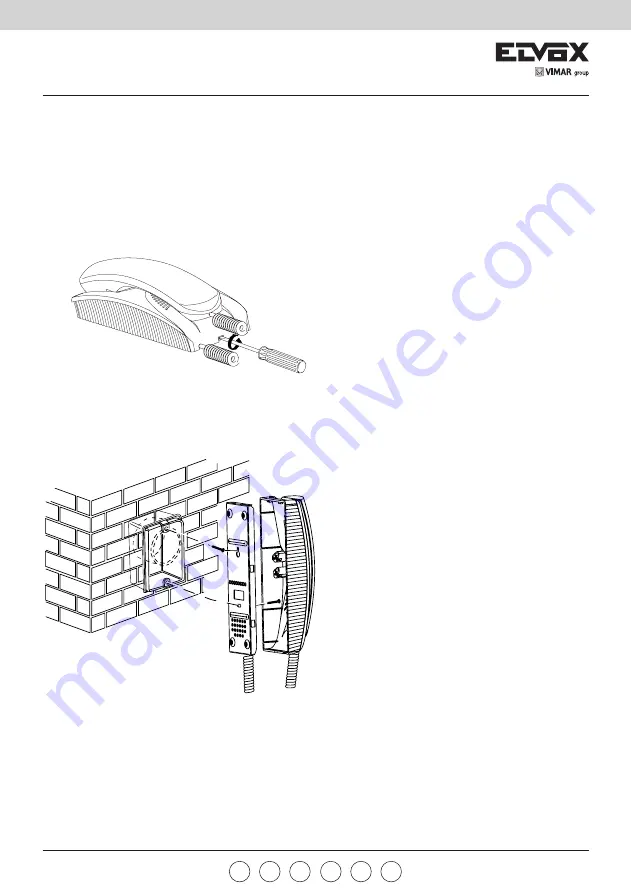
Per aprire il citofono
To open interphone
Pour ouvrir le poste
Öffnen des Haustelefone
Para abrir el teléfono
Para abrir o telefono

INSTALLAZIONE DEL CITOFONO - PHONE INSTALLATION - INSTALLATION DU POSTE

HAUSTELEFON INSTALLIERUNG - INSTALACION DO TELÉFONO- INSTALAÇÃO DO TELEFONE

1  Fissare la vite superiore (A) nella sca to la incasso (o 

tassello) lasciando spor ge re la testa della vite per 

2-3 mm.

2  Agganciare  il  citofono  alla  vite  su pe rio re  uti liz zan do 

l’apposito foro po ste rio re accostandolo alla parete 

e ti ran do lo verso il basso in di re zio ne delle frecce.

3  Completare il fissaggio con la vite inferiore (B) 

nell’apposito foro.

1  Die obere Schraube (A) am Unterputz-Gehäuse 

(oder Dübel) befestigen. Die Schraube 2-3 mm 

vorstehen lassen.

2  Das Haustelefon an der Schraube (A) durch das 

rückseitige Lock zuhacken und es nach unten laut 

dem Zeichen ziehen.

3  Die untere Schraube (B) im bestimmten Loch 

befestigen. 

1  Partially fasten upper screw “A” to back box leaving 

it out for 2 or 3 mm.

2  Hook interphone to upper screw “A” in rear hole and 

pull it downwards. 1 - 2 

3  Complete mounting with lower screw “B” in 

prepared hole.

1  Fijar el tornillo superior (A) en la caja empotrada (o 

taco) dejando la cabeza del tornillo unos 2-3 mm 

fuera. 

2  Enganchar el teléfono al tornillo superior utilizando 

el correspondiente orificio posterior; acercarlo a 

la pared y tirar de él hacia abajo en la dirección 

ilustradas por las flechas. 

3  Com ple tar la fijación con el tornillo inferior (B) en el 

correspondiente orificio.

1  Fixar o parafuso superior (A) no local de encaixe 

deixando a cabeça do parafuso sa lien te 2 a 3 mm.

2  Prender o telefone ao parafuso superior, utilizando o 

furo posterior adequado, aproximando-o da parede 

e puxando-o para baixo na direcção da seta.

3   Completar a fixação com o parafuso (B) no furo 

apropriado.

1   Fixer la vis supérieure (A) dans la boîte de 

raccordement (ou vis à goujon) en laissant saillir la 

tête de la vis pour 2-3 mm.

2  Accrocher le poste à la vis supérieure en utilisant le 

trou approprié, le rapprocher à la paroi et en le tirant 

vers le bas en suivant la direction des flèches.

3  Completer le montage avec la vis inférieure (B) fixée 

dans le trou approprié.

   4

885E - 885M

PT

ES

DE

FR

EN

IT

Содержание Elvax 885E

Страница 1: ...lateur Technisches Handbuch Instrucciones instalador Manual do instalador 885E 885M Kit citofonico bifamiliare Two family interphone kit Kit poste 2 usag Zweifamilienhaus T rsprechanlage set Kit porte...

Страница 2: ...n siguiendo atentamente el esquema Con distancias hasta 100m usar cable de 1mm2 Executar a liga o seguindo atentamente o esquema Para distancias at 100m utilizar condutores de 1 mm2 Art 930C Serratura...

Страница 3: ...doivent tre reli s directement aux bornes 3 et 4 du micro haut parleur Art 930C Die Versorgungskabel 230V und die 12 bzw 15 Vac Kabel sind in von anderen Leitern separaten Kan len zu verlegen um St ru...

Страница 4: ...interphone to upper screw A in rear hole and pull it downwards 1 2 3 Complete mounting with lower screw B in prepared hole 1 Fijar el tornillo superior A en la caja empotrada o taco dejando la cabeza...

Страница 5: ...on rectangular box or with expansion screws Installer la plaque de rue sur bo te rectangulaire ou avec vis goujouns Klingeltableau an der Wand mit Schrauben und D bel montieren Montar la tarjeta exte...

Страница 6: ...erhalten entfernen Sie die Namenschildhalterung von der R ckseite wie dezeigt Para acceder a la tarjetita portanombres mover el sujeta tarjetita desde atr s como muestra la figura Para ter acesso ao...

Страница 7: ...levantar o telefone e come ar a falar Premir o bot o respectivo para accionar o trinco el ctrico Eseguire la chiamata dall esterno premendo il pul san te della targa e parlare a mani libere dopo aver...

Страница 8: ...istanze minime attorno all ap parecchio in modo che vi sia una sufficiente ventilazione L apparecchio non deve essere sottoposto a stillicidio o a spruzzi d acqua ATTENZIONE Per evitare di ferirsi l a...

Страница 9: ...e carga Terminais 12 0 12V a c 0 8A continua 1A intermitente 30 sec ON 150 sec OFF P 35VA alimenta o 230V a c outras ten s es sob pedido 50 60 Hz PRI Prote o por PTC Aten o Para repor o aparelho ap s...

Страница 10: ...ted in accordance with the instructions issued by the local authorities responsible for waste disposal COMMUNICATION AUX UTILI SATEURS CONFORM MENT LA DIRECTIVE 2002 96 RAEE Pour prot ger l environnem...

Страница 11: ...dades encar gadas de la eliminaci n de los residuos a nivel local INFORMA O AOS UTILIZA DORES NOS TERMOS DA DI RECTIVA 2002 96 REEE Para evitar danos ao meio am biente e sa de humana e evi tar incorre...

Страница 12: ...Viale Vicenza 14 36063 Marostica VI Italy www vimar com S6I 885 E00 07 1612...

Отзывы: