background image

17

  A 

MAGNETRON

  B 

POWER TRANSFORMER

  C 

H.V. RECTIFIER ASSEMBLY

  D 

HIGH VOLTAGE CAPACITOR

  E 

PRIMARY INTERLOCK SWITCH

  F 

SECONDARY INTERLOCK SYSTEM

  G 

MONITOR SWITCH

  H 

C/T FUSE

  E 

THIRD DOOR SWITCH

  I 

THERMAL CUT-OUT 

  J 

CONVECTION HEATER 

  K 

THERMISTOR

  L 

DAMPER MOTOR

  M 

DAMPER SWITCH

  P 

TOUCH CONTROL PANEL

  Q 

KEY UNIT

  R 

RELAY RY-1

  R 

RELAY RY-2

  R 

RELAY RY-3

  R 

RELAY RY-4

  R 

RELAY RY-5

  R 

RELAY RY-6

  T 

FOIL PATERN ON PWB.

  U 

AH SENSOR


Replace

  OVEN LAMP OR SOCKET


Replace

  FAN MOTOR


Replace

  TURNTABLE MOTOR

  Replace

  CONVECTION MOTOR


Check

  LOOSE WIRING


Check

  SHORTED IN POWER CORD


Check

  NO POWER AT OUTLET


Check

  LOW VOLTAGE

  O 

NOISE FILTER

TEST PR

OCEDURE

POSSIBLE CAUSE 

AND 

DEFECTIVE PARTS

Home fuse b

lo

ws when po

w

er cord is plugged into w

all receptacle

.

C/T fuse b

lo

ws when po

w

er cord is plugged into w

all receptacle

88:88 

does 

not 

appear 

in 

displa

when 

po

w

er 

cord 

is 

first 

plugged 

into w

all receptacle

.

Displa

does 

not 

oper

ate 

proper

ly 

when 

ST

OP/CLEAR 

pad 

is 

touched.


(The time of da

y should appear on the displa

y with beep sound.)

Ov

en lamp does not light with door opened.


O

ve

la

m

do

es

 n

ot

 l

ig

ht

 i

co

ok

 c

yc

le

(I

lig

ht

 w

he

do

or

 i

opened).

Cooking cycle r

uns 1 min

ute then shuts do

wn.

Ov

en lamp light, b

ut tur

ntab

le motor does not oper

ate

.

Tur

ntab

le 

motor 

oper

ates 

nor

mally 

but 

cooling 

fan 

motor 

does 

not 

oper

ate

.

Ov

en does not go into a cook cycle

, when ST

AR

T pad is touched.

Lo

or 

no 

po

w

er 

is 

produced 

dur

ing 

micro

w

av

cooking 

(The 

food 

is 

heated incompletely or not heated at all)

Extremely une

ven heating is produced in o

ven load (f

ood).

Function 

of 

var

iab

le 

cooking 

does 

not 

oper

ate 

proper

ly 

except 

HIGH 

po

w

er

.

Function of COMPU DEFR

OST does not oper

ate  proper

ly

.

CONV 

indicator 

lights

but 

ov

en 

does 

not 

go 

into 

cook 

cycle 

when 

ST

AR

T pad is touched.


CONV indicator lights

, b

ut heating element does not heat.

Temper

ature in the o

ven ca

vity is lo

w

er or higher than preset.

Cooling f

an motor r

uns inter

mittently or all the time

.

Con

vection cycle r

uns 4 min

utes and 15 seconds then shuts do

wn.

Ov

en 

in 

the 

sensor 

cooking 

condition 

but 

AH 

sensor 

does 

not 

end 

or 

PROBLEM

CONDITION

OFF CONDITION

COOKING CONDITION 

(MICROWAVE)

(CONVECTION) 

(SENSOR

COOKING)

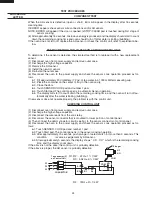
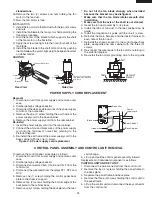
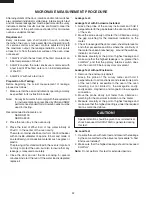
Содержание VMOC206SS

Страница 1: ...ENERGY 2 BEFORE SERVICING 2 WARNING TO SERVICE PERSONNEL 4 MICROWAVE MEASUREMENT PROCEDURE Canada 5 MICROWAVE MEASUREMENT PROCEDURE USA 6 FOREWORD AND WARNING 7 PRODUCT SPECIFICATIONS 8 GENERAL INFOR...

Страница 2: ...per the Microwave Measure ment Procedure outlined in this service manual If microwave emissions level is in excess of the specified limit contact Viking Service immediately 1 888 845 4641 If the unit...

Страница 3: ...3 Notes...

Страница 4: ...itor 4 Disconnect the leads to the primary of the power transformer 5 Ensure that the leads remain isolated from other components and oven chassis by using insulation tape 6 After that procedure recon...

Страница 5: ...ontrol on Full Power Cooking Mode Close the door and select a cook cycle of several minutes If the water begins to boil before the survey is completed replace it with 275 ml of cool water C Leakage te...

Страница 6: ...ty The water container shall be a low form of 600 ml 20 oz beaker with an inside diameter of approx 8 5 cm 3 1 2 in and made of an electrically nonconductive material such as glass or plastic The plac...

Страница 7: ...e not defective C The door packing is not damaged D The door is not deformed or warped E There is no other visible damage with the oven Servicing and repair work must be carried out only by trained se...

Страница 8: ...ng time Convection Temperature for Variable Cooking CONVECTION 100 450 F Temp control LOW MIX BAKE 350 F with 10 microwave power HIGH MIX ROAST 300 F with 30 microwave power SLOW COOK 300 F for 4 hour...

Страница 9: ...t be used it should be a 3 wire 15 amp or more cord Do not drape over a countertop or table where it can be pulled on by children or tripped over accidentally CAUTION DO NOT UNDER ANY CIRCUMSTANCES CU...

Страница 10: ...f microwave energy is stopped The oven will revert to the OFF condition 6 When the door is opened during a cook cycle third door switch monitor switch door sensing switch the secondaryinterlockrelayan...

Страница 11: ...as soon as the convection cycle has ended turning off the convection fan motor 5 At the end of the convection cook cycle shut off relay RY4 is energized turning on the damper motor The damper is retu...

Страница 12: ...ent 4 Now the oven is in the convection cooking mode 5 Whentheoventemperaturehasreachedtheprogrammed convection temperature the oven goes into the programmed cooking mode 6 At the end of the COMPU BRO...

Страница 13: ...RNTABLE MOTOR 0 0033 AC125V 0 022 AC250V 0 0033 AC125V NOISE SUPPRESSION COIL HEATIMG ELEMENT MAGNETRON POWER TRANSFORMER H V RECTIFIER CAPACITOR 0 94 RY4 RY5 RY6 RY1 THIRD DOOR SWITCH OVEN THERMAL CU...

Страница 14: ...N COIL HEATIMG ELEMENT MAGNETRON POWER TRANSFORMER H V RECTIFIER CAPACITOR 0 94 RY4 RY5 RY6 RY1 THIRD DOOR SWITCH OVEN THERMAL CUT OUT 117V 60Hz FM COM RY1 E 5 E 4 E 3 E 2 E 1 F 3 F 2 F 1 RY3 SECONDAR...

Страница 15: ...cut out closes at 266 F 130 C HEATING ELEMENT The heating element is located at the left side of the oven cavity It is intended to heat air driven by the convection fan The heated air is kept in the o...

Страница 16: ...nside of the oven cavity is maintained at approximately the selected temperature When the convection time reaches 0 the heating element is de energized and the convection fan stops operating and the o...

Страница 17: ...of day should appear on the display with beep sound Oven lamp does not light with door opened Oven lamp does not light in cook cycle It light when door is opened Cooking cycle runs 1 minute then shut...

Страница 18: ...ature If the water temperatures are accurately measured and tested for the required time period the test results will indicate if the magnetron tube has low power output low rise in water temperature...

Страница 19: ...k the monitor switch operation by using the ohmmeter as follows When the door is open the meter should indicate a closed circuit When the monitor switch actuator is pushed by a screw driver through th...

Страница 20: ...to measure the exact temperature in the convection oven An accurate thermocouple type TEST PROCEDURES PROCEDURE LETTER COMPONENT TEST CONVECTION CUT OUT on side of the heater duct A continuity check a...

Страница 21: ...ther possible troubles caused by defective control unit a Buzzer does not sound or continues to sound b Clock does not operate properly c Cooking is not possible d Proper temperature measurement is no...

Страница 22: ...C Damper motor RY5 Approx 19 0V D C Convection motor RY6 Approx 19 0V D C Cooling fan motor TEST PROCEDURES PROCEDURE LETTER COMPONENT TEST If the display fails to clear when the STOP CLEAR pad is dep...

Страница 23: ...roximately 200 milliliters 7 2 oz of tap water in a 1000 milliliter measuring cup 2 Place the container on the center of tray in the oven cavity 3 Close the door 4 Touch SENSOR COOK pad and number pad...

Страница 24: ...lliliter measuring cup 6 2 Place the container on the center of tray in the oven cavity 6 3 Close the door 6 4 Touch SENSOR COOK pad and number 1 pad 6 5 Touch Start pad The control panel is in automa...

Страница 25: ...to change the resistance values in parallel with R50 1 Changing the resistancevaluesresultsinthatthereisthesamepotential at both F 3 terminal of the absolute humidity sensor and AN7 terminal of the L...

Страница 26: ...removing outer case 1 Disconnect oven from power supply and remove outer case 2 Discharge high voltage capacitor 3 Disconnect filament leads of transformer from the magnetron and capacitor 4 Disconne...

Страница 27: ...d take off the turntable motor cover 3 Disconnect wire lead from the turntable motor 4 Remove the two 2 screws holding the turntable motor TURNTABLE MOTOR REMOVAL and coupling mounting plate to the ov...

Страница 28: ...waveguide and control panel back plate 6 Remove the chassis support from the oven 7 Remove one 1 screw holding the magnetron air guide to the waveguide 8 Remove the magnetron air guide from the waveg...

Страница 29: ...light weight ball peen hammer or rubber mallet CAUTION Do not hit the fan blade strongly when installed because the bracket may be disfigured Make sure that the fan blade rotates smooth after installa...

Страница 30: ...has not activated with the door closed loosen the screw and adjust it After adjustment check the following 1 In and out play of door remains less than 0 5mm at the latched position 2 The door sensing...

Страница 31: ...The door on a microwave oven is designed to act as an electronic seal preventing the leakage of microwave energy from oven cavity during cook cycle This function does not require that door be airtight...

Страница 32: ...periods After adjustment of the door interlock and monitor switches are completed individual or collectively interlock switch test and microwave leakage test must be performed with survey instrument a...

Страница 33: ...LAMP SOCKET N O PNK G R Y R E D THERMISTOR 1 2 RED RED RED RED BLK BLK WHT WHT GRN MAGNETRON RED HIGH VOLTAGE COMPONENTS HIGH VOLTAGE CAPACITOR POWER TRANSFORMER P P L BRN ORG RY6 RY4 RY5 CN G RY1 COM...

Страница 34: ...t VMOC206SS 1 3 2 FPNLCB558MRK0A Control panel frame with key unit VMOC206BT 1 3 2 FPNLCB559MRK0A Control panel frame with key unit VMOC206SG 1 3 2 FPNLCB560MRK0A Control panel frame with key unit VMO...

Страница 35: ...06BK 1 BT 5 FCOV B426 KIT Door frame assembly VMOC206WH 1 BT 5 FCOV B411 KIT Door frame assembly VMOC206SS 1 BT 5 FCOV B428 KIT Door frame assembly VMOC206BT 1 BT 5 FCOV B429 KIT Door frame assembly V...

Страница 36: ...2 XOTS740P12000 Screw 4mm x 12mm 4 AA 7 3 XCTWW40P08000 Screw 4mm x 8mm 2 AA 7 4 XHTS740P08RV0 Screw 4mm x 8mm 4 AA 7 5 LX CZ0052WRE0 Special screw 2 AA 7 6 XWVS760 07000 Washer 6mm x 0 7 mm 1 AA 7 7...

Страница 37: ...2 1 7 2 7 7 19 1 18 7 16 7 1 1 2 1 4 4 13 1 1 7 19 1 4 4 18 4 19 4 10 4 12 7 9 7 16 4 11 1 6 1 9 7 17 4 9 7 23 7 6 1 16 4 29 4 6 7 24 2 4 7 4 2 11 7 22 4 20 7 7 1 11 4 8 4 24 4 16 7 18 1 4 4 27 4 27 7...

Страница 38: ...ONTROL PANEL PARTS DOOR PARTS MISCELLANEOUS 5 2 5 9 5 1 5 5 8 5 4 5 8 5 8 5 8 5 5 5 3 5 7 5 6 5 10 5 11 7 24 7 24 3 5 3 4 3 7 3 3 3 2 3 2 1 3 6 3 1 3 2 3 3 7 3 2 2 3 9 3 8 Actual wire harness may be d...

Страница 39: ...1 2 3 A B C D E F G H A B C D E F G H 4 3 TURNTABLE TRAY 6 9 VIKING CD 4 2 TURNTABLE SUPPORT TRAY PACKING FOAM DOOR PROTECTION SHEET MICROWAVE OVEN TOP PAD ASSEMBLY PLASTIC BAG TRAY HOLDER BOTTOM PAD...

Страница 40: ...tem or transmitted in any form or by any means electronic mechanical photocopying recording or otherwise without prior written permission of the publisher COPYRIGHT 2011 BY VIKING ALL RIGHTS RESERVED...

Отзывы: