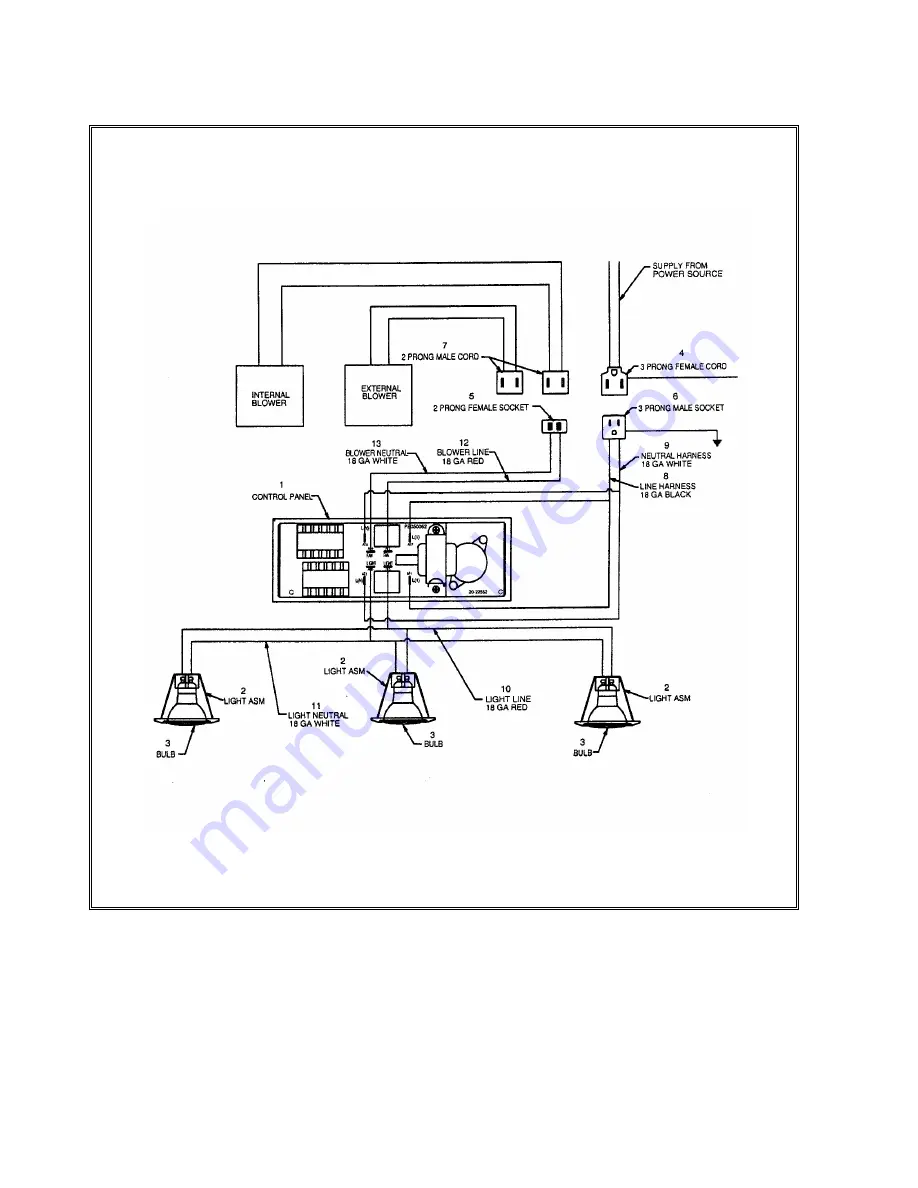
WIRING DIAGRAM
BUILT-IN DESIGNER HOODS
REFER ONLY TO FEATURES EQUIPPED WITH THIS UNIT.
18
Страница 1: ...Viking Installation Guide Designer Series Built In Custom Ventilator System...
Страница 2: ...he National Fire Protection Association NFPA and the American Society for Heating Refrigeration and Air Conditioning Engineers ASHRAE and the local code authorities 3 When cutting or drilling into wal...
Страница 3: ...stated 2 Duct run length is for general reference only for longer duct runs increase duct size and contact a qualified and trained installer Straight runs and gradual turns are best for example each 9...
Страница 4: ...OOD INSTALLATION Plan where the ductwork will be located See pages 12 13 for rough in dimensions Install proper sized duct work and roof or wall cap for the type of blower you are using Adjust your me...
Страница 5: ...s Make sure the back wall of the custom hood canopy is flush with the cutout so the ventilator system may be mounted as shown below Custom Hood Canopy 1 Position ventilator system inside of the custom...
Страница 6: ...red by screw heads 2 Lift ventilator into position inside the hood 3 Fasten ventilator to four 4 THREADED STUDS using four 4 HEX NUTS provided 4 Plug ventilator s POWER CORD into RECEPTACLE inside the...
Страница 7: ...n inside the hood 3 Engage 2 tabs on ventilator into 2 slots in top of hood 4 Fasten ventilator to two 2 THREADED STUDS using two 2 HEX NUTS provided 5 Plug ventilator s power cord into receptacle ins...
Страница 8: ...tion below 4 Wire black to black white to white and green or bare ground to green ground screw provided Replace wiring box cover Make sure to connect remote wires to 2 prong male cord and service to 3...
Страница 9: ...upper two thirds of the shingles around the cutout area Carefully lift the shingles to allow the back flashing sheet on the blower housing to fit under them 9 Center the blower ring in the 11 27 9 cm...
Страница 10: ...cm diameter hole making sure that the 11 4 3 2 cm diameter electrical wiring hole aligns with the hole in the wiring box 9 Attach blower to the wall with the six screws provided It is recommended tha...
Страница 11: ...the top and sides of the cutout area only Carefully lift the shingles to allow the back flashing sheet on the blower housing to fit under them 9 Center the blower ring in the 11 27 9 cm diameter hole...
Страница 12: ...3 2 cm diameter electrical wiring hole aligns with the hole in the wiring box 9 Attach blower to the wall with the six screws provided All six holes in the back panel must be filled or any moisture th...
Страница 13: ...243 4 62 9 cm 151 2 39 4 cm 281 4 71 8 cm DEV900 DEV1200 DEV1500 22 1 8 56 2 cm B 10 1 8 25 7 cm A 29 1 2 74 9 cm 10 25 4 cm Dia Opening for wiring Flashing Flashing Opening for wiring 3 1 2 8 9 cm 6...
Страница 14: ...duct required 7 Round for External Ventilation Duct 16 40 6 cm 6 15 2 cm 6 1 8 15 6 cm A B C 120V 2 5 1 cm 3 4 1 9 cm 8 20 3 cm 5 12 7 cm 16 40 6 cm 6 15 2 cm 1 2 5 cm 11 3 4 29 8 cm For 900 or 1200...
Страница 15: ...cm 11 3 4 29 8 cm For 880 CFM Internal and 1200 or 1500 CFM External Ventilation Installation For 880 CFM Internal and 1200 or 1500 CFM External Ventilation Installation 10 dia duct required 47 5 8 1...
Страница 16: ...10 dia duct required Dim 36 W 42 W A 35 5 8 41 5 8 90 5 cm 105 7 cm B 34 5 8 40 5 8 87 9 cm 103 2 cm C 17 13 16 20 13 16 45 2 cm 52 9 cm 16 40 6 cm 6 15 2 cm A B C 2 5 1 cm 16 40 6 cm 6 15 2 cm A B C...
Страница 17: ...M Internal and 1200 or 1500 External Ventilation Installation For 880 CFM Internal and 1200 or 1500 CFM External Ventilation Installation 10 dia duct required 24 61 0 cm 10 25 4 cm 53 5 8 136 2 cm 52...
Страница 18: ...WIRING DIAGRAM BUILT IN DESIGNER HOODS REFER ONLY TO FEATURES EQUIPPED WITH THIS UNIT 18...
Страница 19: ...8I PS042707J Viking Range Corporation 111 Front Street Greenwood Mississippi 38930 USA 662 455 1200 For more product information call 1 888 VIKING1 845 4641 or visit the Viking Web site at vikingrange...