


1.
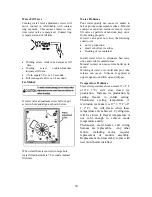
Leave jumper in for half of revolution.
Touch heater mold. If heater mold feels
warm, heater is working properly
2. Remove jumper. Water valve will be
energized in last half of revolution if mold
heater has not failed.
Ice Maker
Module Ohmmeter Check
No power to Ice Maker and
Ejector Blades in End of Cycle Position
Test Points Component
Module Position
Ohms
L-H
Mold & Heater Attached to Support 264
L-M
Motor
Separated form Heater 16,100
Module Voltage Checks with Meter or Test Light
Power to Ice Maker
Test Points Component Line Voltage
0 Volts
L-N
Module
Power On
Power Off
T-H
Bimetal
Open
Closed
L-H
Heater
On
Off
L-M
Motor
On
Off
N-V
Water Valve On
Off
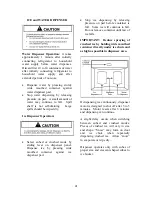
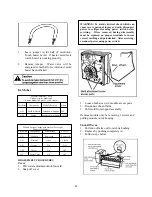
DISASSEMBLY PROCEDURES
Cover
1. Pull water adjustment knob forward.
2. Snap off cover.
WARNING: To avoid electrical shock which can
cause severe personal injury or death, disconnect
power to refrigerator using power switch before
servicing. Wires removed during disassembly
must be replaced on proper terminals to insure
correct earthing and polarization. After servicing,
reconnect power using power switch.
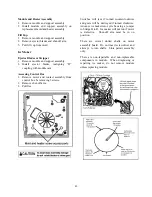
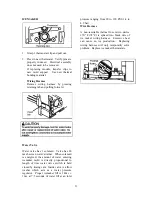
1. Loosen both screws in module access ports.
2. Disconnect shut-off arm.
3. Pull mold from support assembly.
Remove module only be removing 3 screws and
pulling module out of housing.
Shut-Off Arm
1. Pull shut-off arm out from white bushing.
2. Replace by pushing completely in.
3. Follow steps below.
48
Содержание DFSB483D
Страница 1: ...VCSB483D DFSB483D DDSB483D COVER F90597...
Страница 4: ...VCSB483D with ICE and WATER 4...
Страница 5: ...CABINET AIR FLOW 5...
Страница 6: ...MACHINE COMPARTMENT AIR FLOW 6...
Страница 7: ...REFRIGERANT FLOW 7...
Страница 8: ...WATER FLOW 8...
Страница 27: ...VCSB483 WIRING DIAGRAM 27 27...
Страница 28: ...VCSB483D WIRING DIAGRAM DISPENSER MODEL 28...
Страница 38: ...CONTROL BOARD OPERATION 38...
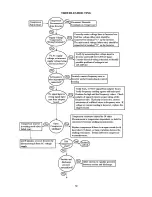
Страница 39: ...TROUBLESHOOTING 39...
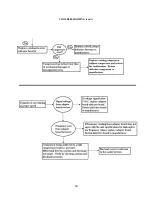
Страница 40: ...TROUBLESHOOTING con t 40...
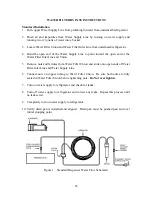
Страница 45: ...45...


