background image

ViewSonic

 Wireless PCI Adapter

7

8.

Complete the Wireless Configuration procedure for your operating
system:

If you are using 

Window XP

, complete the instructions in the next 

section, Wireless Configuration.

If you are using 

Windows 98SE, ME, or 2000

, see the Appendix for 

configuration instructions.

Wireless Configuration 

SUGGESTION: 

To configure your WPCI-100, you will need the

configuration settings (Network Name [SSID], security settings, etc.) of your
wireless router or gateway. For your convenience, write down these settings
for later reference.

To configure your WPCI-100 with Windows XP, do the following:
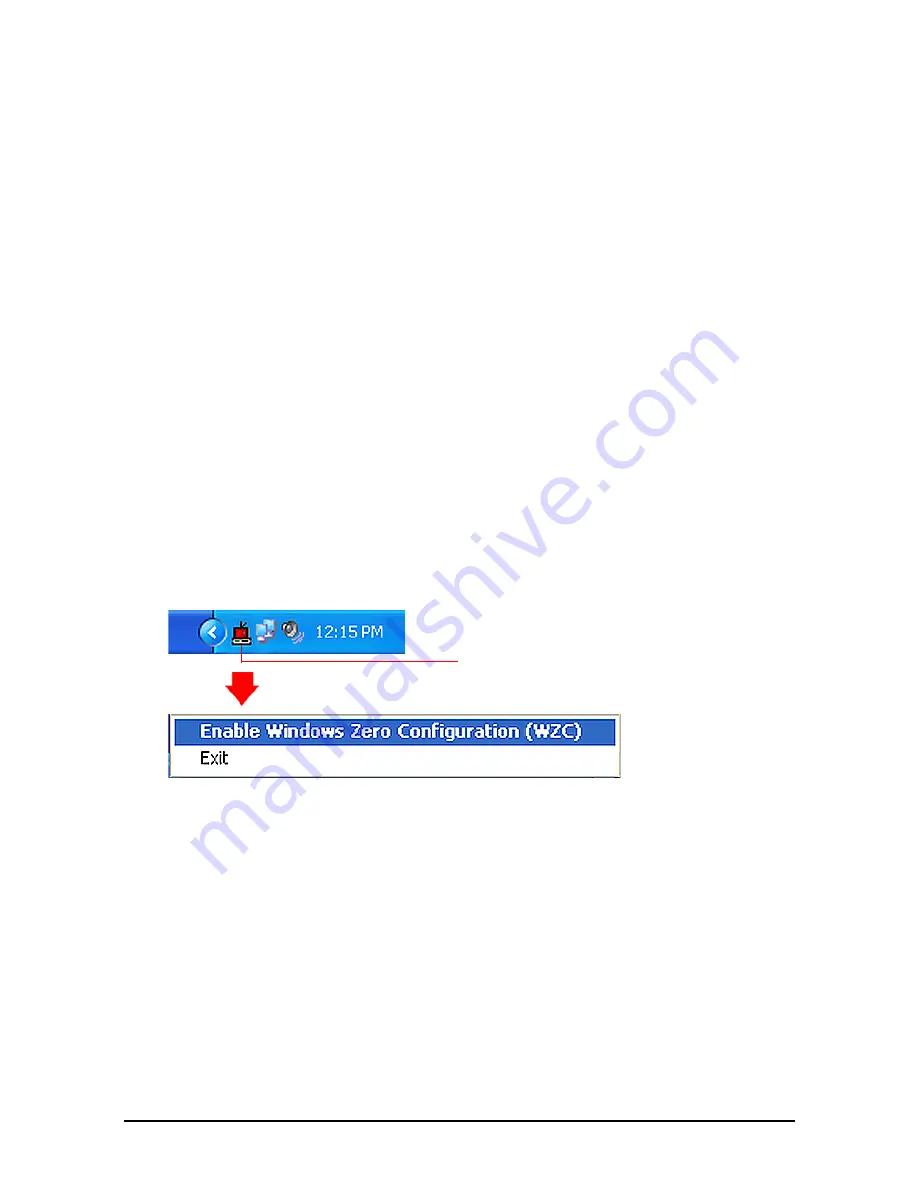
1.

From the Windows XP desktop, right-click the 

Wireless Monitor

 utility

icon on the Windows status bar (shown below), then select 

Enable

Windows Zero Configuration (WZC)

.

The 

Wireless Network Connection

 screen displays.

Wireless Monitor utility icon

Содержание WPCI-100

Страница 1: ...User Guide Wireless 802 11g PCI Adpter ViewSonic WPCI 100 Wireless PCI Adapter...

Страница 2: ...ments 3 Wireless Network Overview 3 Installation 4 NOTE for Windows 98 SE 6 Wireless Configuration 7 Verifying a Successful Installation 10 Uninstalling the Drivers 10 Chapter 3 Appendix Wireless Conf...

Страница 3: ...ng this material or the performance or use of this product In the interest of continuing product improvement ViewSonic Corporation reserves the right to change product specifications without notice In...

Страница 4: ...wireless networks Package Contents Features Up to 54Mbps signal rate at a frequency of 2 4GHz Wireless security using WEP or WPA with TKIP encryption and EAP type Authentication Supports both 802 11b...

Страница 5: ...2 Installation System Requirements Microsoft Windows XP Windows 2000 Windows ME or Windows 98 Second Edition SE Available PCI slot 300MHz processor or higher Minimum 5MB free disk space Minimum 32MB R...

Страница 6: ...d in the Appendix To install your ViewSonic WPCI 100 Wireless 802 11g PCI Adapter do the following 1 Insert the supplied Network Companion CD into the CD ROM drive of your PC The software automaticall...

Страница 7: ...apter 5 3 From the next screen shown below click WPCI 100 Driver Installation 4 Complete the InstallShield Wizard instructions starting with the screen shown below 5 After completing the on screen ins...

Страница 8: ...to restart your PC again and or insert the Windows 98 SE CD Please follow these instructions 6 With your PC powered off plug in WPCI 100 Wireless PCI Adapter into an available PCI slot 7 When the Fou...

Страница 9: ...ESTION To configure your WPCI 100 you will need the configuration settings Network Name SSID security settings etc of your wireless router or gateway For your convenience write down these settings for...

Страница 10: ...lick Connect See the Wireless Network Connection screen shown on the previous page If you selected an SSID with a network key enter it in the Network key field re enter it in the Confirm network key f...

Страница 11: ...and or the router or gateway connected to your wireless network If you want to change add an SSID or network key change the configuration settings on your wireless router or gateway repeat the WPCI 10...

Страница 12: ...Device Manager 3 In the opened screen expand Network Adapters double click Wireless 802 11g Network Adapter NOTE If the WPCI 100 is installed properly there will NOT be a red or yellow icon next to W...

Страница 13: ...curity settings etc of your wireless router or gateway For your convenience write down these settings for later reference Before you start configuring your WPCI 100 be sure you complete the Installati...

Страница 14: ...Profile Setting tab shown above then click Add 3 Enter the wireless configuration settings that are consistent with your router gateway etc This includes Profile Name optional SSID network name Netwo...

Страница 15: ...installing it Check the distance to your router or gateway It should be within 100 feet of your computer Uninstall the WPCI 100 driver software restart your PC then repeat the installation and wirele...

Страница 16: ...a card currently in slot 1 to another slot in your PC Troubleshoot conflicts among your device resources Look for conflicts among your device resources Try using Windows Troubleshooting to verify tha...

Страница 17: ...nd avoid using them while connected to your network To minimize interference from another wireless network try changing channels on your router Verify that you are using the correct wireless settings...

Страница 18: ...wsonic com T 886 463 4775 F 909 468 1202 United Kingdom service eu viewsoniceurope com T 0800 833 648 F 44 0 1293 643 910 Europe Middle East Baltic countries and North Africa service eu viewsoniceurop...

Страница 19: ...Mbps CE Diversity Scheme TX RX at main antenna Range 802 11g 54 Mbps up to 50 m LOS 20 m indoors 18 Mbps up to 150 m LOS 75 m indoors 802 11b 11 Mbps up to 180 m LOS 60 m indoors 1 Mbps up to 570 m LO...

Страница 20: ...RIGHTS AND DUTIES PLEASE SEE THE END USER LICENSE AGREEMENT EULA CONTAINED WITHIN THE SOFTWARE FOR YOUR PRODUCT How long the warranty is effective ViewSonic Wireless Network Adapter products are warr...

Страница 21: ...TNESS FOR A PARTICULAR PURPOSE Exclusion of damages VIEWSONIC S LIABILITY IS LIMITED TO THE COST OF REPAIR OR REPLACEMENT OF THE PRODUCT VIEWSONIC SHALL NOT BE LIABLE FOR DAMAGE TO OTHER PROPERTY CAUS...

Страница 22: ...d on the user is encouraged to try to correct the interference by one of the following measures Reorient or relocate the receiving antenna Increase the separation between the equipment and receiver Co...

Страница 23: ...he device 2 Operation in 2 4GHz band To prevent radio interference to the licensed service this device is intended to be operated indoors and away from windows to provide maximum shielding 3 Equipment...

Страница 24: ...ViewSonic Corporation...

Отзывы: