


AV1
AV2
RGB 1
RGB 2
AV3
MUTE
VOL
VOL
AV4
AUTO
PinP
OK
SIZE
RECALL
MENU
ID
ID SET
ID SET button
ID button
AUTO button
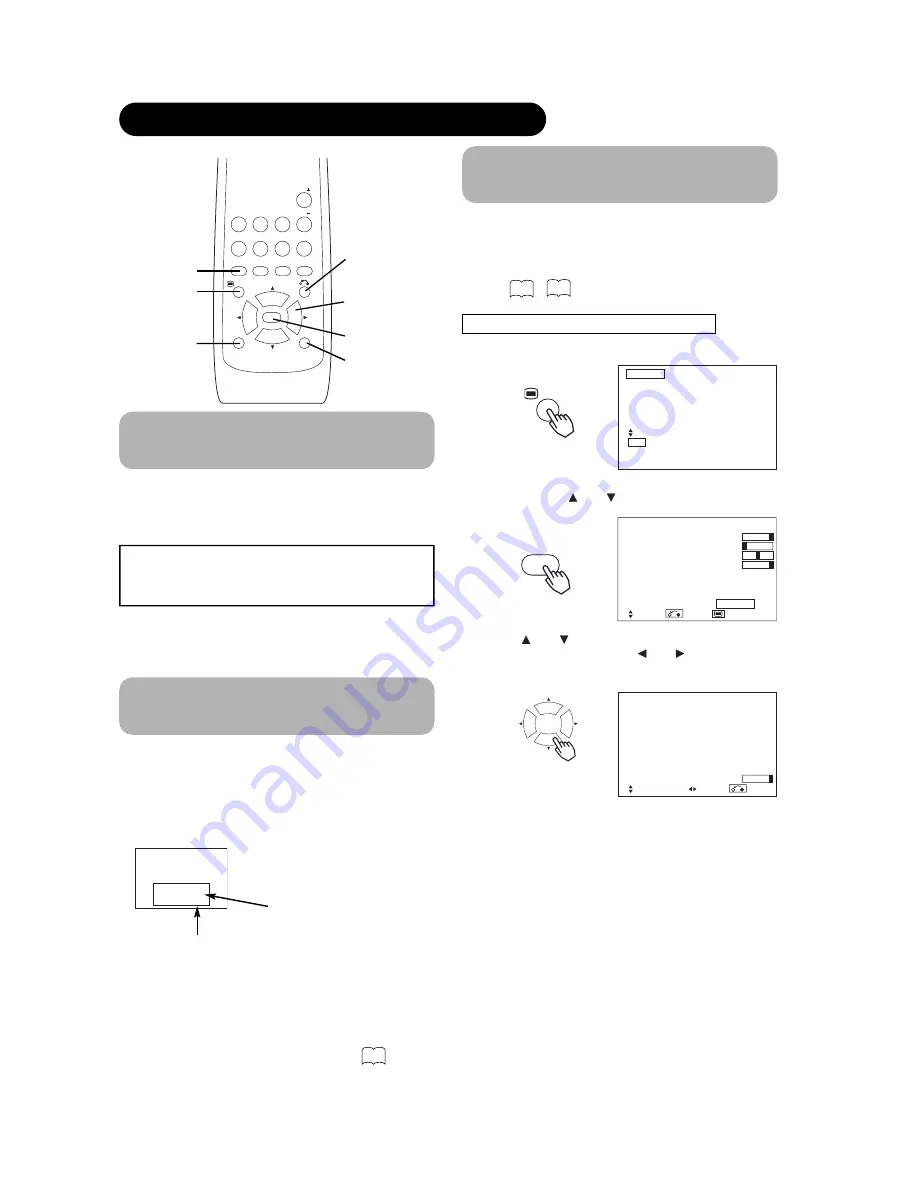
Using the Menu Screen
(On-screen display system)
When the MENU button
is
pre
ss
ed, the adju
s
tment menu
s
creen w
i
ll be d
is
played; from there, PC
si
gnal adju
s
tment
and
s
ett
i
ng
is
po
ssi
ble by u
si
ng the SELECT button,
ADJUST button and OK button.
• Refer to - concerning the adjustment items and the
settings.
Example: Select
i
ng the P
i
cture
s
creen
1. Pre
ss
the MENU button to d
is
play the Ma
i
n Menu
s
creen.
2. Pre
ss
the OK button to d
is
play the P
i
cture Menu
s
creen. (U
s
e
the and SELECT
button
s
to
s
elect
other
i
tem
s
.)
3. U
s
e
the and SELECT
button
s
to
s
elect the
i
tem to
be adju
s
ted and then u
s
e
the and ADJUST
button
s
to adju
s
t (example: Contra
s
t).
• Press the RETURN button to return to the previous screen.
• If there is no operation for a period of one minute, the
Adjustment Menu screen will be closed automatically.
MENU
OK
Picture
Contrast
: + 31
Brightness
: – 31
Color
: 0
Tint
: + 31
Picture Enhancement
: Off
Color Temperature
: Normal
Color Temp.Adjust
Reset
Reset
Select Return Exit
OPERATING INSTRUCTIONS (continued)
Independent Operation of
Multiple Monitors (ID No)
Sett
i
ng the ID No. of the remote control allow
s
s
eparate
control of up to a max
i
mum of
s
even mon
i
tor
s
.
Remote control ID No. 2 (
i
n
i
t
i
ally ID no. 1) can be
s
et by
pre
ssi
ng the ID SET button for 2
s
ec. or more wh
i
le
hold
i
ng down the ID button. The number w
i
ll be
i
ncremented (2
…
6
→
7
→
1
→
cont
i
nuou
s
ly.
The ID remote control
is
operated by pre
ssi
ng the
var
i
ou
s
button
s
wh
i
le hold
i
ng down the ID button;
Operat
i
on
is
po
ssi
ble only when the remote control and
mon
i
tor ID no
s
. are the
s
ame.
• The remote control can be operated normally by pressing the
various remote control buttons without holding down the ID button.
• Set the monitor using the ID No. of Function MENU.
Automatic Adjustment of
Screen Position and the Clock
Adju
s
tment of the
s
creen to a po
si
t
i
on
s
u
i
table for the PC
si
gnal and the clock adju
s
tment can be performed
automat
i
cally by pre
ssi
ng the AUTO button of the remote
control.
* Depending on the signal, satisfactory adjustment may not be
Setup Menu item.
ID Number
Monitor [ 1 ]
R/C [ 1 ]
Monitor ID no.
Remote control ID no.
The remote control ID no. can be
checked by pressing the ID SET button
while holding down the ID button.
22
20
24
MENU button
OK button
SELECT/ADJUST
buttons
Picture
Audio
Timer
Function
Setup
Language
Select
OK Set
Contrast
+ 31
Next / Prev Adjust Return
ViewSonic
VPW5500
19
RETURN button
possible. In such a case, adjust by referring to the
2) when th
is
button is pre
ss
ed
IMPORTANT
(RGB1 or RGB2) and for each signal.
Select the Automatic Adjustment of Screen Position for each input
Содержание VPW5500
Страница 1: ...User Guide Guide de l utilisateur Guía del usuario VPW5500 PLASMA DISPLAY 55 ...
Страница 36: ...SUPPLEMENT ViewSonic VPW5500 33 ...
Страница 54: ...ViewSonic Corporation ...


