background image

Operation

38

Vidikron VL-37 Owner’s Operating Manual

• Save Settings: 

For each input and supported resolution, the DView lets you save image 

quality settings as presets that you can recall at a later time. You can create up to three 
presets -- designated “Custom,” “ISF Day” and “ISF Night” -- per input and resolution. 

You should save changes to any of the following settings to a preset; otherwise they will 
be lost when a new input source or resolution is selected:

• Aspect ratio

• Brightness

• Contrast

• Color saturation

• Tint

• Sharpness

• Gamma

• Color temperature and white balance

To save image settings to a preset, select Save Settings from the ISF Calibration menu and 
select “Custom,“ “ISF Day” or “ISF Night.” 

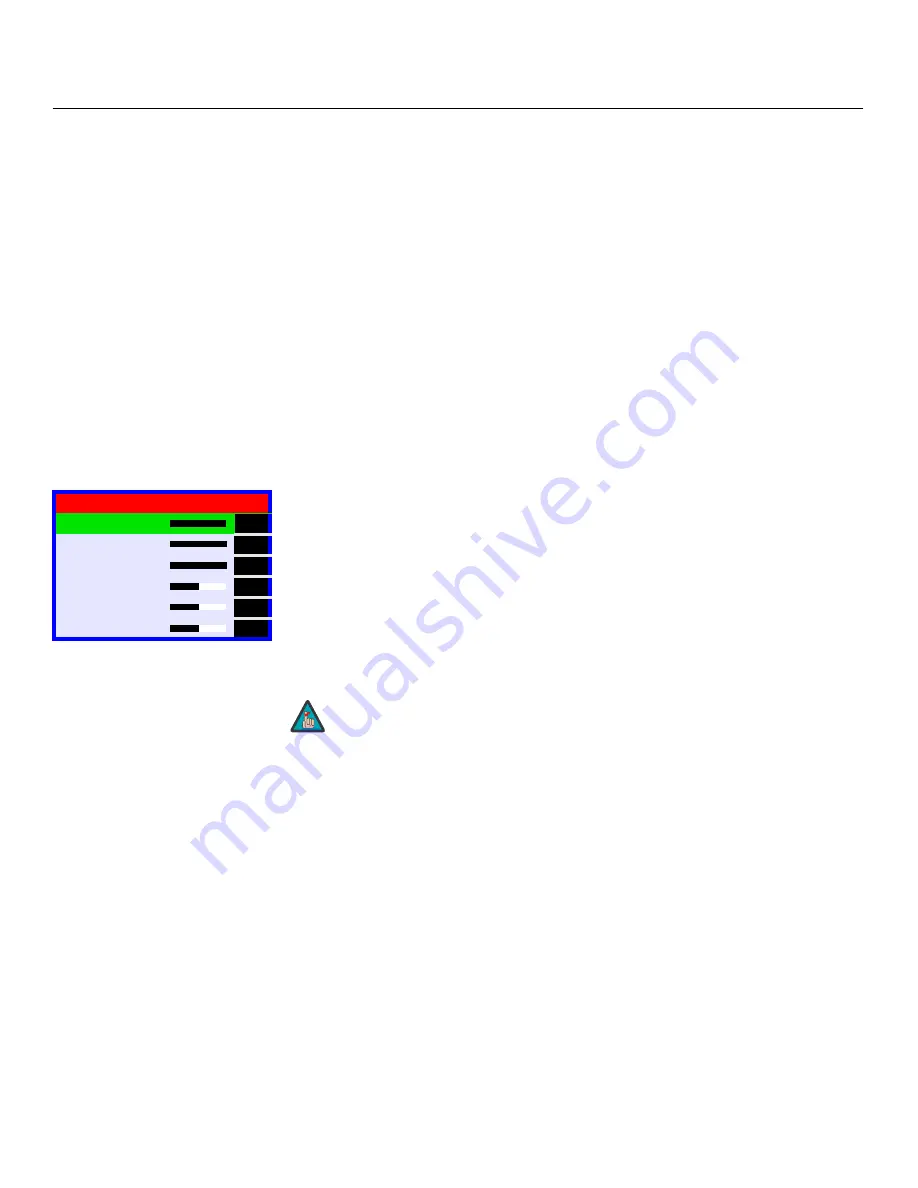
White Balance: 

To remove any trace of color from the white areas of the projected image, 

choose White Balance from the Picture Adjust menu and press 

ENTER

• Gain: 

Use the Gain controls to correct color imbalances in the bright areas of the image. A 

good way to do this is to use a test pattern consisting mostly of solid white areas, such as 
an 80 IRE “window” pattern. If the white areas contain traces of red, green or blue, 
decrease the Gain for that color.

• Offset: 

Use the Offset controls in the White Balance sub-menu to correct color imbalances 

in the dark areas of the image. A good way to do this is to use a test pattern consisting 
mostly of dark gray areas, such as a 30 IRE “window” pattern. If the gray areas contain 
traces of red, green or blue, decrease the Offset for that color.

Blue Enable: 

Blue Enable removes all red and green color information from the image, 

simulating a blue filter. You can use it instead of a blue filter when performing color and tint 
adjustments. 

DNR: 

To apply Digital Noise Reduction (DNR) to the input signal, select DNR from the ISF 

Calibration menu. Noise reduction is useful for clearing up noisy RGB images such as those 
from a PC. Adjust as desired using the left- or right-arrow buttons, keeping in mind that 
reducing noise (which reduces high frequencies) may also “soften” the image.

Gamma: 

The Gamma control determines how gray shades are displayed between minimum 

input (black) and maximum input (white) for all signals. A good gamma setting helps to 
optimize blacks and whites while ensuring smooth transitions for the “in-between” values 
utilized in other grays.

Unlike brightness and contrast controls, Gamma allows you to lighten or darken the overall 
tone of your images without changing the extremes. All images will be more vibrant while 
still showing good detail in dark areas.

The default Gamma setting of 2.2 is appropriate for most typical home theater environments.

White Balance

R Gain

100

G Gain

100

B Gain

100

R Offset

50

G Offset

50

B Offset

50

Any white balance adjustments you make here are automatically stored 
as a “Custom” color temperature. 

Note

Содержание DView VL-37HD

Страница 1: ...VL 37HD HIGH DEFINITION FLAT PANEL LCD MONITOR VERSION 1 2 O W N E R S O P E R A T I N G M A N U A L...

Страница 2: ......

Страница 3: ...displayed in the 4 3 aspect ratio mode black or gray stripes but no picture information is present on the left and right edges of the screen are used as infrequently as possible This will prevent perm...

Страница 4: ...g hours providing location of product is within normal operating distance from a Vidikron Authorized Service Center In some instances it may be necessary for the product to be returned to the Vidikron...

Страница 5: ...________________________ Model Purchased Date ____________________________________________________________________________________________________________ Serial Number _______________________________...

Страница 6: ...gital apparatus meets all requirements of the Canadian Interference Causing Equipment Regulations Please read and follow the safety precautions listed below to ensure the equipment is free from damage...

Страница 7: ...nefits 3 Parts List 4 2 Controls and Functions 5 DView at a Glance 5 Controls and Indicators 5 Connectors 6 DView Remote Control 8 3 Installation 13 Remote Control 13 Notes on Batteries 13 Notes on Re...

Страница 8: ...Picture In Picture PIP 40 Changing the PIP Position 41 Changing the PIP Size 42 Changing the PIP Aspect Ratio 42 Changing the PIP Image Mode 42 Swapping the Main and PIP Images 43 Swapping the Main a...

Страница 9: ...mposite and S Video Connections 19 3 5 Monitor Output Connections 20 3 6 Connecting Headphones 20 3 7 RS 232 Control System Connection 21 4 1 DView OSD Menu Structure 25 4 2 Typical PLUGE Pattern for...

Страница 10: ...List of Figures x Vidikron VL 37 Owner s Operating Manual Notes...

Страница 11: ...d them to info vidikron com Textual and Graphic Conventions Text Conventions The following conventions are used in this manual in order to clarify the information and instructions provided Remote cont...

Страница 12: ...gnificance They also provide supplemental information CAUTIONS alert users that a given action or omitted action can degrade performance or cause a malfunction WARNINGS appear when a given action or o...

Страница 13: ...ing and Parental Control V Chip functionality as well as multi language support The display includes an integrated stereo audio system incorporating surround sound technology with 2 way speakers and g...

Страница 14: ...e missing or damaged please contact your Vidikron dealer or Vidikron Customer Service at 888 4VIDIKRON VL 37 LCD Display Remote Control Unit and two 2 AAA size batteries AC Power Cord Warranty informa...

Страница 15: ...cators 1 TV AV Button Input Source Selection 2 MENU Selection Button 3 Volume Adjustment Buttons 4 Channel Selection Buttons 5 Remote Control Sensor 6 Power Indicator Lights red to indicate that the D...

Страница 16: ...Jack 5 Main Power Switch 6 Power Input 100 to 240 VAC Connect the DView to power here 7 RGB HD A 15 pin VGA connection to a personal computer The DView automatically detects the signal resolution 480i...

Страница 17: ...Input 3 source here 13 INPUT 4 Component Video RCA connectors 14 INPUT 4 Composite Video Input 15 INPUT 4 Audio Input Connect the audio output from your Input 4 source here 16 INPUT 1 COMPOSITE VIDEO...

Страница 18: ...Figure 2 3 DView Remote Control 4 5 0 100 1 2 3 6 RGB HD TV DVI MEMORY TIMER TIMER OFF OFF MENU MENU EXIT EXIT ENTER ENTER INPUT INPUT 1 7 8 9 ASPECT SIZE POSITION PIP P MODE SWAP TV AV S SWAP OFF ON...

Страница 19: ...s this button to switch to the Digital Video input RGB HD Press this button to switch to the RGB HD input TV Not used with this model 5 Memory Preset Buttons CUST Press to recall settings for the curr...

Страница 20: ...em or confirm a changed setting 8 MENU Press this button to access the on screen display OSD controls or to exit the current menu and return to the previous one 9 EXIT Press this button to hide the OS...

Страница 21: ...er presets CUSTOM STANDARD MUSIC FILM or SPEECH SURRND Surround Press this button to turn Surround Mode on or off MTS SAP Multichannel Television Sound Second Audio Program Press this button repeatedl...

Страница 22: ...Controls and Functions 12 Vidikron VL 37 Owner s Operating Manual Notes...

Страница 23: ...e the batteries to avoid damage from battery leakage Notes on Remote Control Operation Do not drop the remote control or expose it to moisture or high temperature The remote control may malfunction un...

Страница 24: ...Step Procedure For Details refer to page 1 Mount the DView on a wall optional 15 2 Connect signal sources to the DView 16 3 Connect external controller to RS 232 port optional 21 4 Apply power to the...

Страница 25: ...done by a custom installation specialist Ambient Light In general minimize or eliminate light sources directed at the display Contrast ratio in your images will be noticeably reduced if light directly...

Страница 26: ...View to Source Components Connect your video sources to the DView as shown and described in the sections that follow DVI Connections The DView has a DVI input for connecting a DVD player DTV decoder p...

Страница 27: ...ing Manual 17 Figure 3 1 DVI or HDMI Source Connections Audio Cable DVI D or HDMI Cable 1 2 3 4 5 6 7 8 9 10 11 12 13 14 15 16 17 18 19 20 21 22 23 24 Audio Cable Sold Separately DVI D Cable Sold Sepa...

Страница 28: ...signals other than those listed may cause some functions not to work 2 Some Macintosh computers may require a Macintosh video adapter Contact your nearest authorized service center or dealer 3 This D...

Страница 29: ...hown in Figure 3 3 Figure 3 3 Component Video Connections Composite S Video Connections The DView has two 2 S Video and four 4 composite video inputs for connecting a VCR camcorder laser disc player o...

Страница 30: ...uipment as shown in Figure 3 5 You can route either the main or picture in picture PIP source to the monitor outputs For more information refer to Monitor Out on page 37 Figure 3 5 Monitor Output Conn...

Страница 31: ...me theater control automation system if present to the RS 232 port on the DView see Figure 3 7 For more information about using this connection refer to Serial Communications on page 47 Figure 3 7 RS...

Страница 32: ...Installation 22 Vidikron VL 37 Owner s Operating Manual Notes...

Страница 33: ...d approximately 10 seconds the DView will display an image 4 2 Changing the OSD Language The DView OSD language is initially set to English but can also display the menus in French Spanish Portuguese...

Страница 34: ...t 3 Press ENTER or the right arrow button to access that menu 4 Use the up or down arrow buttons to select the setting you want to change Then press ENTER or the right arrow button 5 Press the right o...

Страница 35: ...tom Backlight 0 5 10 15 20 100 Save Settings not available on RGB input Custom Restore Settings not available on RGB input Custom ISF Day ISF Night Audio Balance L10 L9 L8 0 R8 R9 R10 Equalizer Standa...

Страница 36: ...s ENTER Select the appropriate aspect ratio for the type of program material being viewed refer to Table 4 1 The currently selected aspect ratio is indicated by a green square to its left in the examp...

Страница 37: ...ard 4 3 scales the input signal to fit in the center of the 16 9 screen 4 3 is the aspect ratio used by computer monitors standard television programming and most VHS video cassettes Letterbox LET BOX...

Страница 38: ...Input3 Input4 2 S Video Input1 Input2 3 Video Input1 Input2 Input3 Input4 4 RGB 5 DVI Although it may be possible to obtain satisfactory picture quality using the naked eye and regular program materia...

Страница 39: ...of some combination of black white and gray areas against a black background The example above includes two vertical bars and four shaded boxes Select Brightness from the Picture Adjust menu Using the...

Страница 40: ...t arrow buttons adjust the contrast to a point just below which the white rectangle starts to increase in size Color Saturation On your external test pattern source select a color bar pattern like the...

Страница 41: ...n tint is decreased the image appears redder when it is increased the image appears greener To set the tint select Tint from the Picture Adjust menu While looking at the color bar pattern through a bl...

Страница 42: ...the top and bottom Lower the sharpness setting to eliminate them Figure 4 5 Typical Test Pattern for Adjusting Sharpness Color Temperature To adjust the color temperature select Color Temp from the Pi...

Страница 43: ...the corresponding buttons on the remote control Audio To adjust the DView audio settings select Audio from the Main Menu and press ENTER Balance To adjust the left right speaker balance select Balanc...

Страница 44: ...the quality of projected images from a computer or other VESA compliant RGB 480p or higher source select PC Mode Adjust and press ENTER Auto Adjust Auto Adjust automatically adjusts settings to optim...

Страница 45: ...embedding Internet data called Interactive TV Links or ITV Links in the captions CC On Mute To have the DView display captions when the audio output is muted set this option to Yes Parental Control To...

Страница 46: ...ER to confirm your choice Change PIN The default PIN for accessing the parental controls or bypassing content restrictions is 0000 Vidikron recommends changing this to something less obvious Letterbox...

Страница 47: ...creen slidebars to set the desired amount of horizontal and vertical overscan as well as horizontal and vertical image shift These settings only affect 480i source material For HDTV DVDs and other vid...

Страница 48: ...o use a test pattern consisting mostly of dark gray areas such as a 30 IRE window pattern If the gray areas contain traces of red green or blue decrease the Offset for that color Blue Enable Blue Enab...

Страница 49: ...ds sent from the serial controller PC or control automation system are logged and or displayed on screen If this is not desired set Command Ack to Off Factory Reset To reset all DView settings to thei...

Страница 50: ...PIP To use PIP press the PIP button The PIP window appears inside the main image window Press PIP again to switch to side by side PIP mode Press PIP again to turn PIP off MENU MENU EXIT EXIT ASPECT SI...

Страница 51: ...Main PIP INPUT 1 INPUT 2 INPUT3 INPUT4 PC VIDEO COMPONENT VIDEO COMPONENT RGB DVI INPUT1 X O O O O O O O INPUT2 O X O O O O O O INPUT3 VIDEO O O X X O O O O COMPO NENT O O X X O X X O INPUT4 VIDEO O O...

Страница 52: ...t ratios Changing the PIP Image Mode To recall settings for the PIP input from either the ISF Night or ISF Day memory preset press the P MODE button on the remote control Choose ISF Day when there is...

Страница 53: ...P button on the remote control Swapping the Main and PIP Audio Programs To swap the main and PIP audio programs press the S SWAP button on the remote control MENU EXIT ASPECT SIZE POSITION PIP P MODE...

Страница 54: ...ast signal by pressing the MTS SAP button on the remote control Choose Stereo for channels that are broadcasting in stereo Choose Mono for channels that are broadcasting in mono or if you are having d...

Страница 55: ...o sound Audio output is muted Volume setting is too low Press the MUTE button on the remote control Turn up the volume Image is too bright and or lacks definition in the bright areas of the image Cont...

Страница 56: ...Maintenance and Troubleshooting 46 Vidikron VL 37 Owner s Operating Manual Notes...

Страница 57: ...xecutes it and acknowledges it with a right bracket character followed by the four digit numeric code you sent for example 0002 When you send an invalid command the DView ignores it and returns N A in...

Страница 58: ...ple S4G0004 selects Input4 SAB 000 Power on off control 0 standby 1 on Example SAB0001 turns unit on SBA 000 Picture mode selection 0 Custom 1 ISF Night 2 ISF Day Example SBA0001 selects ISF Night SCA...

Страница 59: ...ry The response you receive from the unit if the command is valid will be a right bracket followed by the four digit numeric code you sent For example the ON command is key0015 the response will be 00...

Страница 60: ...n Arrow key 0018 Up Arrow key 0011 Left Arrow key 0046 ENTER key 0026 MENU key 0100 EXIT key 0063 ASPECT RATIO 0047 SIZE 0034 POSITION 0032 PIP 0037 P MODE 0052 S SWAP 0033 SWAP 0036 TV AV key 0053 S...

Страница 61: ...t combinations with up to 4 Composite 2 S Video 2 Component 1 DVI w HDCP 1 RGB 15 pin D sub 1 RS 232 5 Audio stereo RCA pairs Outputs 1 Composite 1 Audio stereo RCA pair output level is fixed Audio Sy...

Страница 62: ...rating Manual 7 2 DView Dimensions Figure 7 1 shows the DView dimensions Figure 7 1 DView Dimensions 42 52 in 1080 mm 29 13 in 740 mm 9 84 in 250 mm 1 57 in 40 mm 3 7 0 9 i n 9 4 2 m m 22 05 in 560 mm...

Страница 63: ...720x400 70 70 10 31 50 IBM 720x350 70 70 10 31 50 VESA 720x480 60 59 94 31 50 MAC 720x480 67 66 70 35 00 VESA 720x480 72 72 80 37 80 VESA 720x480 75 75 00 37 50 VESA 720x480 85 85 00 43 60 VESA 800x60...

Страница 64: ...Specifications 54 Vidikron VL 37 Owner s Operating Manual Notes...

Страница 65: ......

Страница 66: ...Vidikron 2900 Faber Street Union City CA 94587 510 324 5900 Fax 510 324 5905 1 888 4 VIDIKRON www vidikron com RUMA 011165 rev 01 25 06 v1 2 SERIAL NUMBER...

Отзывы: