background image

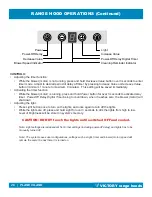
Power

Power-Off Delay

Decrease Value

Blower Speed Indicator

Light

Increase Value
Power-Off Delay Digital Tim

er

Cleaning Reminder Indicator

CONTROLS:

• 

Adjusting the timer function:

•  While the blower (motor) is not running, press and hold 

Decrease Value

 button over 3 seconds to enter 

timer mode.  Adjust to desired period of delay off timer by pressing 

Increase Value

 or 

Decrease Value


button (minimum 1 minute to maximum 9 minutes).  This setting will be saved immediately.

•  Activating the timer function:

•  While the blower (motor) is running, press and hold 

Power

 button for over 3 seconds to activate delay 

timer.  

Power-Off Delay Digital Timer

 being to countdown, when it reaches zero, the blower (motor) will 

shut down.

• 

Adjusting the light:

•  Press 

Light

 button once to turn on the lights, and once again to turn off the lights.

• 

While the lights are off, press and hold 

Light

 for over 3 seconds to dim the lights from high to low.  

Level of brightness will be stored in system’s memory.

CAUTION: DO NOT touch the lights until switched OFF and cooled.

Note: Light settings are independent from other settings (including power-off delay) and lights has to be 

manually turned off.

Note: The system saves user configurations, settings such as light, timer and blower (motor) speed will 

remain the same the next time it is turned on.

VICTORY range hoods

|   PLANE ISLAND

26

VICTORY range hoods


PLANE ISLAND    |    27

RANGE HOOD OPERATIONS (Continued)

Содержание PLANE-ISLAND

Страница 1: ...only Installer Leave this guide with the homeowner Homeowner Keep this guide for future reference Professional Island Range Hood Model Name Available Sizes PLANE ISLAND 30 36 42 48 Rev 3062u 3a INSTALLATION GUIDE AND USERS MANUAL ...

Страница 2: ... PartsSupplied 9 Dimensions 11 Preparation 15 Pre Installation 16 Installation 18 Venting Methods 23 Filter Installation 24 Range Hood Operations 25 Wiring Diagram 27 Troubleshooting 28 Use and Care Information 29 Maintenance 30 Bulb Replacement 31 Warranty 32 Disclaimer 33 Contact Us 33 VICTORY range hoods PLANE ISLAND 2 TABLE OF CONTENTS ...

Страница 3: ...r from being switched ON accidentally Clean grease laden surfaces frequently To reduce the risk of fire and to disperse air properly make sure to duct air outside DO NOT duct exhaust into spaces between walls crawl spaces ceiling attics and or garages Ducted fans MUST always be ducted to the outdoors Use only metal ductwork and this unit MUST be grounded Sufficient air is needed for proper combust...

Страница 4: ... to disperse the gas If you still smell gas call the gas company and fire department or dial your local emergency service immediately Your safety and the safety of others is very important We have provided many important safety mes sages in this manual and on your appliance Always read and obey all safety messages All safety messages will tell you what the potential hazard is tell you how to reduc...

Страница 5: ...s use The range hood must be connected with copper wire plug only The range hood should be connected directly to the fused disconnect or circuit breaker box through flexible armored or non metallic sheathed copper cable A U L or C S A listed strain relief must be provided at each end of the power supply cable Wiresizes copperwireonly andconnectionsmustconformwiththeratingoftheapplianceasspecifiedo...

Страница 6: ... roof opening around the cap USE 6 ROOF OR WALL VENT CAP MINIMUM IMPORTANT A minimum of a 6 round duct standard for this range hood must be used to maintain maximum airflow efficiency 8 or optiona 10 round duct should be used for Model 48 Always use rigid type metal aluminum ducts if available to maximize airflow when connecting to provided duct Please use Duct Run Calculation below to compute tot...

Страница 7: ...f 20ft is the longest that the straight ducting in addition to the duct pieces can be Body Stainless Steel Power Rating AC 110 120V 60Hz USA Canada standard General Input Power 260 W Motor 120W Lamp 4 x 35W 450 W Motor 2x120W Lamp 6 x 35W Motor Input Power 120 W Motor Revolution 800 RPM 10 to 1300 RPM 10 Levels Of Speed Control 6 Levels Maximum Airflow single motor 600 CFM double motor Model 48 10...

Страница 8: ...Putty Knife Marker or Pencil Tape Measure Level Phillips Screwdriver Aluminum Tape Power Drill Utility Knife Drywall Knife VICTORY range hoods PLANE ISLAND 8 REQUIRED TOOLS ...

Страница 9: ...oncrete Anchor x4 Screws included to assemble this Range Hood model NOTE Where necessary additional screws will be needed for installation and added support but is not included Please review contents before installation VICTORY range hoods PLANE ISLAND 9 PARTS SUPPLIED ...

Страница 10: ...del 42 shown 6 Ø Transition Models 30 36 42 only Upper Chimney Lower Chimney Frame Support with extensions Vent Flaps Models 30 36 42 only Transition Extension Models 30 36 42 only Flex Duct Models 30 36 42 only Ø 8 Transition for Model 48 only Ø 10 Transition optional for Model 48 only VICTORY range hoods PLANE ISLAND 10 PARTS SUPPLIED Continued ...

Страница 11: ...Ø 6 Transition 2 11 10 26 to 40 8 12 13 23 Available Sizes 29 35 41 12 BOTTOM VIEW SIDE VIEW FRONT VIEW TOP VIEW VICTORY range hoods PLANE ISLAND 11 DIMENSIONS ...

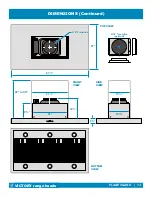
Страница 12: ...13 2 23 A 26 to 40 11 12 Model A 29 30 35 36 41 42 VICTORY range hoods PLANE ISLAND 12 DIMENSIONS Continued ...

Страница 13: ...Ø 8 Transition Ø 10 Transition optional 2 13 12 22 to 40 8 21 21 27 47 12 BOTTOM VIEW SIDE VIEW FRONT VIEW TOP VIEW VICTORY range hoods PLANE ISLAND 13 DIMENSIONS Continued ...

Страница 14: ...21 2 27 47 26 to 40 13 12 Model 48 VICTORY range hoods PLANE ISLAND 14 DIMENSIONS Continued ...

Страница 15: ...g 1 Determine and mark the center line on the ceiling where the range hood will be installed Make sure there is proper clearance within the ceiling or wall for exhaust duct 2 Due to the weight and size of this unit please make sure that the support system or framework being used is stable and secure in the ceiling 3 Put a thick protective covering over counter top cook top or range to protect from...

Страница 16: ...f the range hood support 2 Install an electrical outlet from the ceiling in between the braces Use 6 Ø duct with elbow connection for side vent 4 Screw the frame onto the drywall where the wood braces are which will provide support Recommended to use this type of brace support when installing side wall vent system Duct protruding from ceiling should be 5 minimum in length Use a shallow electrical ...

Страница 17: ...e divide between joists 3 Thread the electrical outlet and duct through the main frame of the range hood support 2 Install an electrical outlet from the ceiling in between the braces Use 6 Ø duct for top vent 4 Screw the frame onto the drywall where the wood braces are which will provide support Use a shallow electrical box Duct protruding from ceiling should be 5 minimum in length VICTORY range h...

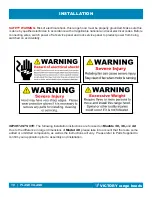
Страница 18: ... service panel to preduct power from being switched on accidentally IMPORTANT NOTE The following installation instructions are focused on Models 30 36 and 42 Due to the difference in larger dimensions of Model 48 please take into account that there are some added or ommitted components as well as the instructions will vary Please refer to Parts Supplied to confirm your application prior to assembl...

Страница 19: ... if your vent cap already has flaps built in 3 Attach a flex duct not included to the extension 2 Attach extension to the transition to protect vent flaps for installation 4 Use aluminum foil tape to secure a proper seal VICTORY range hoods PLANE ISLAND 19 INSTALLATION ...

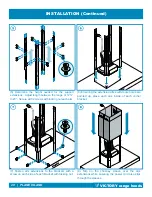
Страница 20: ...extensions to the brackets with a screw on each side of each bracket with locking nut 6 Ensuring the extension arms with more holes are pointed up place each arm inside of each corner bracket 8 Slip on the chimney sleeve over the arm extensions while ensuring the power cord also slips through the sleeves VICTORY range hoods PLANE ISLAND 20 INSTALLATION Continued ...

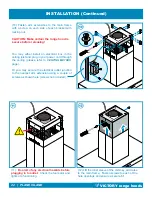
Страница 21: ...eiling NOTE Use a stable platform to rest the range hood and or receive assistance to hold on range hood Connect the flex duct from the range hood to the ducting in the ceiling Use aluminum foil tape to secure a proper seal VICTORY range hoods PLANE ISLAND 21 INSTALLATION Continued ...

Страница 22: ...lease refer to VENTING METHOD page Or you may secure the electrical outlet junction to the nearest arm extension using a couple of screws as shown here screws not included 11 Be alert of any electrical hazards before plugging in to outlet Check the fan motor and lights are functioning 12 Lift the inner sleeve of the chimney and raise to the main frame Fasten screws to each of the hole openings and...

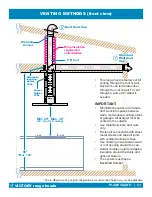
Страница 23: ...ER exhaust air or terminate duct work into spaces between walls crawl spaces ceiling attics or garages All exhaust must be vented to the outside Use metal aluminum duct work only Fasten all connections with sheet metal screws and tape all joints with certified Aluminum Tape Use caulking to seal exterior wall or roof opening around the cap Colder climates require wrapping insulation around the duct...

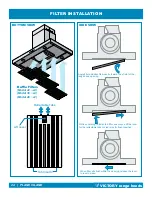
Страница 24: ...r and direct tab inserts toward the aft slot of the range hood opening While continuing to install the filter ensure you lift the lever for the retractable tabs to clear way for flush insertion When filter sits flush within the opening release the lever to lock in place VICTORY range hoods PLANE ISLAND 24 FILTER INSTALLATION ...

Страница 25: ...er This range hood is equipped with a cleaning reminder that will activate following 30 hours of use The blower motor running time starts to accumulate when it first rotates when the running time reached 30 hours the Cleaning Reminder Indicator C flashes and reminds user to clean the range hood After cleaning the filter and when the motoris not in use press and hold Increase Value button over 3 se...

Страница 26: ...ctivate delay timer Power Off Delay Digital Timer being to countdown when it reaches zero the blower motor will shut down Adjusting the light Press Light button once to turn on the lights and once again to turn off the lights While the lights are off press and hold Light for over 3 seconds to dim the lights from high to low Level of brightness will be stored in system s memory CAUTION DO NOT touch...

Страница 27: ...MO 2 MO 3 MO 4 MO 5 MO 6 FAN1 FAN2 FAN3 FAN4 FAN5 FAN6 LAMP L LAMP N LIGHTS M Capacitor Yellow Yellow White Blue Pink Red Orange Purple Brown White 110V Black 110V L N Plug to Outlet VICTORY range hoods PLANE ISLAND 27 WIRING DIAGRAM ...

Страница 28: ...se and vibrations Check if duct is clogged or if damper unit is not installed correctly or open ing properly A tight mesh on a side wall cap unit might also cause restriction to the air flow 4 The lights work but the blower is not spinning at all is stuck or is rattling The blower might be jammed or scraping the bottom due to shipping damage Please con tact us immediately 5 The hood is not venting...

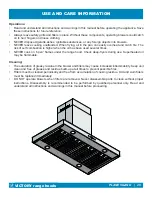
Страница 29: ... cook on open flames under the range hood Check deep fryers during use Superheated oil may be flammable Cleaning The saturation of greasy residue in the blower and filters may cause increased inflammability Keep unit clean and free of grease and residue build up at all times to prevent possible fires Filters must be cleaned periodically and free from accumulation of cooking residue Old and worn fi...

Страница 30: ...l polish such as 3M or ZEP to polish and buff out the stainless luster and grain Always scrub lightly a with clean cotton cloth and with the grain DO NOT allow deposits to accumulate or remain on the hood DO NOT use ordinary steel wool or steel brushes Small bits of steel may adhere to the surface and cause rusting DO NOT allow salt solutions disinfectants bleaches or cleaning compounds to remain ...

Страница 31: ...U10 120V Light Bulb Using the Inner Ring Opener Make sure the range hood is unplugged or turn OFF breaker Make sure the lights are cool to touch carefully align the arrow on the inner ring with the arrow on the outer ring where it says OPEN with the Inner Ring Opener as shown in Figure 1 The inner ring will loosen and the light bulb will be available for removal as shown in Figure 2 Install a new ...

Страница 32: ...correctly or has been sold as second hand What is Not Covered Consumable parts such as light bulbs metal and charcoal filters The natural wear of finish and wear due to improper maintenance use of corrosive and abrasive cleaning products pads and oven cleaner products Chips dents or cracks due to abuse misuse freight damage or improper installation Damage of product caused by accident fire floods ...

Страница 33: ...od working condition with ALL original parts and documentation packed in all original cartons fillers and shipping cartons A restocking fee of 10 will be charged for all approved return s Exchanges or returns will not be accepted if the unit has been installed and may be rejected if parts are missing Make sure to inspect the hood for damages and defects before installation Appearance flaws of the ...

Страница 34: ...583 Nicola Avenue Port Coquitlam BC Canada V3B 0M3 www kitchenhoods ca ...

Отзывы: