background image

10


When carrying the tile saw, hold only by transport handles, do not 
hold by saw shields.

CAUTION! This device is designed to operate indoors.

The design is assumed to be safe, protection measures and 
additional safety systems are used, nevertheless there is always 
a small risk of operational injuries.

CONSTRUCTION AND USE

Ceramic tile saw is designed for dry and wet cutting of small and 
medium ceramic tiles, appropriate for size of the tile saw. The tile saw 
must not be used for cutting wood or metal. Use only cutting blades 
designed for ceramic tile saw. Do not use segmented cutting discs. 
Ceramic tile saw is designed for all works from the range of individual, 
amateur activities (tinkering). It is not intended for professional use.

Use the tool according to its purpose only.

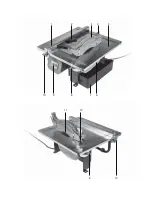
DESCRIPTION OF DRAWING PAGES

Below enumeration refers to the device elements depicted on the 
drawing pages of this manual.

1. 

Fence

2. 

Angle bar

3. 

Cutting blade shield

4. 

Fixing knob for cutting blade shield

5. 

Work table

6. 

Cutting blade bottom shield

7. 

Water container

8. 

Work table locking knob 

9. 

Switch

10. 

Fence fixing knob

11. 

Cutting blade

12. 

Support for cutting blade shield

13. 

Power indicator

14. 

RESET button

15. 

TEST button

* Differences may appear between the product and drawing.

MEANING OF SYMBOLS

 CAUTION

 WARNING

 ASSEMBLY/SETTINGS

 INFORMATION

EQUIPMENT AND ACCESSORIES

1.  Rip fence 

- 1 pce

2

.  Screw + washer  

2

 sets 

3

.  Angle bar  

- 1 pce

4

.  Water container  

- 1 pce

5

.  Ring spanner  

2

 pcs

PREPARATION FOR OPERATION

SAW INSTALLATION ON A WORKSHOP BENCH

It is recommended to firmly fix the tile saw to a workbench with the 
use of mount holes designed for such purpose. They are located on 
the tile saw base and guarantee safe operation and eliminate risk of 
unwanted machine shifts during operation. 

INSTALLATION OF CUTTING BLADE SHIELD 

Disconnect the tool from power supply.


Put cutting blade shield (

3

) on the support for cutting blade shield 

(

12

).


Put the fixing knob for cutting blade shield (

4

) into hole in the 

cutting blade shield (

3

) and hole in the support for cutting blade 

shield (

12

), then tighten.


You can remove the cutting blade shield (

3

) by following above 

procedure in reverse sequence.

FENCE INSTALLATION 

Disconnect the tool from power supply.


Install fence fixing knobs (

10

) and washers to the fence (

1

).


Slide the fence (

1

) into slots in the work table (

5

). 


Set required cutting width using scales located on the work table 
top (

5

).


Tighten fence fixing knobs (

10

). 

SETTING SUPPORT FOR CUTTING BLADE SHIELD 

Disconnect the tool from power supply.


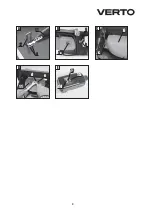
Loosen fixing screws (

a

) of the support for cutting blade shield (

12

(

fig. A

).


Set the support for cutting blade shield (

12

) so the distance 

between cutting blade (

11

) and support for cutting blade shield 

(

12

) is 

3

5

 mm (

fig. A

). 


Support for cutting blade shield (

12

) should be located precisely on 

longitudinal axis of the cutting blade (

11

) plane.


Tighten fixing screws (

a

) of the support for cutting blade shield (

12

).


Install the cutting blade shield (

3

).

Check position of the support for cutting blade shield after each 
replacement of the cutting blade.

OPERATION / SETTINGS

Ensure the tile saw is disconnected from power supply network 
before starting any adjustments. To ensure safe, precise and 
efficient tile saw operation, proceed with all adjustment 
procedures as a whole.
After finishing all the setting and adjustment procedures 
ensure that all adjustment keys are collected. Check that all 
threaded joining elements are properly tightened. When making 
adjustments ensure that all external parts work properly and 
are in good condition. Any worn out or damaged part must be 
replaced by qualified personnel before starting to use the tile 
saw.

Plug of the power supply cord of the tile saw is equipped with 
residual current protection device. Check operation of the 
residual current device before starting to use the tool.


Put the plug into power supply socket, the power indicator (

13

) will 

switch on (

fig. E

).


Press 

TEST

 button (

15

) – the power indicator (

13

) will switch off.


Press 

RESET

 button (

14

) – the power indicator (

13

) will switch on 

again.

If the residual current device is faulty (it does not operate as 
described above) you must remove power cord plug from the 

Содержание 52G281

Страница 1: ...GE RU UA HU CSEMPEV G G P RO T IETOR PLAC CZ PILA NA GLAZURU SK REZA KA DLA BY STOLOV SI AGA ZA PLO ICE LT PLYTELI PJAUSTYKL LV FL GRIEZ JS EE PLAADIL IKUR BG HR Z PILA ZA PLO ICE SR STONA TESTERA GR...

Страница 2: ...1 12 11 3 2 4 6 7 8 9 10 10 8 5...

Страница 3: ...3 A a 3 5mm 12 11 B b 9 8 C c 6 D 11 e d E 14 15 13...

Страница 4: ...S 22 RO INSTRUCTIUNI DE DESERVIRE 25 CZ INSTRUKCE K OBSLUZE 28 SK N VOD NA OBSLUHU 31 SI NAVODILA ZA UPORABO 34 LT APTARNAVIMO INSTRUKCIJA 37 LV LIETO ANAS INSTRUKCIJA 41 EE KASUTUSJUHEND 44 BG 47 HR...

Страница 5: ...olno podejmowa pr by demonta u element w zabezpieczaj cych pilarki lub ich od czenia W przypadku potrzeby przerwania pracy nale y doko czy wykonywan operacj ci cia i wy czy pilark Je li zachodzi potrz...

Страница 6: ...wydajne dzia anie pilarki nale y wszystkie procedury regulacyjne wykonywa w ca o ci Po zako czeniu wszystkich czynno ci regulacyjnych i nastawczych nale y upewni si czy zosta y zabrane wszystkie klucz...

Страница 7: ...czeliny wentylacyjne silnika Nale y regularnie sprawdza dokr cenie wszystkich rub i wkr t w mocuj cych W czasie pracy pilark mog one z czasem ulec poluzowaniu Wymian przewoduzasilaj cegolubinnenaprawy...

Страница 8: ...in conformity with the following UE Directives A fent jelzett term k megfelel az al bbi ir nyelveknek Dyrektywa Maszynowa 2006 42 WE Machinery Directive 2006 42 EC 2006 42 EK G pek Dyrektywa o Kompaty...

Страница 9: ...e is carried out install all shields and protective parts before switching on the tile saw Do not start working with the tile saw when tired or under in uence of medicines It is vital that all persons...

Страница 10: ...in the cutting blade shield 3 and hole in the support for cutting blade shield 12 then tighten You can remove the cutting blade shield 3 by following above procedure in reverse sequence FENCE INSTALL...

Страница 11: ...cutting blade INSTRUCTIONS FOR CUTTING Install appropriate cutting blade depending on the task at hand dry or wet cutting It is recommended to make a try cut after each adjustment to ensure the new s...

Страница 12: ...prechend regulierte Oberabdeckung der Schneidescheibe einsetzen Das Werkst ck stets mit einem geeigneten St el an die Schneidescheibe zustellen Beim Schneiden von Holzst cken die fr her gebraucht word...

Страница 13: ...ets das Restrisiko einer Verletzung beim Betrieb des Ger tes AUFBAU UND ANWENDUNG Die Tischs gemaschine ist f r das Durchschneiden von Holz und holz hnlichen Sto en bestimmt Verwenden Sie das Ger t ni...

Страница 14: ...r Schr gs ge angegeben worden ist Die S gemaschine darf nur dann eingeschaltet werden wenn das Werkst ck von der Schneidescheibe weggezogen ist Einschalten Die Taste des Hauptschalters 9 in die Positi...

Страница 15: ...tig reinigen und eine neue Schneidescheibe in umgekehrter Reihenfolge montieren die richtige Drehrichtung der Schneidescheiben ist dabek zu beachten Die Unterlegscheibe unter die Abdeckung der Schneid...

Страница 16: ...16 1 2 3 4 5 6 7 8 9 10 11 12 13 14 RESET 15 TEST 1 1 2 2 3 1 4 1 5 2 3 12 4 3 12...

Страница 17: ...17 3 10 1 1 5 5 10 a 12 A 12 11 12 3 5 A 12 11 a 12 3 13 E Test 15 13 Reset 14 13 9 I B 9 O 1 5 8 5 b B 8 1 1 11 450 450 1 2 2 1 1 10 2 1 11...

Страница 18: ...35 450 20 330 360 166 IP 54 I 7 3 2016 LpA 92 A K 3 A LwA 105 A K 3 A Grupa Topex Sp ka z ograniczon odpowiedzialno ci Sp ka komandytowa ul Pograniczna 2 4 Grupa Topex Grupa Topem 4 1994 90 631 Grupa...

Страница 19: ...19 52G281 30 30 UA 1 2 3 4 5 6 7 8 9 10 11 12 13 14 RESET 15 TEST...

Страница 20: ...20 1 1 2 2 3 1 4 1 5 2 3 12 4 3 12 3 10 1 1 5 5 10 a 12 A 12 11 12 3 5 A 12 11 a 12 3 13 E Test 15 13 Reset 14 13 9 I B 9 O 1 5...

Страница 21: ...21 8 5 b B 8 1 1 11 450 450 1 2 2 1 1 10 2 1 11 7 6 7 6 c C 6 d D 11 6 6 c 230 50 600 S2 10 2950 1 00 45 180 22 2 2 2 90 35 45 20 330 360 166 IP IP 54 I 7 3 2016 LpA 92 A K 3 A LwA 105 A K 3 A...

Страница 22: ...i Tilos a jelen utas t sban megadott jellemz kt l elt r v g t rcs k haszn lata Soha ne pr b lkozzon az asztali csempev g biztons gi elemeinek elt vol t s val leszerel s vel Ha sz neteltetni kell a mun...

Страница 23: ...L T SOK B rmilyen be ll t si m velet megkezd se el tt ellen rizze hogy a csempev g ramtalan tva lett e a h l zati csatlakoz kih z s val A csempev g biztons gos pontos s hat kony m k d s hez minden sza...

Страница 24: ...A CSER JE ramtalan tsa a berendez st Kiss emelje meg a csempev g egyik oldal t s vegye ki a 7 tekn t Szerelje le a v g t rcsa 6 als v d bor t s t a c r gz t csavarok kicsavar s val mindk t oldalon C b...

Страница 25: ...ctat la alimentarea cu tensiune i nici n timpul func ion rii lui Totdeauna trebuie veri cat starea tehnic a cablului de alimentare cu tensiune Nu este permis utilizarea circularului cu mas n cazul n c...

Страница 26: ...e 10 i aiba Bag bara opritoare 1 n ghidajele de pe masa de lucru 5 Ajusteaz l imea de t iere preferat f c nd uz de cadranul gradat de pe masa de lucru 5 Str nge uruburile de xarea barei opritoare 10 A...

Страница 27: ...nteaz discul t ietor corespunz tor dependent de modul de t iere care vrei s l execu i la uscat sau la ud Dup efectuarea oric rei activit i de ajustare se recomand de a face o t iere de prob spre a ver...

Страница 28: ...yt pilov ho kotou e P isouvejte materi l k pilov mu kotou i pomoc vhodn ho posouva e P i ez n d eva kter ji bylo d ve pou v no se p esv d te zda se v n m nevyskytuj ne douc prvky nap h eb ky vruty apo...

Страница 29: ...ty 11 Pilov kotou 12 Dr k krytu pilov ho kotou e 13 Kontrolka nap jen 14 Tla tko RESET 15 Tla tko TEST Skute n v robek se m e li it od vyobrazen POPIS POU IT CH GRAFICK CH OZNA EN POZOR UPOZORN N MON...

Страница 30: ...d l dorazov li ty 1 Nastavte dorazovou li tu 1 na po adovanou vzd lenost a dn ji upevn te rouby pro upevn n dorazov li ty 10 P isu te materi l k heln ku Zapn te pilu a p em s ujte heln k 2 s materi le...

Страница 31: ...vedaj ce norme PN EN 847 1 Pri v mene p lov ho kot a nezab dajte e jeho hr bka nem e by v ia ako je hr bka roz ahuj ceho klina Venujte pozornos tomu i je zvolen p lov kot vhodn vzh adom na materi l kt...

Страница 32: ...st v polohe ktor zaru uje rovnov hu V etky s iastky stolovej p ly musia by primerane upevnen Stolovou p lou nie je dovolen vykon va z rezy alebo pro lov p lenie Pri pren an stolovej p ly ju chytajte...

Страница 33: ...tku p ly P lu zap najte iba vtedy ke je materi l ktor pl nujete obr ba odsunut od p lov ho kot a Zap nanie Zatla te tla idlo sp na a 9 do polohy I obr B Vyp nanie Zatla te tla idlo sp na a 9 do polohy...

Страница 34: ...ne s domov m odpadom ale maj by odovzdan na recykl ciu na ur enommieste Inform ciuozu itkovan poskytnepredajcav robku alebo miestne org ny Opotrebovan elektrick a elektronick zariadeniaobsahuj l tkyne...

Страница 35: ...ti tehni no stanje mizne age ali so vsi varovalni elementi brezhibni in delajo v skladu z njihovim namenom da se vijaki in drugi pritrdilni elementi niso sprostili da so nastavni klju i odstranjeni Na...

Страница 36: ...i Prepri ati se je treba da so vsi spojni navojni elementi ustrezno priviti Pri opravljanju regulacij je treba preveriti e vsi zunanji elementi pravilno delujejo in so v dobrem stanju Kakr en koli obr...

Страница 37: ...co e in rezilno plo o 11 z notranje prirobnice Skrbno o istite povr ino pritrdilnih prirobnic in namestite novo rezilno plo o tako da opisane dejavnosti izvedete v obratnem vrstnem redu pozornost je t...

Страница 38: ...turi b ti vari Prie pradedant dirbti reikia pa alinti visus medienos liku ius bei nereikalingus daiktus Darbo vieta turi b ti gerai ap viesta Draud iama bla kyti dirban io su medienos pjovimo stakl m...

Страница 39: ...o dang io laikiklio 12 tvirtinimo var tus a U d kite ir pritvirtinkite pjovimo disko dangt 3 Kiekvien kart pakeitus pjovimo disk reikia patikrinti jo laikiklio pad t DARBAS IR NUSTATYMAI Prie pradedan...

Страница 40: ...ite vandens ar bet koki kit chemini skys i Pjovimo stakles visada laikykite sausoje vaikams neprieinamoje vietoje Reguliariai valykite ventiliacijos angas neu denkite j B tina reguliariai tikrinti vis...

Страница 41: ...as personas tiktu atbilsto i apm c tas galda z a apkalpo anas regul cijas un lieto anas jom Ar galda z i nedr kst str d t vai atst t to viet kas ir pak auta lietus vai mitruma iedarb bai Aizliegts da...

Страница 42: ...alstl sti 1 darbgalda 5 vad kl Uzlikt nepiecie amo grie anas platumu izmantojot speci las skalas kas ir izvietotas uz darbgalda 5 virsmas Aizgriezt balstl stes nostiprin t jskr ves 10 Z DISKA AIZSEGA...

Страница 43: ...anu lai p rbaud tu veikt s regul cijas pareizumu un izkontrol tu m r jumus P c z a iesl g anas nepiecie ams uzgaid t kam r z disks sasniegs savu maksim lo grie an s trumu tuk gait un tikai tad var uz...

Страница 44: ...maldamist l litage saepink toitel litist v lja ja eemaldage toitejuhtme pistik pistikupesast P rast mistahes parandus v i hooldustoimingu l petamist ja enne saepingi k ivitamist paigaldage uuesti k ik...

Страница 45: ...US T KS SAE KINNITAMINE T LAUALE Soovitatav on kinnitada saag tugevalt t laua k lge kasutades selleks paigaldusavasid sae aluses See tagab sae ohutuma t ning v listab selle soovimatu liikumise t tamis...

Страница 46: ...GSAAGIMINE T stke saepink hest k ljest pisut les Paigaldage veemahuti 7 l kates selle saeketta alumise katte 6 alla T itke mahuti ulatuses veega Enne igat saagimist ja saagimise ajal kontrollige et sa...

Страница 47: ...hta annab m ja v i kohalik omavalitsus Kasutatud elektrilised ja elektroonilised seadmed sisaldavad looduslikule keskkonnale ohtlikke aineid mbert tlemata seade kujutab endast ohtu keskkonnale ja inim...

Страница 48: ...48 1 2 3 4 5 6 7 8 9 10 11 12 13 14 RESET 15 TEST 1 1 2 2 3 1 4 1 5 2 3 12 4 3 12 3...

Страница 49: ...49 10 1 1 5 5 10 a 12 A 12 11 12 3 5 mm A 12 11 a j 12 3 13 E Test 15 13 Reset 14 13 9 I B 9 O 1 5 8 5 b B 8 1 1 11 45 450 1 2 2 1 1 10 2 1 11...

Страница 50: ...0 45 180 mm 22 2 mm 2 2 mm 900 35 mm 450 20 mm 330 mm 360 mm 166 mm IP 54 I 7 3 kg 2016 LpA 92 dB A K 3 dB A LwA 105 dB A K 3 dB A Grupa Topex Sp ka z ograniczon odpowiedzialno ci Sp ka komandytowa u...

Страница 51: ...do zna ajnog HR smanjivanja broja okretaja rezne plo e Radno mjesto odr avajte istim Prije po etka rada odstranite strugotinu i nepotrebne predmete Radno mjesto mora biti dobro osvijetljeno Nemojte d...

Страница 52: ...titnika rezne plo e 12 treba se nalaziti to no na uzdu noj osovini povr ine rezne plo e 11 Stegnite vijke za pri vr ivanje a potporanj titnika rezne plo e 12 Montirajte titnik rezne plo e 3 Postavke p...

Страница 53: ...ite utika iz mre ne uti nice Nakon zavr etka rada iz radnog stola mjesta do rezne plo e i njenog titnika pa ljivo odstranite sve komade materijala i pra inu Pilu ete najbolje o istiti krpicom ili zrak...

Страница 54: ...trujno kolo koje prekida dovod struje ukoliko dolazni napon pre e 30mA za vreme kra e od 30ms Kada se radi na spoljnom delu zgrade za napajanje stone testere treba koristiti isklju ivo produ ne kablov...

Страница 55: ...podlo ka 2 kompleta 3 Uglomer 1 kom 4 Posuda za vodu 1 kom 5 Okasti klju 2 kom PRIPREMA ZA RAD MONTIRANJE TESTERE NA RADNI STO Kako bi testera bila sigurno pri vr ena za radni sto preporu uje se upotr...

Страница 56: ...2 Postaviti uglomer 2 du grani nika otpora 1 Postaviti grani nik otpora 1 na eljenu udaljenost i sigurno pri vrstiti navrtnjem grani nika otpora 10 Pribli iti materijal do uglomera Uklju iti testeru...

Страница 57: ...54 Klasa bezbednosti I Masa 7 3 kg Godina proizvodnje 2016 PODACI VEZANI ZA BUKU I PODRHTAVANJE Nivo akusti nog pritiska LpA 92 dB A K 3 dB A Nivo akusti ne snage LwA 105 dB A K 3 dB A ZA TITA SREDIN...

Страница 58: ...58 1 2 3 4 5 6 7 8 9 10 11 12 13 14 RESET 15 TEST...

Страница 59: ...1 1 2 2 3 1 4 1 5 2 3 12 4 3 12 3 10 1 1 5 5 10 a 12 A 12 11 12 3 5 A 12 11 a 12 3 13 E Test 15 13 Reset 14 13 9 I B 9 O 1 5...

Страница 60: ...60 8 5 b B 8 1 1 11 450 450 1 2 2 1 1 10 2 1 11 7 6 7 6 c C 6 d D e 11 6 6 c...

Страница 61: ...ejo Los elementos de seguridad da ados deben ser sustituidos inmediatamente Nuncafuerce lasierrade mesadisminuyendode maneraimportante la velocidad de giro del disco de corte Mantenga el rea de trabaj...

Страница 62: ...tope 1 en la gu a en la mesa de trabajo 5 Ajuste el ancho de corte deseado usando las escalas sobre la mesa de trabajo 5 A oje el tornillo de ajuste del tope 10 AJUSTE DEL SOPORTE DEL DISCO DE CORTE D...

Страница 63: ...UCI N DE CORTES Monte el disco de corte adecuado dependiendo del tipo de trabajo ejecutado corte en seco corte en h medo Despu s de terminar de ajustar la herramienta realice un corte de prueba para c...

Страница 64: ...Durante il lavoro indossare abiti adatti Elementi pendenti e bigiotteria possono essere agganciati dal disco in rotazione Prima di ogni regolazione misura operazione di pulizia e di asportazione di p...

Страница 65: ...aglio 3 avviene in successione inversa al suo montaggio MONTAGGIO DELLA GUIDA DI BATTUTA Scollegare l elettroutensile dall alimentazione Montare le viti di ssaggio della guida di battuta 10 con le ron...

Страница 66: ...te il tagliapiastrelle da un lato Inserire il contenitore per l acqua 7 in landolo sotto la protezione inferiore del disco di taglio 6 Riempire per il contenitore con acqua Prima di ogni taglio e dura...

Страница 67: ...chiature elettriche ed elettroniche non devono essere smaltite con i ri uti domestici ma consegnate a centri autorizzati per il loro smaltimento Informazioni circa lo smaltimento sono fornite dal vend...

Страница 68: ......
Отзывы: