


2
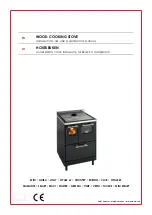
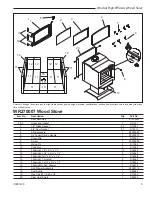
Windsor High Efficiency Wood Stove
30005126
cautiON
After reading these instructions, if you have any doubt
about your ability to complete your installation in a profes-
sional like manner you should obtain the services of an
installer versed in all aspects as to the correct and safe in-
stallation. Do not use temporary makeshift compromises
during installation.
before installation of your appliance
1. Check with the building inspector’s office for compli-
ance with local codes; a permit may be required.
2. This appliance requires a masonry or prefabricated
chimney listed to ULC S629 (Canada) and UL103HT
(U.S.). Sized correctly.
3. A 6” (152 mm) diameter flue is required for proper per-
formance.
4. Always connect this unit to a chimney and
NEvER
vent to another room or inside a building.
5.
dO NOt
connect this unit to any duct work to which
another appliance is connected such as a furnace.
6.
dO NOt
connect this unit to a chimney flue serving
another appliance.
7. The connector pipe and chimney should be inspected
periodically and cleaned if necessary.
8. Remember the clearance distances when you place
furniture or other objects within the area.
dO NOt
store wood, flammable liquids or other combustible
materials too close to the unit.
Refer to certification label on back of your unit for
required clearances.
9. Contact your local municipal or provincial fire authority
for information on how to handle a chimney fire. Have
a clearly understood plan to handle a chimney fire. In
the event of a chimney fire, turn air control to closed
position and
call tHE fiRE dEpaRtMENt.
10.
dO NOt
tamper with combustion air control beyond
normal adjustment.
11.
dO NOt
install these units in a mobile home or trailer.
These units are NOT mobile home approved.
Operation
Why the correct flue size is important - 6”
Draft is the force which moves air from the appliance up
through the chimney. The amount of draft in your chimney
depends on the length of the chimney, local geography.
Nearby obstructions, and other factors. Too much draft
may cause excessive temperatures in the appliance. An
uncontrolled burn or a glowing red part or chimney connec-
tor indicates excessive draft. Inadequate draft may cause
back puffing into the room and “plugging” of the chimney
and/or cause the appliance to leak smoke into the room
through appliance and chimney connector joints.
Today’s solid fuel appliances are much more efficient than
in the past. The units are designed to give you controlled
combustion, as well as maximum heat transfer, using less
fuel to do so.
The design of your new appliance is such that the exhaust
“smoke” is now at lower temperatures than in the past,
therefore requiring proper chimney size to give adequate
draft. If your chimney is too large, the heating appliance
will have a difficult time to raise the “chimney flue” temper-
ature to give adequate draft, therefore causing a smoke
back up, poor burn or both.
Should you experience such a problem call in a local
chimney expert.
With the door closed, the rate of burning is regulated by
the amount of air allowed to enter the unit through the air
control. With experience you will be able to set the control
for heat and burning time desired.
Once the required chimney draft is obtained, operate only
with doors closed and open doors slowly when re-fuel-
ing. (This will reduce or eliminate smoke from entering
the room).
Attempts to achieve higher output rates that exceed heat-
er design specifications can result in permanent damage
to the heater. The recommended wood load is level with
the top of the firebricks.
Overloading may prevent sufficient air entering the heater
to properly fuel the fire.
Operate this heater only with the door closed.
dO NOt buRN gaRbagE OR flaMMablE fluidS.
dO NOt uSE cHEMicalS OR fluidS tO StaRt tHE
fiRE.
tHiS HEatER iS EXtREMEly HOt WHilE iN Op-
ERatiON.
SERiOuS buRNS caN RESult fROM cONtact.
kEEp cHildREN, clOtHiNg aNd fuRNituRE
aWay.
alWayS pROvidE a SOuRcE Of fRESH aiR iNtO
tHE ROOM WHERE tHE uNit iS iNStallEd. fail-
uRE tO dO SO May RESult iN aiR StaRvatiON
Of OtHER fuEl buRNiNg appliaNcES aNd
tHE pOSSiblE dEvElOpMENt Of HaZaRdOuS
cONditiONS.
Optional blower:
Model S31105
120 V, 60 Hz, 0.75 Amps, 2000 rpm
daNgER:
Risk of Electric Shock.
Disconnect power before servicing unit.
iMpORtaNt:
For optimum heater performance at
“low” burn rate, operate the fan at low speed.