background image

Rev 1.1                                                                    Cod. 00.009.126 

23

ENGLISH 


DESCRIPTION OF CHARACTERISTICS AND OPERATION 


The "VP2-HT PH / RX" dosing pumps series are ideal for dosing acid and chlorine in small, medium and large pools. 
They can operate in Manual, ON-OFF and Proportional mode and the flowrate is adjustable from 10% to 100% of the 
maximum flowrate. They can adjust the flowrate by varying the rotation speed of the roll holder. 
In standard version pumps it is possible to set a “delay on” switching on that allows to stabilize the measurement before 
dosing and it is possible to set an overdose alarm (“TAL”). 
Optionally, these pumps can be equipped with a peristaltic tube break sensor which, in case of chemical leaks, blocks the 
dosage and they can optionally have a relay output, configurable for the repetition of an alarm (for example: flow alarm, 
level, peristaltic hose breakage, etc). 
 

THE FIRST THING TO DEFINE ON THE VP2-HT PH / RX PUMP IS IF THE PUMP MUST MEASURE PH OR RX.


See page 27: Set up menu → MEASURE


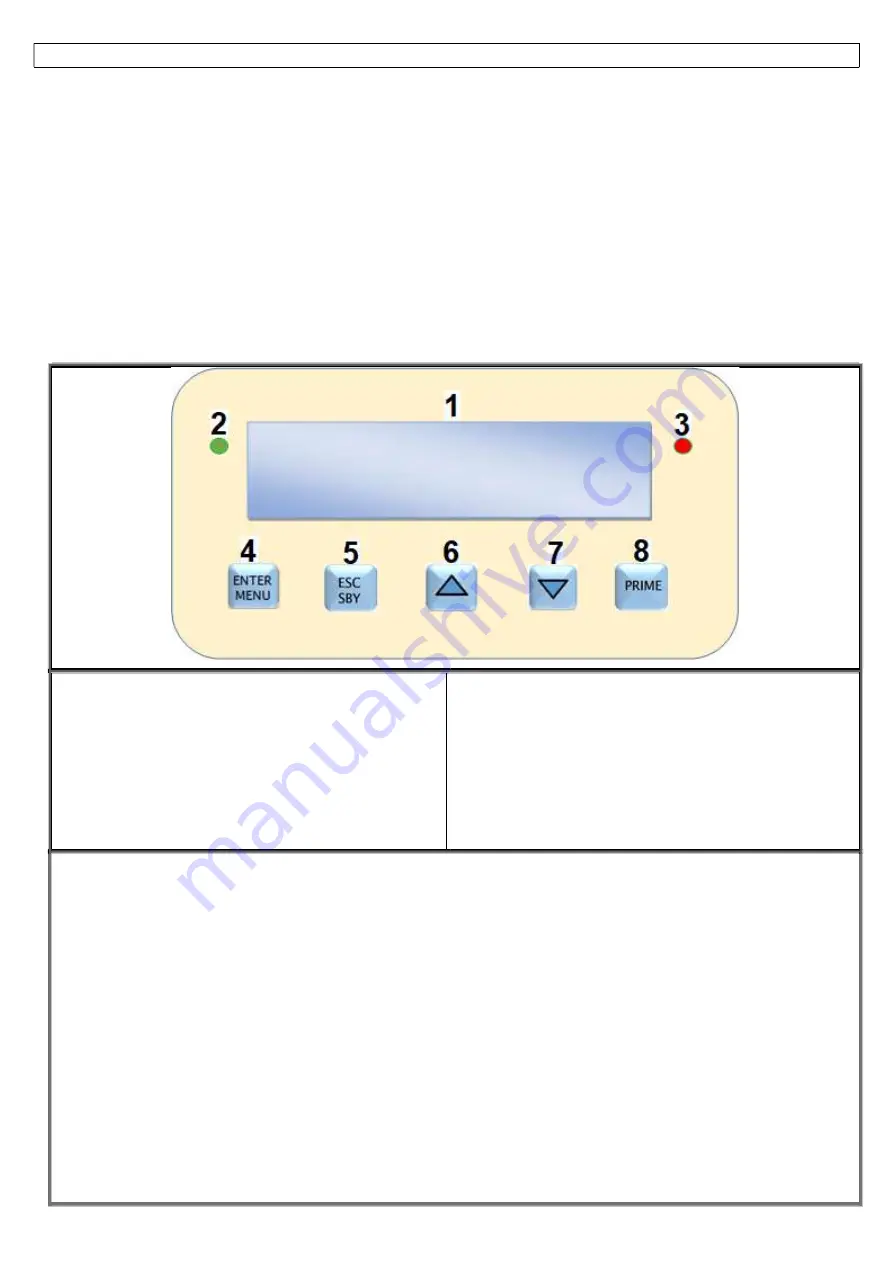
FRONT PANEL DESCRIPTION 


1

.

Display

 LCD 16 x 2 backlight 


2.Green

 Led:

  ▪ 

fix


=


PUMP ON


                        ▪ 

blinking


= PUMP IN ALARM 


3.Red 

Led: indicates the injections of  chemical dosing 


4.ENTER/MENU 

button :

 ▪ 

allows to enter in programming


 ▪

 saves the changes 


 5. ESC/SBY 

button

: ▪ 

allows to exit from the menu 

                                  ▪ 

puts the pump in stand_by mode


6/7. ▲▼ 

buttons :

 ▪ 

allow to


navigate through the menu  

                               ▪ 

allow


to modify the parameters values 


 8. Prime 

button:

  ▪  

allows to prime the pump 


GENERAL FUNCTIONS: 

 
- REAL TIME pH, RX and TEMPERATURE MEASURE  
- REAL TIME FLOW RATE% VISUALIZATION 
- 3 POSSIBLE TYPES OF DOSAGE: MANUAL, ON / OFF, PROPORTIONAL 
- MENU IN 4 LANGUAGES: ITALIAN, ENGLISH, FRENCH, SPANISH 
- POSSIBILITY TO INSERT A PASSWORD 
- DELAY ON SWITCHING 
- OVER DOSAGE TIME ALARM 
- PRIME BUTTON 
- ALARM RELAY (DRY CONTACT) OUTPUT FOR REPEATING ALARMS 
- RESTORATION OF DEFAULT PARAMETERS AND FACTORY CALIBRATION 
- DOSAGE STOP (STAND_BY) 
- WATER FLOW SENSOR ALARM 
- CONTROL OF PRODUCT END LEVEL 
- ENABLE INPUT SIGNAL 
- HOSE BREAKAGE SENSOR 
- OVER AND UNDER RANGE OF THE MEASURE VISUALIZATION 


Содержание VP2-HT PH

Страница 1: ...MANUALE DI PROGRAMMAZIONE IT PROGRAMMING INSTRUCTIONS UK MANUEL DE RÉGLAGE FR MANUAL DE REGULATIÓN ES _____________________VP2 HT PH RX ...

Страница 2: ...RD 10 ENABLE A RICHIESTA 11 ROTTURA TUBO A RICHIESTA 11 MENU UTILITÁ 12 RITARDO DI ACCENSIONE 12 TAL ALLARME TEMPORALE 12 RIPRISTINO PARAMETRI DI PROGRAMMAZIONE e DI CALIBRAZIONE 13 FLUSSO A RICHIESTA 13 TEMPERATURA 14 MENU RELÉ A RICHIESTA 14 ALLARME 15 RITARDO DI ACCENSIONE 15 UR OR 15 MENU DOSAGGIO 16 DOSAGGIO MANUALE 16 PROGRAMMAZIONE E CALIBRAZIONE DELLA POMPA DI PH 17 DOSAGGIO PROPORZIONALE ...

Страница 3: ...U SET UP 26 LANGUAGE 27 MEASURE 27 PASSWORD 27 ENABLE OPTIONAL 28 BROKEN HOSE OPTIONAL 28 MENU UTILITY 29 DELAY ON 29 TAL TIME ALARM 29 RESTORE PROGRAMMING AND CALIBRATION PARAMETERS 30 FLOW CONTROL OPTIONAL 30 TEMPERATURE 31 MENU RELAY OPTIONAL 31 ALARM 32 DELAY ON 32 UR OR 32 MENU DOSING 33 MANUAL DOSING 33 PH PUMP PROGRAMMING AND CALIBRATION 34 pH PROPORTIONAL DOSING 34 pH ON OFF DOSING 35 pH P...

Страница 4: ...URE 44 PASSWORD 44 ENABLE OPTIONNEL 45 RUPTURE TUBE OPTIONNEL 45 MENU UTILITAIRE 46 RETARD D ALLUMAGE 46 TAL ALARME TEMPORELLE 46 RESTAURER LES PARAMÈTRES DE PROGRAMMATION ET D ÉTALONNAGE D USINE 47 FLUX OPTIONNEL 47 TEMPERATURE 48 MENU RELAIS OPTIONNEL 48 ALARME 49 RETARD D ALLUMAGE 49 UR OR 49 MENU DOSAGE 50 DOSAGE MANUELLE 50 PROGRAMMATION ET ÉTALONNAGE DE LA POMPE DE PH 51 DOSAGE PROPORTIONNEL...

Страница 5: ...SSWORD 61 ENABLE OPCIONAL 62 RUPTURA TUBO OPCIONAL 62 MENÚ UTILIDADES 63 RETARDO DE IGNICION 63 TAL ALARMA TEMPORAL 63 RESTAURACIÓN DE PARÁMETROS DE PROGRAMACIÓN Y CALIBRACIÓN 64 FLUJO OPCIONAL 64 TEMPERATURA 65 MENU RELÉ OPCIONAL 65 ALARMA 66 RETARDO DE IGNICIÓN 66 UR OR 66 MENÚ DE DOSIFICACIÓN 67 DOSIFICACIÓN MANUAL 67 PROGRAMACIÓN Y CALIBRACIÓN DE BOMBA DE PH 68 DOSIFICACIÓN PROPORCIONAL pH 68 ...

Страница 6: ...ROLLARE IL PH OPPURE IL RX Vedere pagina 10 Menu Set up MISURA DESCRIZIONE PANNELLO FRONTALE 1 Display LCD 16 x 2 caratteri retroilluminato 2 Led verde fisso POMPA ACCESA lampeggiante POMPA IN ALLARME 3 Led rosso lampeggiante segnala il dosaggio del prodotto chimico 4 Tasto Enter Menu fa entrare in programmazione Salva Conferma le modifiche 5 Tasto ESC SBY fa uscire dai menu mette la pompa in Stan...

Страница 7: ...nable optional attivo Rottura tubo optional attivo TAL 0 unit disabilitato Flusso optional Normalmente Aperto Temperatura PT100 pH FUNZIONAMENTO Proporzionale SETPOINT 7 2 pH S MAX 8 2pH Port Max 80 Rit On 3 sec 0 999sec Rx FUNZIONAMENTO Proporzionale SETPOINT 730mV S MAX 630mV Port Max 80 Rit On 3 sec 0 999sec RIPRISTINO REGOLAZIONI DI FABBRICA 3sec Premere il tasto ENTER MENU per 3 secondi per e...

Страница 8: ...C SBY fa tornare la pompa nello stato di funzionamento TASTO PRIME La pressione breve del tasto PRIME durante il funzionamento pone la pompa in stato di Prime adescamento 1 La pompa dosa al 25 2 LED verde fisso LED rosso lampeggia 3 display visualizza Prime 25 La nuova pressione del tasto PRIME fa tornare la pompa nello stato di funzionamento NB se il tasto PRIME viene premuto prolungatamente la p...

Страница 9: ... TAL scegliere il tipo di funzionamento del sensore di flusso a disposizione scegliere di usare o no una sonda di temperatura PT100 e infine di ripristinare i parametri di fabbrica della programmazione e della calibrazione della sonda Il menu Relè è opzionale quindi potrebbe non esserci sulla vostra pompa Esso permette di scegliere il funzionamento del relè di allarme N A o N C e di includere o es...

Страница 10: ...are con il cursore Password e premere ENTER Si accede così alla definizione cifra per cifra della password Scegliere la cifra con i tasti e premere ENTER Dopo la definizione della 4 cifra la pressione di ENTER salva la password Prenderne nota accuratamente per non dimenticarla Nel caso che si dimentichi chiamare il Servizio di Assistenza Se si vuole abbandonare la programmazione e tornare in misur...

Страница 11: ... sensore che si accorge se il tubo peristaltico si lacera e lascia fuoriuscire il prodotto chimico da dosare Quando l allarme di rottura del tubo scatta blocca il dosaggio e viene segnalato sul display Prima di qualsiasi intervento scollegare la pompa dalla rete di alimentazione Durante l operazione utilizzare sempre le protezioni personali previste dalle avvertenze di uso del prodotto chimico dos...

Страница 12: ... menu per modificare parametri e calibrazioni COME PROGRAMMARE IL RITARDO DI ACCENSIONE All interno del Menu Utilità selezionare con il cursore Rit Acc e premere ENTER Inserire con i tasti il valore dei minuti di ritardo desiderato e premere ENTER Attenzione la modifica sarà attiva dalla prossima accensione della pompa Se si vuole abbandonare la programmazione e tornare in misura premere per 3 sec...

Страница 13: ...mpa ripristina le regolazioni di fabbrica Premere per 3 secondi il tasto ESC per uscire dalla programmazione FLUSSO A RICHIESTA La chiusura o l apertura in dipendenza dalla programmazione di default è Normalmente Aperto del contatto di flusso libero da tensione provoca 1 la cessazione dell attività di dosaggio 2 l accensione lampeggiante del led verde on 3 Il display visualizza alternativamente la...

Страница 14: ... secondi il tasto ESC MENU RELÉ A RICHIESTA L uscita relè segnala la presenza di un allarme È un contatto privo di tensione La segnalazione può avvenire con la chiusura del contatto o con l apertura default Allarme è N A Nel menu relè si decide quali allarmi possono venire segnalati dal relè 3sec Premere il tasto ENTER MENU per 3 secondi per entrare in programmazione Con il cursore selezionare Rel...

Страница 15: ... misura è possibile fissare una soglia di UR Under Range al di sotto della quale il display visualizzerà il messaggio di UR Analogamente è possibile fissare sulla misura una soglia di OR Over Range al di sopra della quale il display visualizzerà il messaggio di OR Il relè in entrambi i casi segnalerà l allarme chiudendosi o aprendosi a seconda dell impostazione del parametro Allarme Il dosaggio no...

Страница 16: ...mpa decide automaticamente se dosare oppure non dosare e modula la sua portata in dipendenza dal valore della misura attuale rispetto al valore desiderato Setpoint ON OFF la pompa decide automaticamente se dosare oppure non dosare in dipendenza dal valore della misura attuale rispetto al valore desiderato a metà tra Set On e Set Off La portata di dosaggio è fissa e programmata nel menu DOSAGGIO MA...

Страница 17: ...Max portata Massima di dosaggio Rit On secondi attesi prima del dosaggio al superamento del setpoint ESEMPIO DI MODIFICA DEL SetP All interno del Menu Dosaggio selezionare con il cursore Proporzionale e premere ENTER In figura a lato sono visibili i parametri di fabbrica Scegliere con i tasti il parametro da modificare e premere ENTER per entrare nella modifica Con i tasti scegliere il valore desi...

Страница 18: ...igura a lato sono visibili i parametri di fabbrica Scegliere con i tasti il parametro da modificare e premere ENTER per entrare nella modifica Con i tasti scegliere il valore desiderato e premere ogni volta necessaria il tasto ENTER per confermare la modifica Se si vuole abbandonare la programmazione e tornare in misura premere per 3 secondi il tasto ESC Con le regolazioni di fabbrica si è deciso ...

Страница 19: ...ione e premere ENTER Il cursone è su Offset e quindi premere ENTER La lettura attuale viene mostrata sul display Premere ENTER e regolare se necessario il valore di lettura del tampone con i tasti e poi confermare con ENTER TARATURA DEL GAIN Pulire la sonda con acqua e poi immergerla nella soluzione tampone a pH 9 oppure 4 Attendere la stabilizzazione della lettura sul display Premere ENTER MENU p...

Страница 20: ...ssima Port Max portata Massima di dosaggio Rit On secondi attesi prima del dosaggio al superamento del setpoint ESEMPIO DI MODIFICA DEL SetP All interno del Menu Dosaggio selezionare con il cursore Proporzionale e premere ENTER In figura a lato sono visibili i parametri di fabbrica Scegliere con i tasti il parametro da modificare e premere ENTER per entrare nella modifica Con i tasti scegliere il ...

Страница 21: ...remere ENTER In figura a lato sono visibili i parametri di fabbrica Scegliere con i tasti il parametro da modificare e premere ENTER per entrare nella modifica Con i tasti scegliere il valore desiderato e premere ogni volta necessaria il tasto ENTER per confermare la modifica Se si vuole abbandonare la programmazione e tornare in misura premere per 3 secondi il tasto ESC Con le regolazioni di fabb...

Страница 22: ...DELL OFFSET Immergere la sonda di Rx nella soluzione tampone Attendere la stabilizzazione della lettura sul display Premere ENTER MENU per 3 sec e poi con i tasti spostare il cursore su Calibrazione e premere ENTER Il cursone è su Offset e quindi premere ENTER Il display mostra il valore letto Premere ENTER e regolare se necessario il valore di lettura del tampone con i tasti e poi confermare con ...

Страница 23: ...VP2 HT PH RX PUMP IS IF THE PUMP MUST MEASURE PH OR RX See page 27 Set up menu MEASURE FRONT PANEL DESCRIPTION 1 Display LCD 16 x 2 backlight 2 Green Led fix PUMP ON blinking PUMP IN ALARM 3 Red Led indicates the injections of chemical dosing 4 ENTER MENU button allows to enter in programming saves the changes 5 ESC SBY button allows to exit from the menu puts the pump in stand_by mode 6 7 buttons...

Страница 24: ... Open Temperature PT100 probe is optional pH Dosing Proportional SetP setpoint 7 2 pH T MAX maximum threshold 8 2pH Flow Max maximum flowrate 80 Delay On 3 sec 0 999sec Rx Dosing Proportional SetP setpoint 730mV T MAX maximum threshold 630mV Flow Max maximum flowrate 80 Delay On 3 sec 0 999sec DEFAULT SETTINGS RESTORE 3sec Keep pushing for 3 seconds the ENTER MENU button to enter into the programm...

Страница 25: ...to return the pump to the programmed functioning PRIME BUTTON Push the PRIME button shortly during the functioning to put the pump in Prime status 1 The pump doses at 25 of maximum flowrate 2 the green LED is lit fix 3 the red LED flashes 4 display shows Prime 25 Push again PRIME button to return the pump to the operating state NOTE keeping pressed the PRIME button the pump will dose at 80 of the ...

Страница 26: ...chedule or not the Delay On the overdosage TAL alarm the type of functioning of the flow sensor to use or not a PT100 temperature probe and finally to Restore the factory programming of the parameters and the factory probe calibration The Relay menu allows choosing the operation of the alarm relay N O or N C whether to include or exclude from the relay signal the various types of alarm Delay On TA...

Страница 27: ...by the cursor and press ENTER Enter the password digit by digit selecting the number by button and pressing ENTER After the selection of the 4th digit press ENTER to save the password Take note of it carefully to not forget it If it is not possible to remember the password call the Customer Service Assistance To esc programming and return to measurement press the ESC button for 3 seconds Change pa...

Страница 28: ...When the broken hose alarm starts it stops the dosage and the green led flashes and the display shows broken hose Before any intervention disconnect the pump from the mains supply During the operation always use the personal protections recommended by the warnings of use of the dosed chemical For example use gloves apron glasses etc The peristaltic hose must therefore be changed The sensor area in...

Страница 29: ...ct Delay On by the cursor and press ENTER Use the buttons to select the desired minutes of delay and press ENTER Attention the change will be active from the next power on of the pump If you want to esc programming and return to measurement press ESC for 3 seconds TAL TIME ALARM WHAT IS IT The Time alarm is expressed in units 0 120units of dosage One unit is equivalent to 1 minute of chemical dosi...

Страница 30: ...nds to exit programming FLOW CONTROL OPTIONAL The closing or opening this dipends on the programming in Utility menu default is Normally Open contact of the flow input contact free of tension will cause 1 the pump stops dosing 2 the green ON led blinks 3 The display shows Flow on the second line which alternates with the writing of the operating mode and the flow rate When the flow contact returns...

Страница 31: ...LAY OPTIONAL The relay output indicates the presence of an alarm It is a dry contact The relay reports an alarm by closing the contact or by opening it default is N O See the following paragraph Alarm In the Relay menu it is possible to decide which alarms can be reported by the relay 3sec Press the ENTER MENU button for 3 seconds to enter programming Select by the cursor the menu Relay and press ...

Страница 32: ...et an UR Under Range threshold for the measure below which the display will show the UR message Similarly a threshold of OR Over Range can be set for the measure above which the display will show the OR alarm message In both cases the relay will signal the alarm by closing or opening depending on the setting of the Alarm parameter This type of alarm does not influence the dosing of the pump In the...

Страница 33: ...cides whether to dose or not and modulates its flowrate depending on the value of the current measurement with respect to the desired value Setpoint ON OFF the pump automatically decides whether to dose or not depending on the value of the current measurement with respect to the desired value Setpoint The dosage flowrate is fixed and programmed in the menu MANUAL DOSING Constant dosing independent...

Страница 34: ...conds expected by the pump before dosing when the setpoint is exceeded EXAMPLE OF SETTING THE SETPOINT In the Dosing menu select Proportional by the cursor and press ENTER The factory parameters are shown in the figure on the left Use the buttons to move the cursor and select the parameter to be modified and press ENTER to enter the modification Use the keys to select the desired value and press t...

Страница 35: ...e shown in the figure on the left Use the buttons to move the cursor and select the parameter to be modified and press ENTER to enter the modification Use the keys to select the desired value and press the ENTER button each time to confirm the change If you want to esc programming and return to measurement press ESC for 3 seconds The factory settings allow dosing ACID to lower the pH in the plant ...

Страница 36: ... Choose Offset by the cursor and press ENTER The current reading of the probe is shown on the display Press ENTER and adjust if necessary the buffer reading value with the buttons and then confirm by ENTER GAIN CALIBRATION Clean the probe with water and then immerse it in the buffer solution at pH 9 or 4 Wait for the reading stabilization on the display Press ENTER MENU for 3 seconds and then use ...

Страница 37: ... Del On seconds expected by the pump before dosing when the setpoint is exceeded EXAMPLE OF SETTING SetP In the Dosing menu select Proportional by the cursor and press ENTER The factory parameters are shown in the figure on the left Use the buttons to move the cursor and select the parameter to be modified and press ENTER to enter the modification Use the buttons to define the desired value and pr...

Страница 38: ...ry parameters are shown in the figure on the left Use the buttons to move the cursor and select the parameter to be modified and press ENTER to enter the modification Use the keys to select the desired value and press the ENTER button each time to confirm the change If you want to esc programming and return to measurement press ESC for 3 seconds The factory settings allow to dose Chlorine in the p...

Страница 39: ...FSET CALIBRATION Immerse the RX probe in the buffer solution Wait for the reading stabilization on the display Press ENTER MENU for 3 seconds and then use the keys to move the cursor to Calibration and press ENTER twice The current reading of the probe is shown on the display Press ENTER and adjust if necessary the buffer reading value with the buttons and then confirm by ENTER ...

Страница 40: ...NIR SUR LA POMPE VP2 HT PH RX C EST SI LA POMPE DOIT MESURER LE PH OU LE RX Voir page 44 Menu Set up MESURE DESCRIPTION DU PANNEAU AVANT 1 Ecran LCD rétro éclairé 16 x 2 caractères 2 LED verte fixe PUMP ON clignotant POMPE D ALARME 3 LED rouge indique les injections du produit chimique 4 Touche Entrée Menu entre la programmation Enregistrer confirmer les modifications 5 Touche ESC SBY quitte le me...

Страница 41: ...Rupture Tube optionnel actif TAL 0 unité désactivé Flux optionnel normalement ouvert Température PT100 pH Dosage Proportionnel Consigne 7 2 pH S MAX 8 2pH Deb Max 80 Ret On 3 sec 0 999sec Rx Dosage Proportionnel Consigne 730mV S MAX 630mV Deb Max 80 Ret On 3 sec 0 999sec RESTAURATION DES PARAMETRES D USINE 3sec Appuyez sur le bouton ENTER MENU pendant 3 secondes pour entrer en programmation Utilis...

Страница 42: ...Y la pompe rétourne dans l état de fonctionnement BOUTON PRIME En appuyant brièvement sur la touche PRIME pendant le fonctionnement la pompe passe en état Prime amorçage 1 La pompe dose à 25 2 LED verte fix La LED rouge clignote 3 l affichage indique Prime 25 En appuyant à nouveau sur la touche PRIME la pompe revient à l état de fonctionnement NB Si la pression sur le bouton PRIME est prolongée la...

Страница 43: ...TAL choisir le type de fonctionnement du capteur de débit disponible choisir d utiliser ou non une sonde de température PT100 et enfin rétablir les paramètres d usine de la programmation et d étalonnage de la sonde Le menu Relais permet choisir le fonctionnement du relais d alarme N O ou N F et incluir ou excluir les différents types d alarme délai d allumage TAL Flux UR OR Stand by Niveau Enable ...

Страница 44: ...yez sur ENTER Cela donne accès à la définition chiffre par chiffre du mot de passe Sélectionnez le chiffre avec les touches et appuyez sur ENTER pour confirmer Après avoir défini le 4ème chiffre appuyez sur ENTER pour enregistrer le mot de passe Prenez en soigneusement note pour ne pas l oublier Si vous oubliez appelez le service clientèle Appuyez sur la touche ESC pendant 3 secondes pour quitter ...

Страница 45: ... C est un capteur qui détecte si le tube péristaltique est cassé et laisse échapper le produit chimique Lorsque l alarme de rupture de tube se déclenche elle arrête le dosage et s affiche à l écran Avant toute intervention débrancher la pompe du réseau électrique Au cours de l opération utilisez toujours les protections personnelles indiquées dans les avertissements d utilisation du produit chimiq...

Страница 46: ...COMMENT PROGRAMMER LE RETARD D ALLUMAGE Dans le menu Utilitaire sélectionnez Ret All avec le curseur et appuyez sur ENTER Utilisez les touches pour entrer les minutes de retard souhaitées puis appuyez sur ENTER Attention la modification sera active dès le prochain démarrage de la pompe Appuyez sur la touche ESC pendant 3 secondes pour quitter la programmation TAL ALARME TEMPORELLE Qu est ce que c ...

Страница 47: ...e ESC pendant 3 secondes pour quitter la programmation FLUX OPTIONNEL La fermeture ou l ouverture en fonction de la programmation par défaut normalement ouverte du contact de flux libre de tension provoque 1 cessation de l activité de dosage 2 le led vert clignote 3 L écran affiche alternativement le message Flux sur la deuxième ligne et le mode de fonctionnement et le débit actuel La réouverture ...

Страница 48: ...La sortie de relais signale la présence d une alarme C est un contact sans tension La signalisation peut être effectuée avec la fermeture de contact ou avec l ouverture valeur par défaut est N O Voir le paragraphe suivant Alarme Dans le menu relais vous décidez quelles alarmes peuvent être signalées par le relais 3sec Appuyez sur le bouton ENTER MENU pendant 3 secondes pour entrer en programmation...

Страница 49: ...a mesure il est possible de définir un seuil UR Under Range en dessous duquel l écran affiche le message UR De même un seuil de OR Over Range peut être défini pour la mesure au dessus de laquelle l écran affichera le message OR Dans les deux cas le relais signalera l alarme en se fermant ou en s ouvrant en fonction du réglage du paramètre Alarme Le dosage n est jamais influencé par ce type d alarm...

Страница 50: ...e la pompe décide automatiquement si elle doit ou non doser et module son débit en fonction de la valeur de la mesure en cours par rapport à la valeur souhaitée valeur de consigne ON OFF la pompe décide automatiquement s il faut doser ou non en fonction de la valeur de la mesure en cours par rapport à la valeur souhaitée valeur de consigne Le débit de dosage est fixé et programmé dans le menu DOSA...

Страница 51: ... Dosage Ret On secondes attendues avant le dosage lorsque le point de consigne est dépassé EXEMPLE DE MODIFICATION DE LA CONSIGNE Dans le menu Dosage sélectionnez Proportionnel avec le curseur et appuyez sur ENTER Sur la figure ci contre les paramètres d usine sont visibles Positionnez le curseur sur l élément à modifier Appuyez sur ENTER pour accéder au changement Utilisez les touches pour sélect...

Страница 52: ... figure ci contre les paramètres d usine sont visibles Positionnez le curseur sur l élément à modifier Appuyez sur ENTER pour accéder au changement Utilisez les touches pour sélectionner la valeur souhaitée et appuyez sur la touche ENTER à chaque fois pour confirmer le changement Appuyez sur la touche ESC pendant 3 secondes pour quitter la programmation Avec les réglages d usine il a été décidé de...

Страница 53: ...uyez sur ENTER Le curseur est sur Offset puis appuyez sur ENTER La lecture actuelle est affichée à l écran Appuyez sur ENTER et ajustez si nécessaire la valeur de lecture du tampon avec les touches puis confirmez avec ENTER ETALONNAGE DU GAIN Nettoyez la sonde avec de l eau puis plongez la dans la solution tampon à pH 9 ou 4 Attendez que la lecture se stabilise sur l écran Appuyez sur ENTER MENU p...

Страница 54: ...ondes attendues avant le dosage lorsque le point de consigne est dépassé EXEMPLE DE MODIFICATION DE LA CONSIGNE Dans le menu Dosage sélectionnez Proportionnel avec le curseur et appuyez sur ENTER Sur la figure ci contre les paramètres d usine sont visibles Positionnez le curseur sur l élément à modifier Appuyez sur ENTER pour accéder au changement Utilisez les touches pour sélectionner la valeur s...

Страница 55: ...sur ENTER Sur la figure ci contre les paramètres d usine sont visibles Positionnez le curseur sur l élément à modifier Appuyez sur ENTER pour accéder au changement Utilisez les touches pour sélectionner la valeur souhaitée et appuyez sur la touche ENTER à chaque fois pour confirmer le changement Appuyez sur la touche ESC pendant 3 secondes pour quitter la programmation Avec les réglages d usine il...

Страница 56: ...DE L OFFSET Immerger la sonde de Rx dans une solution tampon Attendre la stabilisation de la lecture à l écran Appuyez sur ENTER MENU pendant 3 secondes puis utilisez les touches pour déplacer le curseur sur Etalonnage et appuyez sur ENTER Le curseur est sur Offset puis appuyez sur ENTER La lecture actuelle est affichée à l écran Appuyez sur ENTER et ajustez si nécessaire la valeur de lecture du t...

Страница 57: ...CAR EL PH O EL RX Consulte la página 61 Menú de configuración MEDIDA DESCRIPCION DEL PANEL FRONTAL 1 Display LCD 16 x 2 caracteres 2 Led verde fijo BOMBA ENCENDIDA intermitente BOMBA EN ALARMA 3 Led rojo indica las inyecciones del producto químico 4 Tecla Enter Menu deja entrar en la programación Salva Confirma las modificaciones 5 Tecla ESC SBY deja salir del menu pone la bomba en stand_by 6 7 Te...

Страница 58: ...cional activo Rotura de tubo opcional activo Retardo de ignición 0 minutos TAL 0 unidad deshabilitado Flujo opcional Normalmente Abierto Temperatura PT100 pH DOSIFICATION Proporcional SETPOINT 7 2 pH V MAX 8 2pH Caud Max 80 Ret On 3 sec 0 999sec Rx DOSIFICATION Proporcional SETPOINT 730mV V MAX 630mV Caud Max 80 Ret On 3 sec 0 999sec RESTAURACIÓN DE AJUSTES DE FÁBRICA 3sec Presione la tecla ENTER ...

Страница 59: ...a vez la bomba vuelve al estado de funcionamiento congruente con los ingresos en curso TECLA PRIME La breve presión del la tecla PRIME cebado durante el funcionamiento pone la bomba en un estado de Prime priming 1 La bomba dosifica al 25 2 LED verde fijo LED rojo parpadea 3 la pantalla muestra Prime 25 Al presionar nuevamente la tecla PRIME la bomba vuelve al estado operativo NB si se presiona la ...

Страница 60: ...tilidades permite programar o no el Retraso de ignición la alarma de sobredosis TAL elegir el tipo de operación del sensor de flujo disponible optar por usar o no una sonda de temperatura PT100 y finalmente restaurar los parámetros de fábrica de la programación y calibración de la sonda El menú Relè permite elegir la operación del relé de alarma N A o N C incluir o excluir desde la señalización de...

Страница 61: ...o da acceso a la definición dígito a dígito de la contraseña Seleccione el dígito con las teclas y presione ENTER Después de definir el cuarto dígito al presionar ENTER se guarda la contraseña Toma nota de ello con cuidado para no olvidarlo En caso de que lo olvide llame al Servicio al Cliente Si desea abandonar la programación y volver a la medición presione la tecla ESC durante 3 segundos Cambio...

Страница 62: ...es Es un sensor que detecta si el tubo peristáltico está roto y deja salir el químico que se va a dosificar Cuando se activa la alarma de ruptura del tubo se detiene la dosificación y se señaliza en la pantalla Antes de cualquier intervención desconecte la bomba de la red eléctrica Durante la operación utilice siempre las protecciones personales proporcionadas por las advertencias de uso del produ...

Страница 63: ...alibraciones COMO PROGRAMAR EL RETRASO DE LA IGNICION En el menú Utilidades seleccione Ret Ign con el cursor y presione ENTER Use las teclas para ingresar los minutos de retraso deseados y presione ENTER Atención la modificación estará activa desde el próximo arranque de la bomba Si desea abandonar la programación y volver a la medición presione la tecla ESC durante 3 segundos TAL ALARMA TEMPORAL ...

Страница 64: ...ba restaura los ajustes de fábrica Presione la tecla ESC durante 3 segundos para salir de la programación FLUJO OPCIONAL El cierre o la apertura según la programación de fábrica es normalmente abierto del contacto de flujo libre de voltaje hace que 1 LA DOSIFICACIÓN SE PARA 2 el LED verde parpadea 3 LA PANTALLA muestra en la segunda línea Flujo que alterna con la escritura del modo de dosification...

Страница 65: ...ndos MENU RELÉ OPCIONAL La salida de relé señala la presencia de una alarma Es un contacto libre de tensión La señalización puede ocurrir con el cierre del contacto o con la apertura el valor predeterminado es N A Vea el siguiente párrafo Alarma En el menú del relé se puede decider qué alarmas pueden ser señalizadas por el relé 3sec Pulse la tecla ENTER MENU durante 3 segundos para entrar en la pr...

Страница 66: ...la medición es posible establecer un umbral de UR Bajo rango debajo del cual la pantalla mostrará el mensaje UR De manera similar se puede establecer un umbral de OR Over Range en la medida por encima de la cual la pantalla mostrará el mensaje OR En ambos casos el relé señalará la alarma cerrando o abriendo dependiendo de la configuración del parámetro Alarma La dosificación nunca está influenciad...

Страница 67: ...de automáticamente si dosificar o no y modula su caudal dependiendo del valor de la medición actual con respecto al valor deseado punto de ajuste Setpoint ON OFF la bomba decide automáticamente la dosificación o no en función del valor de la medición actual con respecto al valor deseado a medio camino entre el Set On y el Set Off El caudal de dosificación es fijo y programado en el menú DOSIFICACI...

Страница 68: ...o Ret On segundos esperados antes de la dosificación cuando se excede el punto de ajuste Setpoint EJEMPLO DE MODIFICACIÓN DE SETP En el menú de Dosificación seleccione con el cursor Proporcional y presione ENTER En la figura al lado se muestran los parámetros de fábrica Use las teclas para seleccionar el parámetro a modificar y presione ENTER para ingresar la modificación Use las teclas para selec...

Страница 69: ... figura al lado se muestran los parámetros de fábrica Use las teclas para seleccionar el parámetro a modificar y presione ENTER para ingresar la modificación Use las teclas para seleccionar el valor deseado y presione la tecla ENTER cada vez para confirmar el cambio Si desea abandonar la programación y volver a la medición presione la tecla ESC durante 3 segundos Con los ajustes de fábrica se deci...

Страница 70: ...ción y presione ENTER El cursor está desplazado sur Offset y luego presione ENTER La pantalla muestra la lectura actual Presione ENTER y ajuste si es necesario el valor de lectura del búfer con las teclas y luego confirme con ENTER CALIBRACION GAIN Limpie la sonda con agua y luego sumérjala en la solución tampón a pH 9 o 4 Espere a que la lectura se estabilice en la pantalla Presione ENTER MENU du...

Страница 71: ...ficación máximo Ret On segundos esperados antes de la dosificación cuando se excede el punto de ajuste Setpoint EJEMPLO DE MODIFICACIÓN DE SetP En el menú de Dosificación seleccione con el cursor Proporcional y presione ENTER En la figura al lado se muestran los parámetros de fábrica Use las teclas para seleccionar el parámetro a modificar y presione ENTER para ingresar la modificación Use las tec...

Страница 72: ...ENTER En la figura al lado se muestran los parámetros de fábrica Use las teclas para seleccionar el parámetro a modificar y presione ENTER para ingresar la modificación Use las teclas para seleccionar el valor deseado y presione la tecla ENTER cada vez para confirmar el cambio Si desea abandonar la programación y volver a la medición presione la tecla ESC durante 3 segundos Con los ajustes de fábr...

Страница 73: ...Sumerja la sonda de RX en la solución tampón Espere hasta que la medición en la pantalla sea estable Presione ENTER MENU durante 3 segundos y luego use las teclas para mover el cursor a Calibración y presione ENTER El cursor está desplazado sur Offset y luego presione ENTER La pantalla muestra la lectura actual Presione ENTER y ajuste si es necesario el valor de lectura del búfer con las teclas y ...

Страница 74: ...Rev 1 1 Cod 00 009 126 74 ...

Страница 75: ...Rev 1 1 Cod 00 009 126 75 ...

Страница 76: ...Rev 1 1 Cod 00 009 126 76 Please go to www verderliquids com for your local distributor ...

Отзывы: