background image

8

CONNECTIONS

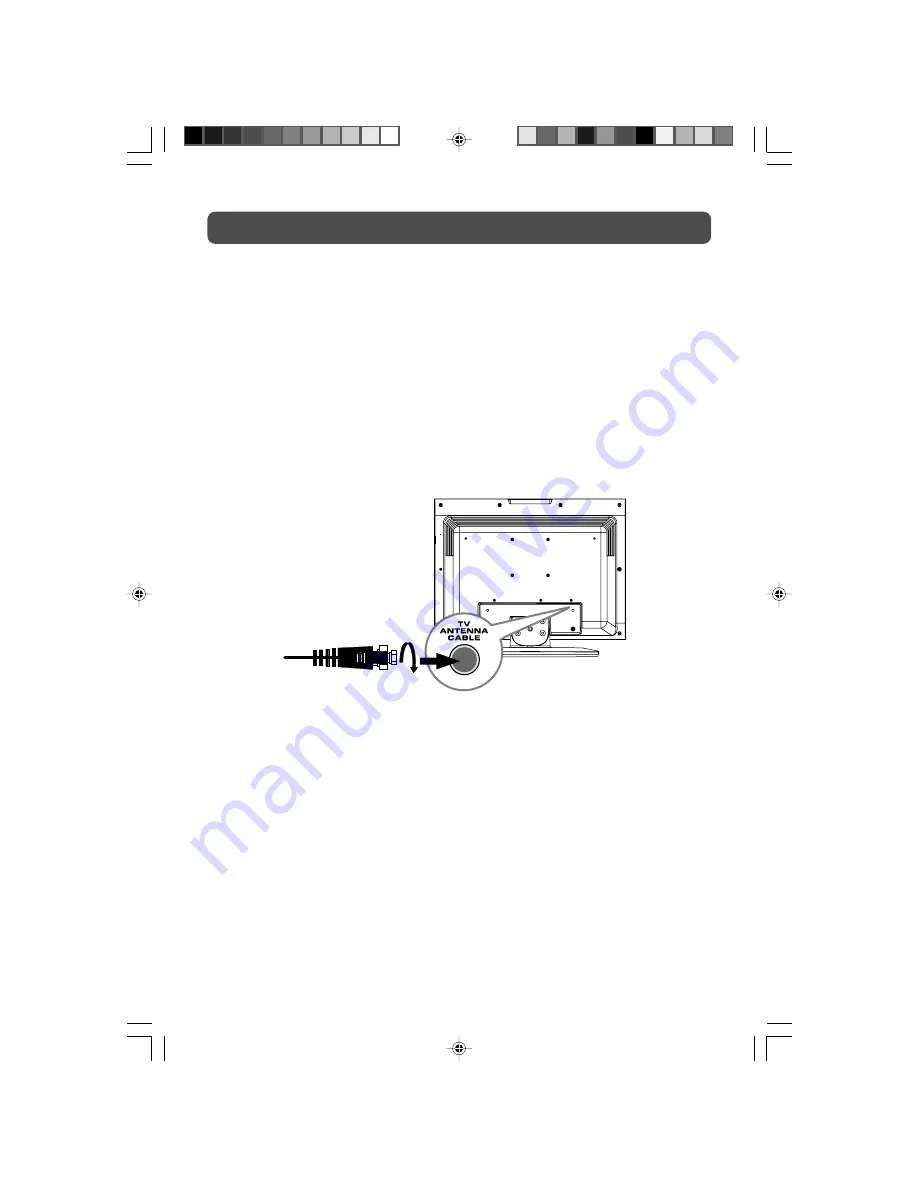
CONNECTING A TV ANTENNA/CABLE/SATELLITE

To view television channels correctly, a signal must be received from one of the following
sources:

- An indoor or outdoor aerial antenna
- A cable system
- A satellite system

Note:

For receiving over-the-air TV broadcasts, we recommend that you use an external fixed antenna.
Should you require the use of a temporary antenna, please ensure that you purchase an antenna
with sufficient ability to receive in weak signal areas. Only when you are in close proximity
to a transmitter will a temporary antenna reproduce a signal as strongly as a fixed antenna.

Satellite, Cable, or

TV  antenna cable to

TV ANTENNA

CABLE  Terminal

(cable not included)

PLV36190_ib_eng_1-14_wDVI.pmd

18/01/2007, 17:01

8

Содержание PLV3619-DVI

Страница 1: ...19 LCD TV PLV3619 DVI Venturer Manual English OWNER S MANUAL ...

Страница 2: ...se harmful interference to radio or television reception which can be determined by turning the equipment does cause harmful interference to radio or television reception which can be determined by turning the equipment off and on the user is encouraged to try to correct the interference by one or more of the following measures Reorient or relocate the receiving antenna Increase the separation bet...

Страница 3: ...t an electrician for replacement of the obsolete outlet 10 Protect the power cord from being walked on or pinched particularly at plug convenience receptacles and the point where they exit from the apparatus 11 Only use attachments accessories specified by the manufacture 12 Use only with the cart stand tripod bracket or table specified by the manufacturer or sold with the apparatus When a cart is...

Страница 4: ...h definition HD source 11 Connecting an audio amplifier 11 Connecting a PC 12 Connecting to sources with DVI output DVD only 480i 480p 720p 1080i are supported 12 Connecting the power cord 13 INSTALLATION 13 14 Removing the base stand 13 Mounting on the wall 14 USING HEADPHONE 14 TV SETUP 15 19 Main menu 15 Picture menu 15 Sound menu 16 Setup menu 16 Parental setting 17 18 TV setting 19 MTS settin...

Страница 5: ...properly The recommended effective distance for using the remote control is about 16 feet 5 meters TO CHANGE THE REMOTE CONTROL BATTERY 1 Open the battery door 2 Insert two AAA batteries BATTERY REPLACEMENT When the batteries become weak the operating distance of the remote control will be greatly reduced and you will need to replace the batteries Note If the Remote Control is not going to be used...

Страница 6: ...emain ON for the time that is set and will automatically shut off afterwards 8 CC button Press to activate the Closed Captioning feature This function only works on programs broadcasted with captions 9 FORMATbutton Press to select the picture format 10 STANDBY ONbutton Press to turn ON the unit or put it in STANDBY OFF mode 11 YUV IN button Directly select YUV IN component video mode 12 AV IN butt...

Страница 7: ...controls Adjust the volume level and highlight selections Left Right on the menu screen 8 buttons Select a TV channel and highlight selections Up Down on the menu screen 9 Power Cord 10 DVI Input 11 AV IN S Video Input 12 AV IN Video Input Jack 13 AV IN Audio Input Jacks Left Right 14 Audio Output Jacks Left Right 15 TV Antenna Cable terminal Coaxial TV antenna input 16 Headphone jack 17 PC IN Aud...

Страница 8: ...sts we recommend that you use an external fixed antenna Should you require the use of a temporary antenna please ensure that you purchase an antenna with sufficient ability to receive in weak signal areas Only when you are in close proximity to a transmitter will a temporary antenna reproduce a signal as strongly as a fixed antenna Satellite Cable or TV antenna cable to TV ANTENNA CABLE Terminal c...

Страница 9: ... both audio and video from the same VCR to the same input AV IN Note Please refer to the user manual for the VCR for more information CONNECTIONS Connect to a camcorder Connect the right red and left white audio output from the camcorder to the right red and left white input on this unit Audio cable not included Connect the S VIDEO output from the camcorder to the S VIDEO input on this unit S VIDE...

Страница 10: ...ideo from the same VCR to the same input AV IN Note Please refer to the user manual for the VCR for more information CONNECTIONS Connect to a camcorder Connect the right red and left white audio output from the camcorder to the right red and left white input on this unit Audio cable not included Connect the video yellow output from the camcorder to the video input on this unit Video cable not incl...

Страница 11: ...hannels check with your cable satellite service provider for details CONNECTING A HIGH DEFINITION HD SOURCE High Definition HD Devices with component video output must be connected to the YUV input Connect the three video outputs Y Pb Pr from the source to the corresponding video inputs on this unit Component video cable not included Connect the right red and left white audio output from the sourc...

Страница 12: ...p 720p 1080i are supported Connect the output from your HD source to the DVI input on this unit Connect a stereo audio cable not included to the PC AUDIO IN jack on the bottom of this unit and the other end to the AUDIO OUT jack on your HD source To operate the connected device first press the FUNCTION button to select the DVI IN mode Using in HD High Definition Mode The HD High Definition mode al...

Страница 13: ...l such as a pillow or thick piece of foam beneath the screen 3 Remove the four screws and then remove the BASE STAND from the TV INSTALLATION CONNECTIONS CONNECT THE POWER CORD Connect the AC power cord into a wall outlet Press the STANDBY ON button on the top of unit or remote control to turn on the unit Note Be sure the AC power cord is disconnected and all functions are off before making connec...

Страница 14: ...ons included with the mounting kit Turn down the volume before connecting headphones to the unit then adjust the volume to your desired level When headphones are connected no sound will come from the front speakers Note Avoid listening to sound at high levels for prolonged periods of time This may be harmful to you and may cause hearing loss USING HEADPHONES INSTALLATION 3 9 3 9 PLV36190_ib_eng_1 ...

Страница 15: ...harpen the picture quality The black portions of the picture become richer in darkness and the white become brighter Color Adjust the color of the picture Sharpness Adjust the sharpness level to improve detail in the picture Hue Adjust the hue of the picture Toward purple Toward green ColorTemp Adjust the three color temperature of the picture Select Normal balanced Cold blue white Warm red white ...

Страница 16: ... of show you are watching SETUP MENU 1 Press the MENU button 2 Use the or button to select the Setup menu then press the button to confirm the setting 3 Use the or button to select the options OSD Size Language Parental Timers and adjust them using the or buttons 4 Repeat step 3 to adjust other settings 5 To exit the MAIN MENU and return to the normal screen press the EXIT button on remote control...

Страница 17: ...etting 3 Use the or button to select the Parental menu then press the or button to confirm the setting and the menu locked screen will be displayed 4 Enter a 4 digit lock code Once entered the screen will enter the Parental menu The preset lock code is 0000 5 To exit the MAIN MENU and return to the normal screen press the EXIT button on remote control TV AV MODE PLV36190_ib_eng_15 20_wDVI pmd 18 0...

Страница 18: ...gue Contains dialogue 5 Fantasy Violence Contains fantasy violence Can Eng 1 E Exempt 2 C Children 3 C8 Recommended for children age 8 4 G GENERAL AUDIENCES Suitable for all ages 5 PG PARENTAL GUIDANCE SUGGESTED Some material may not be suitable for children 6 14 Viewers 14 years and older 7 18 Adult Programming Can French 4 13 Not suitable for children under the age of 13 5 16 Not suitable for ch...

Страница 19: ... to confirm the setting 3 Use the or button to select the Channel no setting and use the or button to change the channel no 4 Use the or button to select the Tuning mode and use the or button to change from AIR over the air broadcasts to CABLE cable satellite broadcasts 5 Use the or button to select the Auto tune and press the or button to confirm the selection The unit will immediately search thr...

Страница 20: ...na is connected properly Increase the volume Make sure the antenna or audio video source device is working properly Make sure all cables are connected firmly Check for local interference Make sure there are no unshielded electrical devices nearby that are causing interference Turn the TV off for 30 minutes then try it again Bad Picture snow multiple images distortion blurry No sound Black and whit...

Отзывы: