background image

14

CALLER ID OPERATION

DELETE CID RECORDS

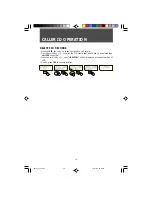
– Press the CID key to go to check the received call record.
– Press the scroll key 

6

/

5

 to select the CID record that would like to be deleted then

press YES to confirm.

– Press the scroll key 

3

/

4

 until “<DELETE>” will be displayed at the bottom line of

LCD.

– Finally, press YES to execute deletion.

9025_ib_us2.p65

11/21/02, 12:11 PM

15

Содержание 9025

Страница 1: ...MODEL 9025 OWNER S MANUAL 9025_ib_us2 p65 11 21 02 12 11 PM 1 ...

Страница 2: ...E OPERATION 10 11 Answering a call Making a call Transferring an external call Pause function Call waiting operation MEMORY OPERATION 12 Adding a new entry to memory Deleting a memory entry Editing a memory entry CALLER ID OPERATION 13 14 View call records Dial from CID records Store the CID records into phone book Delete CID records TELEPHONE SETTING 15 16 Clock setting Keypad setting Ringer sett...

Страница 3: ...rom the type of power source indicated on the marking label If you are not sure of the type of power supply to your home consult your dealer or local power company 8 Do not allow anything to rest on the power cord Do not locate this product where the cord will be abused by persons walking on it 9 Do not overload wall outlets and extension cords as this can result in the risk of fire or electric sh...

Страница 4: ...ded with or identified for use with this product only in accordance with the instructions and limitations specified in the instruction manual provided for this product 6 Observe proper polarity orientation between the battery pack and battery charger 7 Keep batteries out of the reach of children 3 USE ONLY WITH CLASS 2 POWER SOURCE 7 5V DC 450mA SAVE THESE INSTRUCTIONS d If the product does not op...

Страница 5: ...ipment Caution To maintain compliance with the FCC s RF exposure guidelines place the base unit at least 20 cm from nearby persons Note This equipment has been tested and found to comply with the limits for a Class B digital device pursuant to Part 15 of the FCC Rules These limits are designed to provide reasonable protection against harmful interference in a residential installa tion This equipme...

Страница 6: ...erations or proce dures that could affect the operation of the equipment If this happens the telephone company will provide advance notice in order for you to make necessary modifications to maintain uninterrupted service Please follow instructions for repairing if any e g battery replacement section otherwise do not alternate or repair any parts of device except specified Connection to party line...

Страница 7: ...Min 220meter outdoors line on sight Up to 50 phone book memories 24 digits with 12 characters 10 dialed number records 24 digits 7 level Adjustable Receiver Volume 7 level Adjustable Ringer Volume 10 Ringer melody selection Name to number matching Real time clock function Call timer display Alarm clock function Hold function for call transfer Pre dial facility Low battery indication Keypad Lock Ke...

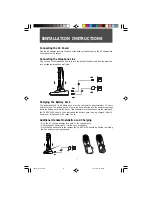
Страница 8: ...12 hours before first use The battery pack will not have been inserted into the handset so please insert the battery pack into the back of the handset Place the handset into the cradle and the CHARGE LED should light indicating the battery pack is being charged After 12 hours your telephone will be ready to use Additional Handset Installation and Charging Plug the AC charger adaptor into back of t...

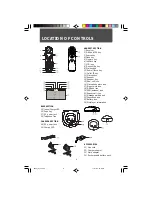
Страница 9: ...ll icon 16 Microphone mute icon 17 Ringer mute icon 18 Off hook icon 19 RSSI antenna icon 20 Repeat call icon 21 Message waiting icon 22 Phonebook icon 23 Battery icon 24 Dislplay of information BASE SECTION 25 In use Charge LED 26 Page key 27 DC power jack 28 Telephone line CHARGER SECTION 29 DC power jack 30 Charge LED ACCESSORIES 31 Line cord 32 Charger adaptor 33 Main adaptor 34 Rechargeable b...

Страница 10: ...wo mechanisms that allow the user to recover Pressing and holding the NO key during a function will return the user to the menu from which that function was selected If this key is pressed while in a submenu then the user is returned to the menu from which that submenu was selected Menus and memory selections also navigated via the arrow keys all have simple timeouts so that a phone left in these ...

Страница 11: ...ert to showing the elapsed call duration after a 5 second timeout Pre dialing Here the user enters the number and can edit and correct it before going off hook at which point the number is actually dialed Calling from Alphanumeric Memory The user dials a number which has already been stored in one of the alphanumeric memories Entries in the memories are stored in alphabetical order or in the case ...

Страница 12: ...extension then the FLASH key may be pressed during a call to send a Flash to the PABX Call transfer to another PABX extension is then handled according to the procedure specified by the PABX PAUSE FUNCTION Pause function will lead to the 3 6 seconds pause in the dialing sequence Press the R P button to create a pause in the dialing or to store a pause in the abbreviated dialing memories CALL WAITI...

Страница 13: ...r to abort the procedure There will be no checking for repeated entries The user will be allowed to enter the same name and or number into two or more memories DELETING A MEMORY ENTRY Memory deletion is considerably simpler than adding new memory entries Press the MEM key to enter to Phonebook directly Press scroll keys 6 5 to choose the phone numbers and press YES to select The selected phone num...

Страница 14: ...be displayed at the bottom line of LCD Finally press YES to dial the selected record out STORE THE CID RECORDS INTO PHONE BOOK Press the CID key to go to the received call record Press the scroll key 6 5 to select the CID record that would like to be saved then press YES to confirm Press the scroll key 3 4 until SAVE will be displayed at the bottom line of LCD Then press YES to confirm the selecte...

Страница 15: ...eceived call record Press the scroll key 6 5 to select the CID record that would like to be deleted then press YES to confirm Press the scroll key 3 4 until DELETE will be displayed at the bottom line of LCD Finally press YES to execute deletion 9025_ib_us2 p65 11 21 02 12 11 PM 15 ...

Страница 16: ...et as an alarm clock If activated the alarm clock on handset will ring every day at the time entered Press scroll keys 6 5 to select CLOCK and press YES to confirm Press scroll keys 6 5 to select SET ALARM and press YES to confirm Key in the AL time by 24 hour format e g 10 00pm press 2200 at the 1st row i e AL _ _ _ _ Press scroll keys 6 5 to go to second row for alarm on off setting Press 3 4 to...

Страница 17: ...ack to standby mode All key presses cause the message Unlock to be shown on the LCD The user must then press the Yes key to unlock RINGER SETTING User could change ringer volume melody by following procedure Press scroll keys 6 5 to select RING and press YES to confirm Press scroll keys 6 5 to select the ringer setting for either PHONE or INTERCOM and press YES to confirm the selection Press 3 4 t...

Страница 18: ...e Press scroll keys 6 5 to select W TALKIE and press YES to confirm Press 3 4 to select walkie talkie mode on or off e g MODE OFF Press YES to confirm the setting and handset will go back to phone mode Make walkie talkie call Press ID number of the called handset then press YES to call A calling tone could be heard if it is available and within the communication range Press the NO key to end the c...

Страница 19: ... mode setting Then handset would go back to standby mode SPEAKER PHONE MODE Enable the speakerphone mode While the phone mode off hook mode or in Walkie Talkie mode handset to handset simply press and hold the speaker phone button X which is located at handset back for 1 sec to activate the speaker phone mode When speakerphone mode is activated speaker will sound and symbol X will also show on LCD...

Страница 20: ...ng to register mode ENTER PIN will also display on LCD when entering to register mode Press 4321 for the PIN entry then registration has been starting The antenna icon on LCD will flash Once the registration has been succeeded Antenna icon on handset LCD will steady The handset ID no will also be displayed below battery icons e g H3 Note Please try to repeat the same procedure as above for registr...

Страница 21: ...sure telephone line is plugged firmly into base unit telephone wall jack Make sure your telephone line is operating normally by unplugging the unit replacing with another which is known to be operating correctly If you still don t hear dial tone call your local telephone company Ensure telephone line is plugged firmly into base unit telephone wall jack Make sure handset battery is NOT in battery l...

Отзывы: