background image


•  Caused by any misuse, abuse or negligent use of the Vent-Axia product, including but not 

limited to any failure to use it in accordance with the Operating Instructions supplied with the 

product.


•  Caused by any failure to assemble, install clean and maintain your Vent-Axia product in 

accordance with the Operating Instructions supplied with the product unless this was carried 

out by Vent-Axia or its authorised dealers.


•  Caused by repairs or alterations to your Vent-Axia product not carried out by Vent-Axia service 

personnel or its authorised dealer(s).


•  Caused by use of any consumables or spare parts for your Vent-Axia product which are not 

Vent-Axia - specified.

Terms and Conditions

•  The Vent-Axia Guarantee is valid for Vent-Axia from the date of purchase of your Vent-Axia product 

from a recognised retailer in the country of purchase and use, or the date of delivery of the product 

if later, always provided the original receipt has been retained and is produced as proof of purchase.

•  You must provide to Vent-Axia or its authorised agents on request the original receipt as proof 

of purchase and - if required by Vent-Axia - proof of delivery. If you are unable to provide this 

documentation, you will be required to pay for any repair work required.

•  Any repair work under the Vent-Axia Guarantee will be carried out by Vent-Axia or its authorised 

dealer(s) and any parts that are replaced will become the property of Vent-Axia. Any repairs 

performed under the Vent-Axia Guarantee will not extend the Guarantee Period.

•  Any replacement of your Vent-Axia product by Vent-Axia during the Guarantee Period will start 

the Vent-Axia Guarantee Period afresh from the date of delivery of the replacement Vent-Axia 

product to you.

•  The Vent-Axia Guarantee does not entitle you to recovery of any indirect or consequential loss or 

damage including but not limited to loss or damage to any other property.

•  The Vent-Axia Guarantee is in addition to your statutory rights as a consumer and your statutory 

rights are not affected by this Vent-Axia Guarantee.

Contact Vent-Axia

If you have any questions about what the Vent-Axia Guarantee covers and does not cover or how 

to claim under the Vent-Axia Guarantee, please contact us using the information on the back page.

27

Содержание Optimax Plus VAPH100TE

Страница 1: ...ned for future use Note also the information presented on the appliance Optimax Plus Panel Heater VAPHTE Models VAPH50TE VAPH75TE VAPH100TE VAPH125TE VAPH150TE VAPH200TE VAPH300TE INSTRUCTION MANUAL I...

Страница 2: ...the power to the heater Once the heater has cooled down it will reset automatically it will continue to cycle on and off automatically until the reason for overheating is removed The display screen m...

Страница 3: ...r the electrical connection point Excess cable should not be inserted and stored behind the heater WARNING This heater must not be connected to the electricity supply via an external switching device...

Страница 4: ...icity Consumption At nominal heat output elmax 0 00 0 00 0 00 0 00 0 00 0 00 0 00 At minimum heat output elmin 0 00 0 00 0 00 0 00 0 00 0 00 0 00 In standby mode elSB 0 0005 0 0005 0 0005 0 0005 0 000...

Страница 5: ...on Durable epoxy polyester powder coated steel casing with forward facing grille Advanced controls with cap sense technology for total flexibility of heating Element Compact finned mineral filled shea...

Страница 6: ...d with the heater must be used and the heater must be installed in the correct orientation Thefixingsshouldbeusedtosecure the bracket to the particular wall on which the heater will be installed The h...

Страница 7: ...ular wall type 3 Present the heater to the wall bracket and engage bottom slots in the back with bracket hooks 4 Press heater into locked position and ensure the clips on the top are engaged WARNING T...

Страница 8: ...s to set the minutes Day Month and Year Press Enter to confirm and return to home screen Set the Temperature The temperature shown on the display is the target room temperature known as Setpoint This...

Страница 9: ...produce some noise during operation This noise is caused by the expansion and contraction of the element as it changes temperature and is normal for this type of product Whilst the noise produced is u...

Страница 10: ...e Device Name as a 4 digit PIN The timed periods during which the heater is providing heat are defined as Comfort On this is displayed in the middle of the screen Outside of heating periods the heater...

Страница 11: ...e Advance function will be displayed here When left inactive for a long period of time this display will sleep and the text will disappear Press any button for its return NOTE Pressing Enter will show...

Страница 12: ...u button Press Up button 3 times Press Enter when the Date time Icon is highlighted Press Enter to set Time Press Down Up to set the Hour then press Enter to confirm Press Down Up to set the Minutes t...

Страница 13: ...s mode should be used to provide protection against frost as indicated by the Frost icon Standby Select Standby to switch off the heating element Heat will not be provided To activate standby Press Me...

Страница 14: ...y 3 Wednesday Day 4 Thursday Day 5 Friday Day 6 Saturday Day 7 Sunday Press Enter to Modify Day 1 or Press Up to navigate to the desired day and Press Enter to Select User Timer To activate User timer...

Страница 15: ...ust the on Minute time press Enter to Confirm 6 Press Down or Up to adjust the Temperature setting press Enter to Confirm 7 Press Down or Up to adjust the off Hour time press Enter to Confirm 8 Press...

Страница 16: ...he Enter Button to activate User Timer the backlight will flash and the screen will return to the home screen Manual Mode To choose a constant heat mode This mode ignores the User Timer and maintains...

Страница 17: ...have heating on You can change the way you use your heating temporarily this temporary change is achieved using the Advance function When a timer has been selected the Advance function allows you to b...

Страница 18: ...the Date time Icon is highlighted Press Down or Up to Enter DST screen Press Enter to adjust DST Press Down or Up to toggle DST on off Press Enter to confirm Sound Audio feedback can be enabled or dis...

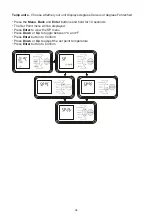
Страница 19: ...the Menu Back and Enter buttons and hold for 10 seconds The Set Point menu will be displayed Press Enter to view the SP menu Press Down or Up to toggle between o C and o F Press Enter button to Confi...

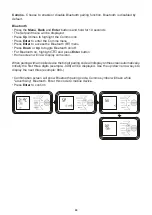
Страница 20: ...BT menu Press Down or Up to toggle Bluetooth on off For Bluetooth on highlight and press Enter button Home screen will now display coms icon Whenpairingwithamobiledevicethe6digitpairingcodewilldispla...

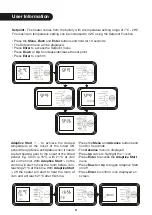
Страница 21: ...he onset of the timed ON period the appliance anticipates when it needs to start heating prior to the onset of the timed period E g room is 16o C with 21o C at 7am set on the timer With Adaptive Start...

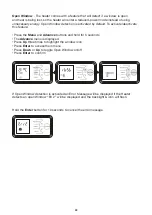
Страница 22: ...ss the Menu and Advance buttons and hold for 5 seconds The Advance menu is displayed Press Up three times to highlight the window icon Press Enter to access the menu Press Down or Up to toggle Open Wi...

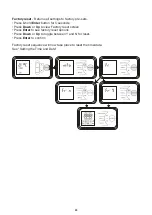
Страница 23: ...n for 5 seconds Press Down or Up to view Factory reset screen Press Enter to see factory reset options Press Down or Up to toggle between Y and N for reset Press Enter to confirm Factory reset sequenc...

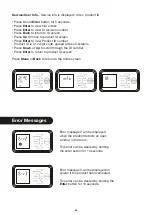
Страница 24: ...a 12 digit code spread across 3 screens Press Down or Up to scroll through the ID number Press Enter to return to product ID screen Press Menu or Back to return to the home screen Error message 3 will...

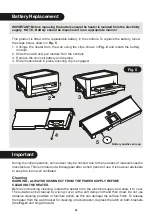
Страница 25: ...able to keep the room well ventilated Cleaning WARNING ALWAYS DISCONNECT FROM THE POWER SUPPLY BEFORE CLEANING THE HEATER Before commencing cleaning isolate the heater from the electrical supply and a...

Страница 26: ...problem with your Vent Axia product please call the Helpline on 0344 856 0594 or visit https www vent axia com contact us We will need details of your Vent Axia product its serial number and a descri...

Страница 27: ...thorised agents on request the original receipt as proof of purchase and if required by Vent Axia proof of delivery If you are unable to provide this documentation you will be required to pay for any...

Страница 28: ...ver the essential requirements of EEC Directives 2006 95 EC and 2004 108 EC Customer Helpline 0344 856 0594 tech vent axia com www vent axia com heating Vent Axia Fleming Way Crawley West Sussex RH10...

Отзывы: