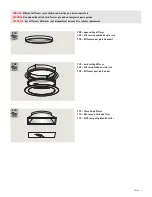
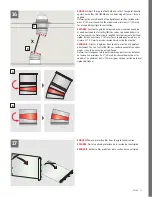
Velux TGC Скачать руководство пользователя страница 9

VELUX   9

5

ENGLISH:

 Center the flashing over the rough opening and secure the 

flange with ten of the provided 1½" (40 mm) screws in all the pre-
punched holes along the edges.

ESPAÑOL:

 Centre el tapajuntas sobre el hueco y asegure la brida 

con diez de los tornillos de 1½" (40 mm) suministrados en todos los 
orificios previamente perforados a lo largo del borde.

FRANÇAIS :

 Centrer le solin au-dessus de l'ouverture brute et fixer 

le rebord à l'aide des dix des vis fournies de 1½" (40 mm) dans 
toutes les ouvertures déjà perforées tout autour du rebord. 

6

1½"


(40 mm)

ENGLISH:

 Remove the roofing material around the upper half of the 

rough opening as indicated and apply mastic around rough opening 
as shown.

ESPAÑOL:

 Quite el material de cubierta que rodea la parte superior 

del hueco y aplique masilla alrededor del hueco como se indica.

FRANÇAIS :

 Enlever le matériel de toiture autour de la moitié 

supérieure de l'ouverture brute tel qu'indiqué et appliquer du mastic 
autour de l'ouverture brute tel qu'illustré ci-contre.  

Содержание TGC

Страница 1: ...ENGLISH Installation instructions for rigid sun tunnel TGC TMC TTK ESPA OL Instrucciones de instalaci n para t nel solar r gido TGC TMC TTK FRAN AIS Instructions d installation du tunnel de lumi re r...

Страница 2: ...ajuntas 3 Collar superior con anillo pivotal Bolsa pl stica Tornillos 4 Codo superior y inferior 5 Secci n de t nel r gido secciones de t ne les r gidos adicionales disponibles 6 Empaquetadura de felp...

Страница 3: ...do FRAN AIS Des diffuseurs diff rents sont disponible et doivent tre achet s s par ment TOC open ceiling diffuser TOC difusor suspendido de cielo raso TOC Diffuseur pour plafond ouvert THC hard ceilin...

Страница 4: ...a puede invalidar las garant as contenidas en la Promesa VELUX El pro veedor no acepta responsabilidad alguna por instalaciones de t nel solar VELUX que los instaladores no hayan hecho de acuerdo con...

Страница 5: ...is tra m s luz Para montajes de t neles solares r gidos generalmente se recomienda asegurar la transmi si n de carga a la estructura del techo mediante el kit de suspensi n ZTZ 203 C Verifique que el...

Страница 6: ...6 VELUX 1 3 14 60 15 90 0 14 15 90 tGc tGc TMC...

Страница 7: ...tas con los tornillos de 1 40 mm suministrados Nota La sujeci n refuerzo del tapajuntas al brocal puede dejarse para el final Esto limitar acceso al tico y permitir la instalaci n por completa del con...

Страница 8: ...tunnel on the roof and use the flashing to mark top and bottom of the rough opening ESPA OL Localice el clavo que indica el centro del t nel solar en el techo y use el tapajuntas para marcar arriba y...

Страница 9: ...ture brute et fixer le rebord l aide des dix des vis fournies de 1 40 mm dans toutes les ouvertures d j perfor es tout autour du rebord 6 1 40 mm ENGLISH Remove the roofing material around the upper h...

Страница 10: ...OL Instale nuevamente el material de cubierta sobre la brida Deje un canal de 5 8 15 mm para que el agua pase Opcional puede solicitar extensiones de la torre ZTA si necesita elevar la c pula 12 300...

Страница 11: ...VELUX 11 tGc TMC TTC THC Pages 15 19 tGc TMC TOC Pages 12 14 10 10 TTC THC TOC...

Страница 12: ...installer la trousse de s curit ZTQ utiliser les instruc tions d installation inclus avant de proc der 12 11 ENGLISH Remove protective film from the rigid tunnel section ESPA OL Quite la pel cula pro...

Страница 13: ...d ESPA OL Conecte el conjunto del t nel con los sujetadores suministrados FRAN AIS Relier l assemblage du tunnel avec les attaches de tunnel fournies ENGLISH Tape all joints ESPA OL Asegure todas las...

Страница 14: ...del t nel como se indica FRAN AIS Installer l assemblage du tunnel tel qu illustr 18 19 mm ENGLISH Place sun curve on top of tunnel assembly 022 only Install dome by aligning holes and securing with t...

Страница 15: ...by aligning holes and securing with the 19 mm screws pro vided Do not overtighten the screws Note If installing energy kit ZTC use instructions enclosed with the kit If installing security kit ZTQ us...

Страница 16: ...de la parte interna de los componentes del t nel Coloque el codo sobre el difusor del cielo raso FRAN AIS Retirer tout le film protecteur de l int rieur des com posants du tunnel Positionnez le coude...

Страница 17: ...ido Incluya un m nimo 2 50 mm para superponer los codos y un m nimo 1 40 mm por cada secci n adicional de t nel r gido FRAN AIS Ajuster l angle des deux coudes de sorte qu ils pointent directement l u...

Страница 18: ...pour former une section de tunnel t lescopique Fixer les joints avec les deux vis de 3 8 10 mm B 18 ZTR ENGLISH Assemble the rigid tunnel section with clips provided Note For longer sun tunnels use VE...

Страница 19: ...el assembly with the clips supplied If tunnel section was trimmed or holes do not align use the screws supplied ESPA OL Conecte el conjunto del t nel con los sujetadores sumi nistrados Si se recort la...

Страница 20: ...5 JP VELUX Japan Ltd 03 3478 81 41 www velux com installation instructions for TgC TMC TTK 2013 VELUX Group VELUX and the VELUX logo are registered trademarks used under licence by the VELUX Group Ins...

Отзывы: