WT401 VELLEMAN
2
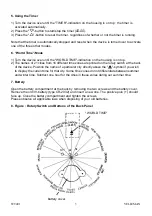
- Place the device on a flat surface with the "WORLD TIME"-indication on top. Select the city
you live in or a city within your time zone by turning the rotary switch at the back until the
"
"-symbol is pointing at the desired city. The message "WORLD TIME" is displayed as
soon as the user turns the rotary switch. Press the "SET"-button at the back of the device to
install the displayed time as "local time". The "WORLD TIME"-indication is automatically
erased from the display.
- Keep in mind that the device does not automatically adjust the time when summer or winter
time sets in : the user will have to set the clock manually.
3. Setting the Calendar & the Time
Place the device on a flat surface with the "WORLD TIME"-indication on top. Select the city you
live in or a city within your time zone by turning the rotary switch at the back until the "
"-
symbol is pointing at the desired city. The "WORLD TIME"-indication is always displayed in the
"world time" mode, except when the "local time" is being viewed. Use the following procedure to
set the time :
1) Turn the unit over so that the "CALENDAR"-indication on the housing is on top.
2) Press the "SET"-button to activate the time/calendar mode. The digits for the seconds will
start to flash. Use the "
"- or "
"-button to reset the seconds. Press "SET" to confirm the
seconds and make the digits for the hours flash.
3) Use the "
"- and/or "
"-button to enter the correct value. Press "SET" to confirm the hours
and make the digits for the minutes flash.
4) Use the "
"- and/or "
"-button to enter the minutes. Press "SET" to confirm the setting and
make the digits for the year flash.
5) Use the "
"- and/or "
"-button to enter the year. Press "SET" to confirm the year and
make the digits for the month flash.
6) Use the "
"- and/or "
"-button to enter the month. Press "SET" to confirm the month and
make the digits for the day flash.
7) Use the "
"- and/or "
"-button to enter the correct day. Press "SET" to return to the normal
display mode.
Remark : The digits will progress faster if the "
"- or "
"-button is held.
4. Setting the Alarm Time
1) Turn the device over until the "ALARM TIME"-indication on the housing is on top.
2) Press the "
"- or "
"-button to activate or deactivate the alarm. The "
"-symbol is
displayed when the alarm is ON.
3) Press "SET" to enter the alarm time. The digits for the hours will flash.
4) Use the "
"- and/or "
"-button to enter the hours. Press "SET" to confirm the hours and
make the digits for the minutes flash.
5) Use the "
"- and/or "
"-button to enter the minutes and press "SET" to confirm them.
6) The alarm will be activated for one minute at the entered time. Press any button or turn the
device over in any direction (so the "TIMER"-, "CALENDAR"- or "WORLD TIME"-indication
on the housing is on top) to deactivate the alarm.
7) The "
"-symbol indicates that the alarm is ON, regardless of the position of the device.
Turn the device over until the "CALENDAR"-indication is on top in order to return to the
normal time display.


