background image

TELES1


VELLEMAN 

TELES1 – TELESCOPE 50mm 


1. Introduction & Features 

 
Thank you for buying the 

TELES1

! Please read the manual thoroughly before bringing this device into service. 

If the device was damaged in transit, don't install or use it and contact your dealer. 
 

2. Safety Instructions 


Damage caused by disregard of certain guidelines in this manual is not covered by the warranty and the dealer will 

not accept responsibility for any ensuing defects or problems. 


Damage caused by user modifications to the device is not covered by the warranty. 


Only use the device for its intended purpose. Using the device in an unauthorised way will void the warranty. 


Familiarise yourself with the functions of the device before actually using it. Do not allow operation by unqualified 

people or children less than 8 years of age. Any damage will most probably be due to improper use of the device. 


Protect the device against extreme heat, dust and moisture. 


Use the original packaging if the device is to be transported. 


Do not look at the sun through the 

TELES1

 ; this may result in serious injury to your eye. 


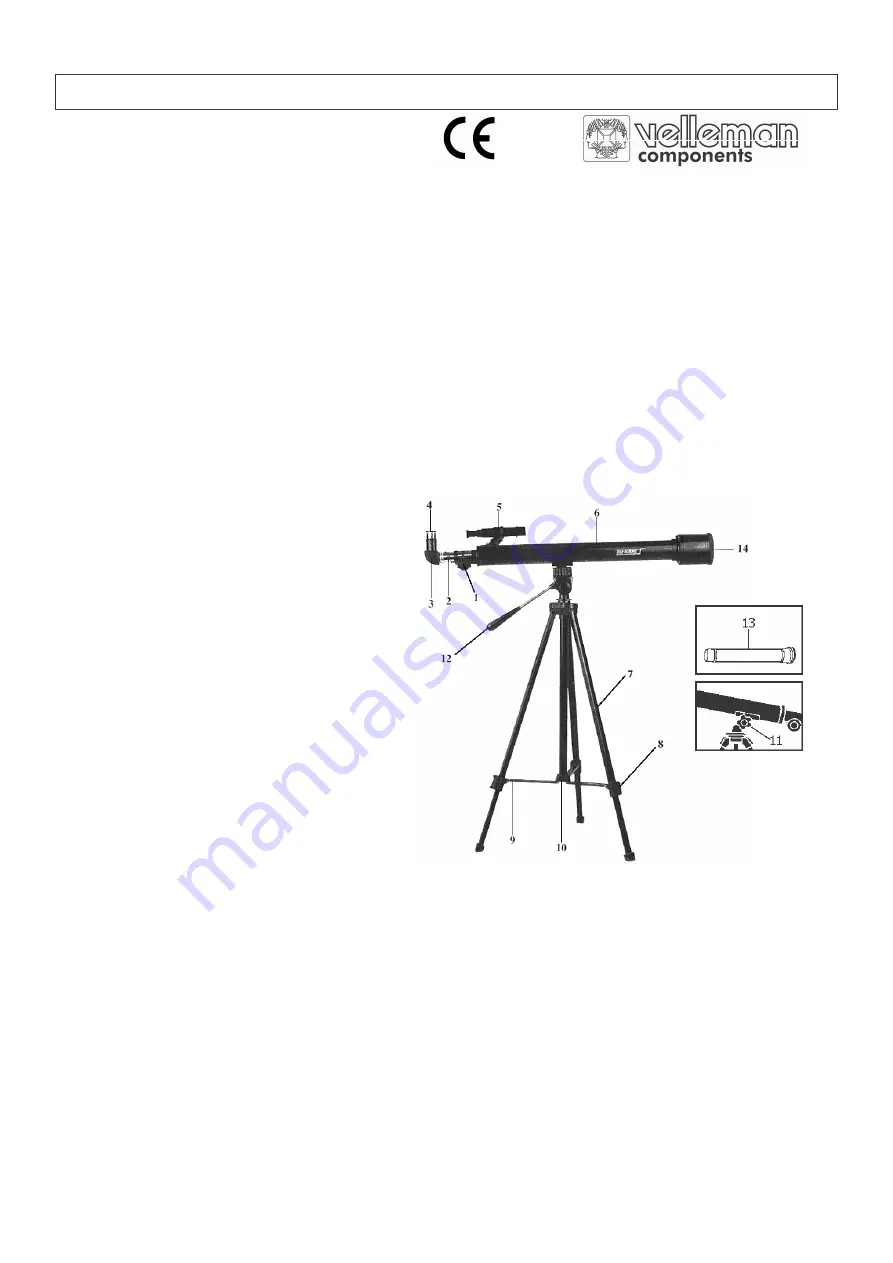
3. Parts of the Telescope 


1.  Focusing Knob 
2.  Focusing Tube 

3.  Diagonal Mirror 
4.  Eyepiece 

5.  Finderscope 
6.  Telescope Main Body 

7.  Tripod Legs 
8.  Tripod Leg Locks 

9.  Tripod Leg Braces 
10. Tripod Centre Post 

11. Azimuth Lock 
12. Alt-azimuth Adjustment 

13. Erecting Eyepiece / 21X Microscope 
14. Objective 


4. Maintenance 

 
The objective lens (14) of the 

TELES1

 must be cleaned with care and as seldom as possible to avoid affecting its 

precision and performance. An inexperienced person must never take a lens out of its mount. 
First try to remove the dust with a soft brush or by blowing. Moisten a piece of clean cotton with a few drops of ether 

or isopropyl alcohol and wipe the lenses very delicately, avoiding a circular motion.  
 

If possible, avoid taking the telescope from cold outside air into a warm room. This will cause the objective lens to be 
covered with condensation, which must be removed at once. To do this, place the telescope at a safe distance from 

any heat source and let it warm slowly until the condensation has vanished. Any stains left on the lens must be 
delicately wiped off when the lens is completely dry. 


Содержание TELES1

Страница 1: ...d Do not look at the sun through the TELES1 this may result in serious injury to your eye 3 Parts of the Telescope 1 Focusing Knob 2 Focusing Tube 3 Diagonal Mirror 4 Eyepiece 5 Finderscope 6 Telescop...

Страница 2: ...how accurately you see it is a function of three factors Power magnification Brightness Resolution clarity of image It is a common misunderstanding that the more power you have the better it is Indee...

Страница 3: ...entre the object in the field of view and focus Tighten the azimuth lock 11 to hold the telescope in position 2 Look through the finderscope If you cannot see the selected object loosen the adjustment...

Страница 4: ...ijken hierdoor kunt u uw ogen ernstige schade toebrengen 3 Onderdelen van de Telescoop 1 scherpstellingknop 2 scherpstellingbuis 3 Diagonale spiegel 4 Oculair 5 Zoeker 6 Telescoopbehuizing 7 Driepoot...

Страница 5: ...door drie factoren Sterkte vergroting Lichtintensiteit Resolutie scherpte van het beeld Het is een algemeen misverstand dat een sterkere vergroting ook beter is Het is inderdaad zo dat de essenti le...

Страница 6: ...de zoeker Kunt u het voorwerp niet zien draai dan de regelschroeven los en beweeg de zoeker tot u het voorwerp te zien krijgt Zet de regelschroeven zodanig vast dat het voorwerp in beeld blijft 3 Ste...

Страница 7: ...originel Ne regardez pas au soleil avec votre TELES1 ceci peut causer de s rieux dommages vos yeux 3 Parties du T lescope 1 Bouton de focalisation 2 Tube de focalisation 3 Miroir diagonal 4 Oculaire 5...

Страница 8: ...ts d une combinaison de trois facteurs Puissance grossissement Eclairage clart R solution pr cision de l image Le raisonnement qu il vaut mieux avoir plus de puissance possible est un malentendu g n r...

Страница 9: ...rrouillage azimut 11 pour garder la position du t lescope 2 Regardez dans le viseur Si vous ne voyez pas l objet d vissez les vis de r glage et positionnez le viseur de mani re que vous voyez l objet...

Страница 10: ...rato en su embalaje original No mire al sol con el TELES1 esto podr a da ar los ojos gravemente 3 Partes del Telescopio 1 Bot n de enfoque 2 Tubo de enfoque 3 Espejo diagonal 4 Ocular 5 Buscador 6 Cue...

Страница 11: ...copio y la precisi n de la imagen son el resultado de una combinaci n de tres factores Potencia ampliaci n Intensidad luminosa Resoluci n precisi n de la imagen El razonamiento de que una ampliaci n m...

Страница 12: ...mpo visual Apriete el bloqueo azimut 11 para mantener la posici n del telescopio 2 Mire en el buscador Si no veo el objeto desatornille los tornillos de ajuste y coloque el buscador de manera que vea...

Страница 13: ...nalverpackung wenn das Ger t transportiert werden soll Schauen Sie mit dem TELES1 nie in die Sonne Erblindungsgefahr 3 Teile des Teleskops 1 Scharfstellungsknopf 2 Fokussierrohr 3 Diagonalspiegel 4 Ok...

Страница 14: ...drei Faktoren ab Leistung Vergr erung Helligkeit Aufl sung Klarheit des Bildes Es ist ein g ngiges Missverst ndnis dass mehr Vergr erung ein besseres Ergebnis bedeutet Es stimmt tats chlich dass die e...

Страница 15: ...lung fest um das Teleskop in Position zu halten 2 Schauen Sie durch das Sucherfernrohr Wenn Sie das selektierte Objekt nicht sehen drehen Sie Schrauben los und bewegen Sie das Sucherfernrohr bis Sie d...

Отзывы: