manualshive.com logo in svg
background image

CS9000

 1 

VELLEMAN 

CS9000 – PROFESSIONAL METAL DETECTOR 


1.  Introduction & Features 


Thank you for buying the 

CS9000

! Please read the manual thoroughly before bringing this device into service. 

If the device was damaged in transit, don't install or use it and contact your dealer. 
This high-quality metal detector offers value for money and uses the latest technological developments. Read the 
manual carefully as it will enable you to enjoy the full range of possibilities this device has to offer. We advise you to 

experiment with objects you have buried yourself. This is a very efficient way of getting to know the behaviour of your 
detector and the different types of signals. 
Always remember that becoming a proficient user requires many hours of practice. 
 

2. Safety 

Instructions 


Damage caused by user modifications or disregard of certain guidelines in this manual is not covered by the 

warranty and the dealer will not accept responsibility for any ensuing defects or problems. 


Do not switch the device on immediately after it has been exposed to changes in temperature. Protect the device 
against damage by leaving it switched off until it has reached room temperature. 


Familiarise yourself with the functions of the device before actually using it. Do not allow operation by unqualified 

people. Any damage that may occur will most probably be due to unprofessional use of the device. 


Use the original packaging if the device is to be transported. 


All modifications of the device are forbidden for safety reasons. 


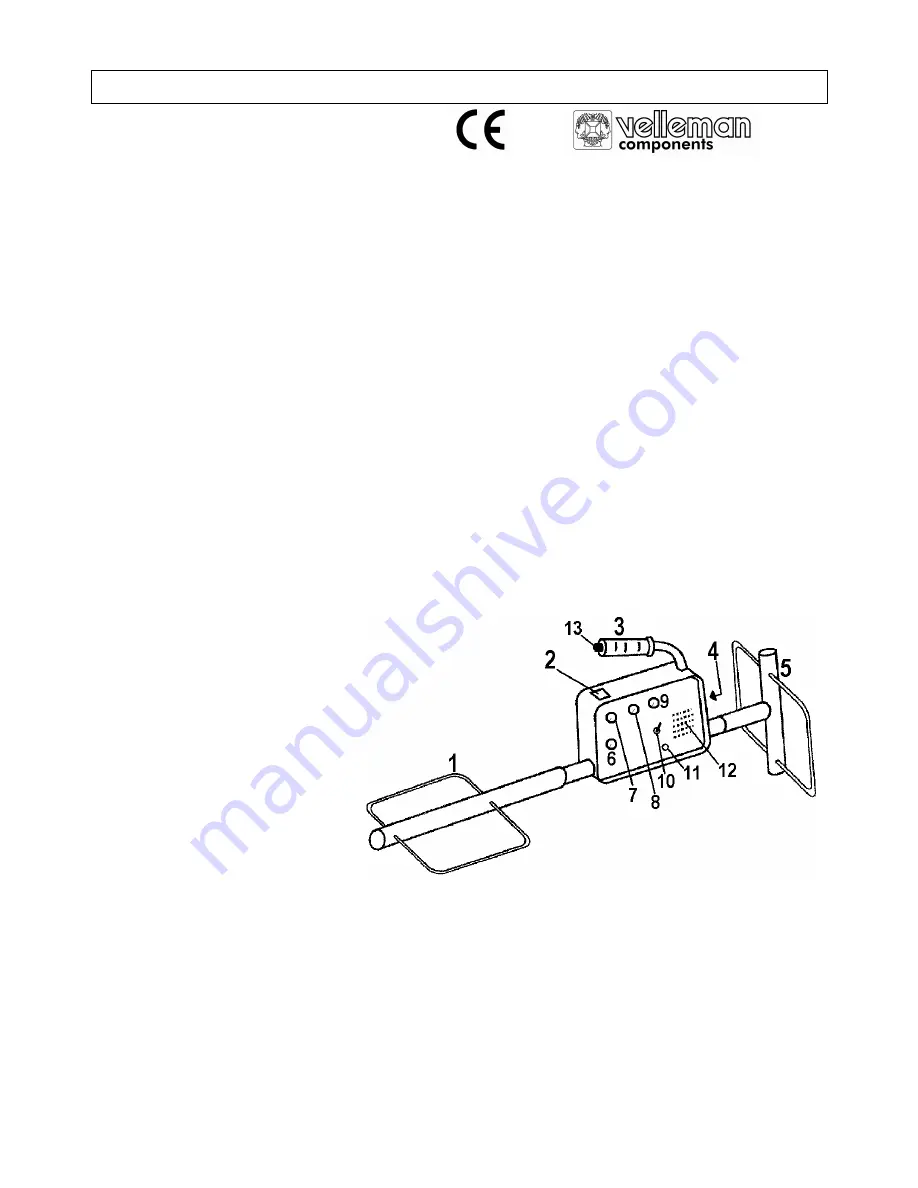
3.  Assembly and Parts Denomination 


Assemble the device as shown in the figure below: 
 
1. Receive antenna 
2. Meter 

3. Handle 
4. Battery compartment 
5. Transmit antenna 
6. Signal balance control 

7.  Ground balance control 
8. Threshold control 
9. Mode selector 
10. Automatic threshold on/off selector 

11. 6.35mm headphones socket 
12. Built-in speaker 
13. Thumb button 
 

4. Battery 

replacement 


Make sure the Mode selector (#9 in the figure above) is set to “OFF”. 


Open the battery compartment (#4) by simply pulling the knob. 


Tilt the metal detector so the battery holder slides out. 


Open the battery holder by pressing the 2 locking tabs on one side until they unlock and then pressing the 2 

locking tabs on the other side until the lid slips off.  


Place or replace the batteries with new batteries of the same type and rating. 


Close the battery holder, slide it in its compartment and close the battery compartment by first closing the lid 

completely and then pressing the knob to lock it. 

Содержание CS9000

Страница 1: ...l it has reached room temperature Familiarise yourself with the functions of the device before actually using it Do not allow operation by unqualified people Any damage that may occur will most probab...

Страница 2: ...operational when the METAL mode is selected It is adjusted to cancel out the mineralisation in the ground and allow for maximum penetration This allows the detection of objects that would otherwise n...

Страница 3: ...e search switch the automatic threshold back off and proceed in the following manner 4 If the tone and meter reading went down when the instrument was raised the ground balance control needs to be mov...

Страница 4: ...and will produce the same response for voids such as a cave When a ferrous target such as iron is encountered or when there is heavy iron mineralisation the sound will respond by going quiet Since th...

Страница 5: ...ce CS9000 PROFESSIONELE METAALDETECTOR 1 Inleiding en kenmerken Dank u voor uw aankoop Lees deze handleiding grondig voor u het toestel in gebruik neemt Ga na of het toestel niet werd beschadigd tijde...

Страница 6: ...ies OFF Zet de schakelaar in deze stand als u uw CS9000 niet gebruikt METAL in deze mode ligt de grondbalans aan en worden alle metalen voorwerpen zoals goud zilver muntstukken of zelfs deksels van se...

Страница 7: ...genoemd Deze zorgt voor een gepaste basistoon volgens de ondergrond Deze basistoon kan wat stijgen of zakken door de verandering in mineralisatie van de bodem Let wel dat het aanpassingsbereik van de...

Страница 8: ...m een gebied af te tasten is een rooster patroon op het gebied toe te passen Om het risico voorwerpen te missen te vermijden mogen de roosterlijnen niet meer dan 2m uit elkaar liggen Het terrein eerst...

Страница 9: ...ector in een vijandige omgeving heeft gebruikt zout water zand enz Zorg ervoor dat de antennes goed aansluiten op de controlebox 9 Problemen en oplossingen a De detector werkt niet meer Controleer de...

Страница 10: ...t de votre d tecteur en g n ral Retenez galement cette astuce importante un utilisateur r ussi est un utilisateur exp riment 2 Prescriptions de s curit La garantie ne s applique pas aux dommages surve...

Страница 11: ...dessiner soigneusement un patron de recherche pendant lequel vous faites particuli rement attention aux changements du ton BAT CHK dans ce mode vous pouvez v rifier l tat des piles sur le m tre 2 b B...

Страница 12: ...z le s lecteur de seuil automatique 10 sur AUTO 2 Mettez le s lecteur de mode 9 sur BAT CHK et v rifiez l tat des piles sur le m tre 2 Ensuite mettez le s lecteur de mode sur METAL Ce r glage convient...

Страница 13: ...comme valeur de r f rence et ainsi de localiser pr cis ment un objet Le seuil automatique fonctionne similairement mais moindre degr e Chercher des grottes et d autres cavit s 1 Mettez le s lecteur d...

Страница 14: ...radio lectrique d un taxi passant ou d un autre v hicule peut perturber le fonctionnement de votre d tecteur de m taux Diminuez la sensibilit ou si a ne marche pas attendez ce que le signal ait dispa...

Страница 15: ...experimentado 2 Instrucciones de seguridad Da os causados por descuido de las instrucciones de seguridad de este manual invalidar n su garant a y su distribuidor no ser responsable por ning n da o u...

Страница 16: ...de b squeda prestando particularmente atenci n a los cambios de la se al sonora BAT CHK en este modo es posible controlar el estado de la pilas en el medidor 2 b Balanza de la se al 6 Este bot n ajus...

Страница 17: ...alcance NORMAL Coloque el selector de threshold autom tico 10 en la posici n AUTO 2 Coloque el selector de modo 9 en BAT CHK y controle el estado de las pilas 2 Luego coloque el selector de modo en M...

Страница 18: ...sta manera un objeto precisamente El threshold autom tico le permite localizar el objeto autom ticamente e Buscar cuevas y otras cavidades 1 Coloque el selector de modo en CAVE y las balanzas de la se...

Страница 19: ...s por un coche equipado con un radio emisor o por una fuente electromagn tica estacionaria Si ocurre disminuya la sensibilidad Si el problema persiste es mejor esperar hasta que se termine la transmis...

Страница 20: ...Sie das Ger t nicht an bevor es Zimmertemperatur erreicht hat Machen Sie sich mit den Funktionen des Metalldetektors vertraut Erlauben Sie nicht dass unbefugte Personen das Ger t verwenden Die meisten...

Страница 21: ...lung unregelm ige Ergebnisse extreme Schwankungen des Grundtons Treshold tone ausl sen m ssen Sie den Knopf der Signalbalance nach MIN gegen den Uhrzeigersinn drehen Wenn Sie eine gr ere Suchtiefe ben...

Страница 22: ...ter f r automatischen Grundton auf AUTO 10 4 Setzen Sie den Modus Schalter auf 9 BAT CHK und pr fen Sie den Messer 2 um den Zustand der Batterien zu pr fen Setzen Sie dann den Modusschalter auf die Me...

Страница 23: ...sich die Empfangsantenne ber dem Ziel befindet Wenn Sie auf den Daumenknopf dr cken und ihn wieder loslassen schrumpft das Ziel und k nnen Sie es genau orten Der Grundton erm glicht eine automatische...

Страница 24: ...e Verbindungen richtig hergestellt und die Batterien korrekt eingelegt sind St rung verursacht durch ein Fahrzeug ausgestattet mit einem Funksender oder wahrscheinlich eine station re Quelle von elekt...

Отзывы: