background image

10

simulates a short to ground and pops the breaker. This turns off the outlets.

Pressing the RESET button allows the outlets to turn on and provide power.

Use with Appliances

Make sure the AC appliance can operate on 110/120 volts 60 Hz AC

modified sine wave (MSW) most appliances sold in the USA can. There are a

few exceptions, noted later.

• Plug the appliance’s two or three-pin North American standard plug into

the GFCI AC receptacle on the inverter

• Turn On the inverter’s power switch

• Turn On the appliance and operate it as usual

• After use, turn Off the power inverter’s On/Off Switch

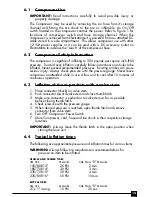
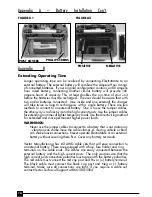
5.2 Principles of Operation

The Power Inverter converts power in two stages. The first stage is a DC-to-DC

conversion process that raises the low voltage DC at the inverter input to 145

Volts DC. The second stage is the actual inverter stage that converts the high

voltage DC into 110 Volts, 60 Hz AC, Modified Sine Wave (MSW). MSW is a

waveform that has characteristics similar to the sine wave shape of utility

power. This type of waveform is suitable for most AC loads, including linear

and switching power supplies used in electronic equipment, transformers, and

motors. The modified sine wave produced by the Power Inverter has an RMS

(root mean square) voltage of 110, which is the same as standard household

power. Most AC voltmeters (both digital and analog) are calibrated for RMS

voltage under the assumption that the waveform measured will be a pure sine

wave. These meters will NOT READ the RMS voltage of a modified sine wave

correctly. They will read about 20 to 30 Volts low when measuring the output

of the power inverter. For accurate measurement of the output voltage of this

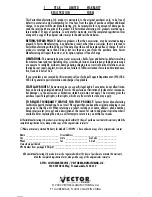
unit, use a voltmeter marked “TRUE RMS”. Figure 6 compares a Modified Sine

Wave with a True Sine Wave.

FIGURE 6

Power is provided to the inverter through two conductors that pass through the

battery compartment cover. With a full charge on the battery (typically 85AH),

the inverter will supply an AC load of 100 watts for approximately 8 hours.

Lower wattage loads will operate longer, higher wattage loads will operate

for a shorter time.
Example: If a load is rated at 100 watts AC, the power source must be able to

deliver: 100 / 10 = 10 amperes

CAUTION:

 The inverter must be connected only to batteries with a nominal

output voltage of 12 Volts. The unit will not operate from a 6 volt battery and

will sustain permanent damage if connected to a 24 VOLT battery.

WARNING:

  NEVER TRY TO JUMPSTART A 6 OR 24 VOLT SYSTEM.

DAMAGE TO THE INVERTER AND INTERNAL BATTERY CAN RESULT.

Содержание ElectroMate VEC095

Страница 1: ...AND PRODUCT LABELS PLUS YOUR VEHICLE S BATTERY MANUFACTURER GUIDELINES FAILURE TO DO SO COULD RESULT IN INJURY AND OR PROPERTY DAMAGE 110 Volt AC 12 Volt DC Portable Power Supply VEC095 Electronic Gen...

Страница 2: ...le battery is jump started Before jump starting this type of vehicle read the vehicle s owner s manual to confirm that external starting assistance is advised 11 Excessive engine cranking can damage t...

Страница 3: ...Tips 12 5 7 Troubleshooting the Inverter 12 6 COMPRESSOR TIRE INFLATOR 12 6 1 Compressor Use 13 6 2 Compressor Safety Information 13 6 3 Inflation of Tire or Products with a Valve Stem 13 6 4 Typical...

Страница 4: ...ccessories This ElectroMate model is modular in design and can be considered as several interconnected components The major components are Battery Power Inverter Automatic Battery Charger Tire Compres...

Страница 5: ...I outlets can connect to any two or three pin North American standard appliance plugs ElectroMate is also ideal to power 12 Volt DC cordless portable appliances with a combined current rating up to 30...

Страница 6: ...rage Hatch and must be removed from the Storage Hatch for use The VEC077EM is a high frequency three stage charger that can either be permanently connected to ElectroMate or connected to a battery cla...

Страница 7: ...Battery Status Button Polarity Correct LED indicates when it s safe to turn on the Safety Switch Audible alarm sounds when polarity is incorrect Visual LED Alarm indicates Reverse Polarity Adjustable...

Страница 8: ...start Procedure 1 Make sure the ElectroMate Safety Switch is turned OFF enabling the reverse polarity alarms and correct polarity indicator 2 Turn Off ignition and all accessories radio A C lights et...

Страница 9: ...FCI dual outlets 110 Volt 60 Hz AC alternating current household power It s DC source is the installed 12 Volt battery Safety features include an audible low battery alarm and automatic shutdown to pr...

Страница 10: ...ied sine wave produced by the Power Inverter has an RMS root mean square voltage of 110 which is the same as standard household power Most AC voltmeters both digital and analog are calibrated for RMS...

Страница 11: ...itor its temperature for the initial ten minutes of use to determine whether it becomes warmer than usual If excessive heat is generated it is a good indication that the device should not be used with...

Страница 12: ...those that start under load such as compressors and pumps Testing is the only definitive way to determine whether a specific load can be started and how long it can run The unit will simply shut down...

Страница 13: ...re with the pressure gauge Never leave compressor unattended while in use Allow unit to cool after 10 minutes of continuous operation 6 3 Inflation of tire or products with a valve stem 1 Place connec...

Страница 14: ...ocation NOTE The lamp may be used with any 12 Volt DC source vehicle accessory socket that can supply at least one ampere This allows great flexibility in positioning the lamp during tire inflation an...

Страница 15: ...STORAGE HATCH IT WILL OVERHEAT AND SHUT DOWN POSSIBLE DAMAGE TO THE CHARGER MAY RESULT As recharge progresses the battery level LEDs will light one by one Charge the ElectroMate until the Battery Sta...

Страница 16: ...ry compartment cover Periodically the cables and connectors should be inspected for dam age corrosion dust and dirt If surfaces are dirty they can be wiped clean with a cloth moistened with water and...

Страница 17: ...artment Lift the two cables out of the way so they are not down inside the battery compartment Carefully lower the battery into the battery compartment The terminals on the battery can be one of sever...

Страница 18: ...extended and more permanent higher power loads WARNINGS Never use the jumper cables to connect to a battery that is not stationary vibration can shake loose the cable clamps A moving vehicle or boat c...

Страница 19: ...er Green LED lit battery charged and no alarms sound Battery is charged but Loose battery connections Clean all contacts tighten won t handle large loads the post connectors and battery terminals Fluo...

Страница 20: ...eneral repair information and charges if applicable STATE LAW RIGHTS This warranty gives you specific legal rights Some states do not allow limita tions on how long an implied warranty lasts or the ex...

Отзывы: