17
©Vecow IVH-9204MX ICY User Manual
GETTING TO KNOW YOUR IVH-9204MX ICY
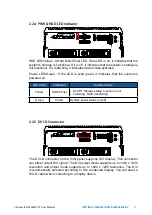
2.2.4
PWR & HDD LED Indicator
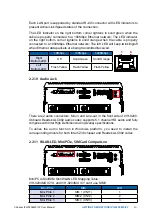
HDD LED/Yellow : A Hard Disk/CFast LED. If the LED is on, it indicates that the
system's storage is functional. If it is off, it indicates that the system's storage is
not functional. If it is flashing, it indicates data access activities.
Power LED/Green : If the LED is solid green, it indicates that the system is
powered on.
LED Color
Indication
System Status
Yellow
HDD/CFast • On/Off : Storage status, function or not
• Twinkling : Data transferring
Green
Power
System power status (on/off)
RST
DP
LAN 1
LAN 2
DVI-D
DVI-I
CFast
SIM 2
SIM 3
SIM 1
1
2
3
WLAN
2.2.5
DVI-D Connector
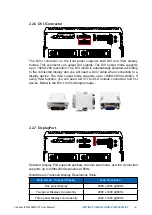
The DVI-D connector on the front panel supports DVI display. This connector
can either output DVI signal. The DVI output mode supports up to 1920 x 1200
resolution and output mode supports up to 1920 x 1200 resolution. The DVI
is automatically selected according to the connected display. You will need a
DVI-D cable when connecting to a display device.
RST
DP
LAN 1
LAN 2
DVI-D
DVI-I
CFast
SIM 2
SIM 3
SIM 1
1
2
3
WLAN
Содержание IVH-9204MX ICY
Страница 54: ...47 Vecow IVH 9204MX ICY User Manual SYSTEM SETUP Step 4 Finish Step 3 Remove eight flat head 6 32 screws...
Страница 58: ...51 Vecow IVH 9204MX ICY User Manual SYSTEM SETUP Step 5 Remove rear panel Step 6 Finish Step1 5...
Страница 59: ...52 Vecow IVH 9204MX ICY User Manual SYSTEM SETUP Step 7 Remove seven 6 32 screws Step 8 Remove front panel...
Страница 60: ...53 Vecow IVH 9204MX ICY User Manual SYSTEM SETUP Step 9 Remove extender Step 10 Remove 6 32 screw...
Страница 61: ...54 Vecow IVH 9204MX ICY User Manual SYSTEM SETUP Step 11 Remove 6 32 screw Step 12 Put out extender...
Страница 62: ...55 Vecow IVH 9204MX ICY User Manual SYSTEM SETUP Step 13 Remove SATA SATA power cable Step 14 Finish Step9 13...
Страница 75: ...68 Vecow IVH 9204MX ICY User Manual SYSTEM SETUP Step 7 Install the tray Step 8 Close the door...
Страница 76: ...69 Vecow IVH 9204MX ICY User Manual SYSTEM SETUP Step 9 Can use key to locked Step 10 Finish...


