


aXsGUARD Gatekeeper Authentication Quick Install Guide v1.6
DIGIPASS Management
8.2.2
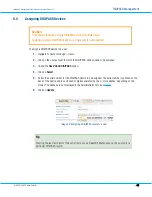
Manual import
A DPX file can also be imported manually through the aXsGUARD Gatekeeper Administrator Tool. This is useful
for importing (re-using) DIGIPASS devices and records which have been purchased with other VASCO products.
Caution
Importing a DIGIPASS DPX file without a valid license is not allowed. Contact your reseller for
more information.
To import a DPX file:
1.
Navigate to
Authentication > VASCO DIGIPASS > Upload
. A screen as shown
below
appears.
2.
Click on
Browse
and select the DPX file.
3.
Enter the provided DPX Transport Key. This is required because encryption is used for transport.
4.
Click on
Update
to finish.
5.
To view the list of imported DIGIPASS records, navigate to
Authentication > VASCO DIGIPASS >
DIGIPASS
.
8.3
DIGIPASS Device Testing
The aXsGUARD Gatekeeper is equipped with a DIGIPASS device testing tool. This is useful to test a DIGIPASS
device before assigning it to a user, or for troubleshooting.
To test a DIGIPASS device:
1.
Navigate to
Authentication
>
VASCO DIGIPASS
>
DIGIPASS
.
2.
Click on the serial number for the DIGIPASS device to be tested. The serial number is printed on the
back of the DIGIPASS housing.
3.
Click on
Test OTP
(Test One-Time Password).
4.
Generate an OTP with the DIGIPASS device and enter the OTP in the
DIGIPASS Code
field.
5.
Click on
Test DIGIPASS
.
© 2009 - VASCO Data Security
38
Image 28:
Manually Importing a DIGIPASS DPX File