background image

Critical event detection is triggered by the G-Sensor (Gravity 
Sensor) and will auto-detect vehicle impacts and collisions. 
This will cause the camera to protect the current video clip 
from being overwritten by locking it and saving the footage in 
the “Video/Event” folder. 

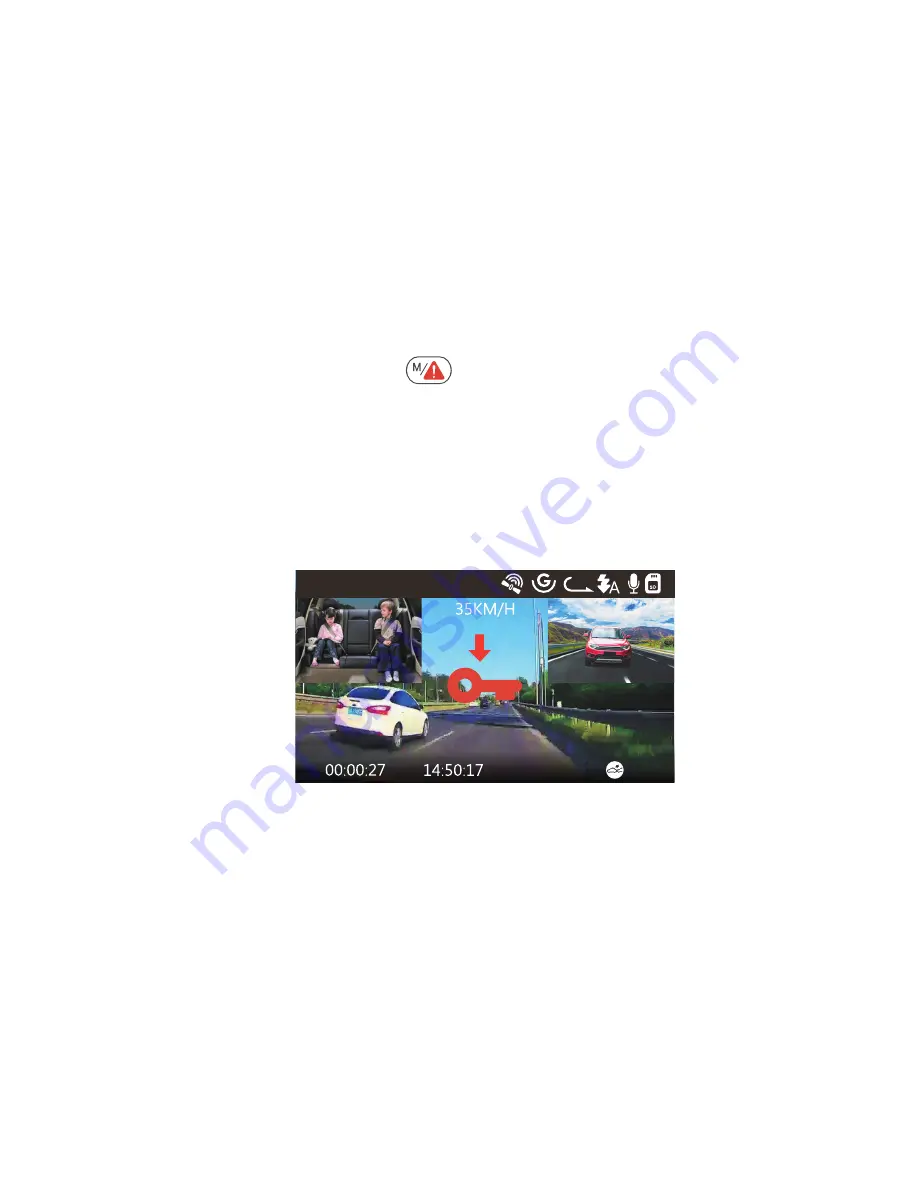
The user can also manually lock the current video recording 
session by pressing the          Button. A key icon will appear at 
the center of the screen. 

The G-Sensor sensitivity is adjustable with 3 settings: Low, 
Medium, and High ‒ it is set to Medium by default. The 
G-Sensor can also be deactivated in “Record Setup” > “
G-Sensor”.

- 19 -

4.8  Event Recording

Event  videos  are  stored  in  the  “Video/Event”  folder,  and 
cannot be automatically overwritten. 

Note:

  The  camera  will  auto  overwrite  old  Event  videos  once 

the  Event  folder  has  accumulated  25%  of  the  card  capacity. 
Please regularly transfer important videos to your PC or anoth-
er storage location (e.g. external hard drive). To maintain good 
read/write performance, the microSD card should be format-
ted at least once a month.

12-20-2019

3

1440P+1080P+1080P

Содержание OnDash N4

Страница 1: ...OnDash N4 3 Channel Dash Cam User Manual 100mmX130mm ...

Страница 2: ... 1 www vantrue net contact facebook com vantrue live f Always a surprise in Vantrue Hey find us here ...

Страница 3: ...9 28 58 86 29 60 87 Camera Overview Die Übersicht über Kamera 各部の名称とはたらき Getting Started Vorbereitung vor dem Einschalten 入門 Basic Operation Grundlegende Operation 基本的な使い方 Specifications Spezifikationen 製品仕様 Warranty Support Garantie und Unterstützung 保証とサポート VERZEICHNIS 1 2 3 4 5 6 ...

Страница 4: ...ith Built in Type C Cable 11 4 ft B VANTRUE N4 Dash Cam C Suction Cup Mount D Type C USB Data Cable 3ft E User Manual F Quick Start Guide G Warranty Card H Rear Camera 0 98 ft I Rear Camera Cable 20 ft J Adhesive Sticker A D C B E F G H J I ...

Страница 5: ...ove selector down Switch the Front cabin and rear camera window display Fast forward when playing back videos Move selector up Microphone on off Slow forward when playing back videos 4 Button Confirms the action Stop Start the video recording 4 3 4 5 2 1 17 15 14 16 6 9 8 7 19 13 18 12 10 11 VTN40AXXXX ...

Страница 6: ...r 10 IR LED Light 4 IR LED lights enhances the night vision in car 12 Indicator light Blue light blinking when recording Light on when charging 13 Microphone Records clear audio with the video footage 15 Front Camera Front Facing Camera for video recording road events 14 Mount Connector Connects to the Suction Cup Mount 18 Serial Number Serial Number for Warranty Registration 17 Speaker Delivers s...

Страница 7: ... cam is off Carefully insert the memory card into the cameraʼs card slot until it clicks To remove the card power off the camera first then push the card into the slot until it clicks again G Sensor OFF Loop Recording Time MIC is ON MIC is OFF Recording Emergency File Lock Time lapse On Collision Detection Motion Detection ON Current Date MM DD YY and Time 24H Night mode off Night mode auto on off Nigh...

Страница 8: ...s button to access into the menu Press the button to highlight the System Setup option press the button to confirm REMINDER The microSD card should be formatted once a month to maximize the lifetime of the memory card Please do not take the card out when the camera is recording in case that the important video files missing Please don t use Sandisk or Transcend SD card on this dash cam 1 2 3 If you ...

Страница 9: ...tor pushing it in until it clicks 1 2 3 4 Thoroughly clean the windshield using water or alcohol and wipe clean with a dry cloth Wipe the Suction Mounting Pad clean on the Suction Mount Securely attach the Suction Mount to the windshield and rotate the locking clamp on the mount 90 upward until it clicks ...

Страница 10: ...uck it under the trim 5 Connect the External Camera to the Rear Cam Port on the device through the rear camera cable carefully route the cable and tuck it under the trim 6 With the Type C USB Cable connect the supplied Car Charger to the Front Camera Mount Base 7 ...

Страница 11: ... will auto power on and start recording 4 Basic Operation 4 1 Power ON OFF Once the car starts on the camera will automatically turn on and start recording A Manually Long press the button to power it OFF Insert the Car Charger into your vehicleʼs cigarette lighter port ...

Страница 12: ...f the charger cable is disconnected or if the vehicle is turned off The device has two USB ports available for power supply on the camera or via the suction cup mount When charging via computer please use the USB port located on the mount If you use the USB port on the camera USB Connecting and Power On will be displayed on the camera screen please select Power on to charge the dash cam Note 1 2 4 ...

Страница 13: ...ding Press button to change the duration 1Min 3Min 5Min and OFF IR lEDs Press the and or button to select the section Auto On and Off G Sensor Set Pressing button gives the following sensitivity options Low Medium High Off Audio Recording Press button and button to toggle it OFF ON Parking Mode Press and button to change the options Collision Detection Collision Motion Detection OFF Exposure Press a...

Страница 14: ... navigate button and select format to format the micro SD card Time Date Press or and button to set the current date and time Press the button to exit Auto LCD Off If the setup is 3 min the dash cam screen would auto turn off after 3 min it start recording If the setup is off the screen will not turn off Press the button to select the duration in minutes 30sec 1Min 3Min or OFF to disable it Device Sou...

Страница 15: ...os and critical event videos recorded 4 3 Set Date Time Open the MENU interface navigate to System Setup Time Date and press the button to set the date time Navigate or to select date and time values Press button to confirm and proceed To finish setup just press the 1 button to exit Note Date default format is MM DD YY with the time in 24 hour format C Files Review and delete videos stored in the fil...

Страница 16: ...0P 30FPS 1080P 1080P 30FPS 1080P 720P 30FPS 720P 1080P 30FPS 720P 720P 30FPS Front Mode 2592x1520P 30FPS 2560x1440P 30FPS 1920x1080P 30FPS 1280x720P 30FPS To finish setup just press the button to exit 15 4 4 Switch Recording Mode Resolution By default Front Cabin Rear RECORDING mode 1440P 1080P 1080P resolution will show on the screen the 3 cameras will simultaneously capture road front inside cabi...

Страница 17: ...t Front Cabin Rear Front Cabin Front Rear Front Front Cabin Rear Front Cabin Front Rear Front Front Cabin Rear Front Cabin Front Rear Front 2592x1520P 30FPS 2560x1440P 30FPS 1920x1080P 30FPS 1280x720P 30FPS 1440P 1080P 1080P 30FPS 1080P 1080P 1080P 30FPS 1080P 1080P 720P 30FPS 720P 720P 720P 30FPS 1440P 1080P 30FPS 1080P 1080P 30FPS 1080P 720P 30FPS 720P 1080P 30FPS 1440P 1080P 30FPS 1080P 1080P 3...

Страница 18: ...ed to a power source it will not immediately start on and record While recording the Record indicator will blink and a red dot will flash on the lower corner left of the screen You can stop start the recording at any time by pressing the button 12 20 2019 3 1440P 1080P 1080P 3 1440P 1080P 1080P 3 1440P 1080P 1080P 3 1440P 1080P 1080P Front Camera Bigger Inside Camera Bigger Rear Camera Bigger ...

Страница 19: ...les Standard files are stored in the Video Normal folder When the Micro SD card is full the camera will write over older files When Loop Recording is turned off the camera will record video in 20 minute clips but will not overwrite old videos when the storage card is full 4 7 IR LED Light By default the IR LED light is auto on Short Press button to toggle the night vision mode ON Auto ON OFF OFF Nigh...

Страница 20: ...r sensitivity is adjustable with 3 settings Low Medium and High it is set to Medium by default The G Sensor can also be deactivated in Record Setup G Sensor 19 4 8 Event Recording Event videos are stored in the Video Event folder and cannot be automatically overwritten Note The camera will auto overwrite old Event videos once the Event folder has accumulated 25 of the card capacity Please regularl...

Страница 21: ...owing methods When the voice recording has been turned OFF the MIC icon at the top of the screen will turn white with a red line across it 4 10 Parking Mode Constant Power Supply Needed Parking Mode operates as a sentry function under different situations To activate Parking Mode go to Record Setup Parking Mode press and select the following options Collision Detection Collision Detection Motion De...

Страница 22: ...ng will be triggered by the Collision Detection sensor Once front camera detects vehicle impacts or collision it will auto turn on and start auto recording it will stop recording and auto off again after 5 minutes of inactivity When the Collision Detection Motion Detection has been turned on this is represented by an Collision Detection Motion Detection icon at the bottom right corner of the screen...

Страница 23: ...rs on the screen In Parking Mode the camera will exit Parking Mode if it detects any vibration Such as opening and closing the door or moving the car from rest or other impact vibrations can be triggered and enter the Normal Video Mode In Parking Mode if you set the Auto LCD OFF to 3 minutes the camera s LCD will light off after 3 minutes but recording will continue with blue light blinks on the In...

Страница 24: ...te of 30fps recording 8 hours of video with Time Lapse 1Sec will generate a time lapse video lasting just 16 minutes 8 x 60 x 60 30 60 This Eco Mode is recommend ed for storage cards with smaller capacities Normal Recording Time Time Lapse Recording Time Sec x Recording Frame Rate FPS x Time Lapse Option 4 12 Connecting External GPS Receiver Optional Accessory To use the cameraʼs GPS function plea...

Страница 25: ...ress the Button to stop recording Press the button button to enter setup go to System Setup GPS to activate the cameraʼs GPS function The GPS receiver will start to search for a GPS signal the GPS icon will keep flashing on the screen Once the GPS signal has been received and locked the icon will stop flashing 3 2 4 5 6 You can include GPS tracking and vehicle speed on the video footage go to Record...

Страница 26: ... HDMI port for connecting an external display such as a monitor or TV Please note that the product doesnʼt come supplied a Micro HDMI to HDMI cable Use a USB charger to charge the camera Insert the Micro HDMI connector into the cameraʼs HDMI port Insert the HDMI connector end into your TV or monitorʼs HDMI port Adjust your display settings to detect the HDMI input source Once connected to your TV ...

Страница 27: ...can be a nuisance or even a hazard to the driver If you set the Auto LCD Off to 3 minutes the cameraʼs LCD will light off after 3 minutes but recording will continue with blue light blinks on the Indicator light You can press any button to light on the screen Delete Normal Files Go to Normal file choose a video on the dash cam press the button then press the button to select Delete section press butt...

Страница 28: ...ation email when a new firmware update is available 4 17 Working Temperature The camera is designed to operate in temperatures from 14 158 F 10 C to 70 C temperatures outside this range risk degrading the cameraʼs performance work and causing damage To avoid damage In hot weather do not expose the camera directly to the sun when the car is parked In extreme winter conditions i e 4 20 or lower detac...

Страница 29: ...or Channels 3 Channel LCD 2 45 IPS LCD 480x272 Lens Languages Video resolution N4 English Japanese Spanish French Italian 简体中文 Simplified Chinese Deutsch Russian Front Cabin Rear Mode 1440P 1080P 1080P 30FPS 1080P 1080P 1080P 30FPS 1080P 1080P 720P 30FPS 720P 720P 720P 30FPS Front Cabin Mode 1440P 1080P 30FPS 1080P 1080P 30FPS 1080P 720P 30FPS 720P 1080P 30FPS 720P 720P 30FPS Front Rear Mode 1440P ...

Страница 30: ...1 5A 800mA Typical value DC 5V 14 158 F 10 C to 70 C 4 to 176 F 20 C to 80 C Windows XP Vista 7 8 10 Mac OS Warranty The VANTRUE OnDash N4 Dash Cam comes with a full 12 months warranty If you register your product on our official site www van true net register you can extend the warranty to 18 months Support If you have any questions regarding your product please do not hesitate to contact us via Am...

Страница 31: ...mmitted to always improving our products services and user experience If you have any thoughts on how we can do even better we welcome your constructive feedback and suggestions Connect with us today at support vantrue net THANK YOU for choosing ...

Отзывы: