I N S T A L L A T I O N
©Vantage, 8/12/2016 / IS-0521-B
DIN Low Voltage Output Station — MODEL: LVOS-0-10-PWM-DIN
page 2 of 2
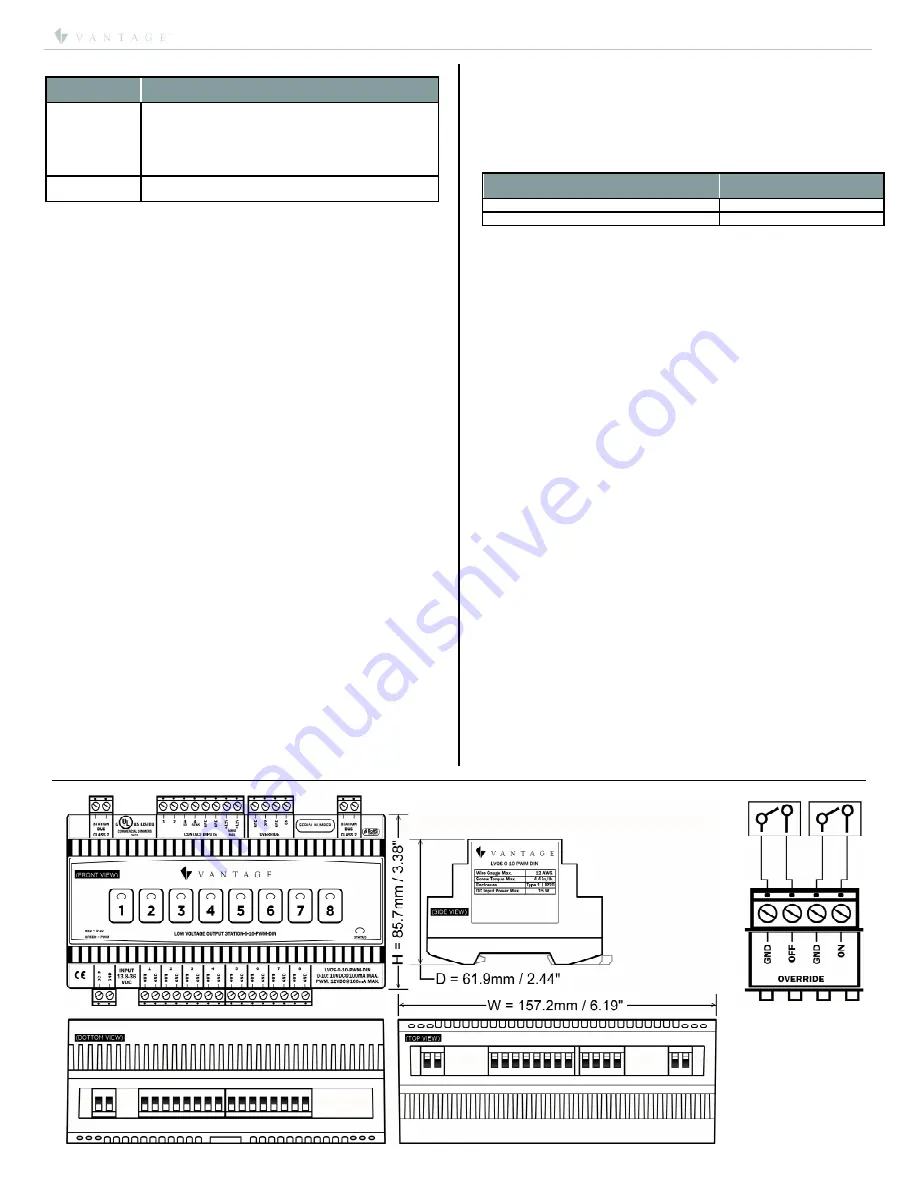
Override
Wiring
Example
Button Operation
Button
Action
Load Operation
Press/Release
1.
The load ramps to 100%
or
fades to 0% over
three seconds, alternating with every other
press and release.
2.
If the button is pressed again before the three
seconds time, the load stops ramping/fading
at its current level.
Press and
Hold/Learn
Press and Hold
and
learned level
features are
not
supported from the front panel buttons.
Installation
Installation of Vantage products should be performed or
supervised by a
Certified Vantage Installer
. Each LVOS-0-10-PWM-
DIN must be installed inside of a properly vented and covered DIN
enclosure. Connection torque is 4.4 inch pounds.
Station Connection
The LVOS-0-10-PWM-DIN connects to a Vantage System via
Station Bus. Two screw terminals are located in the low voltage
section of the electrical box (through top). The two connectors are
internally wired, in parallel, to facilitate daisy chaining the station
bus. The wire should comply with the Vantage Station Bus wiring
specification.
Remote Infrared Receiver or Dry-Contact
A remote infrared receiver (part # REMOTEIR) may be connected
to the LVOS-0-10-PWM-DIN dry-contact 3. This terminal is not
compatible with remote infrared receivers from other
manufacturers.
The receiver connects to +12V, IR IN (dry contact 3) and Gnd. If not
used with an IR receiver this input may be used as a standard dry
contact input, connecting the contact between IR IN (dry contact
3) and Gnd.
Sensor Input or Dry-Contact
Dry contact 4 connects to +12V, SENSOR IN and Gnd. If not used
for a light sensor, this input may be used as a standard dry contact
input, connecting the contact between SENSOR IN (dry contact 4)
and Gnd.
Wiring
Loads 1 – 8, Low Voltage outputs, should be limited to 250 feet /
76.2 meters for each wire run, using a minimum of 18AWG /
0.823mm2 gauge wire. All connections use 4.4 inch pound torque.
Stranded wire recommended.
Override
The station supports two Override modes, ON and OFF. When
either switch is closed, using a simple toggle switch, all loads are
ON or OFF depending on which override loop is closed. However,
the ON override takes precedence over the OFF override if both
switches are closed. NOTE:
Station does not communicate to
controller when in override.
Power Connection
Connect the 13.8 – 36VDC power feed. Vantage recommends the
PSU36-DIN 36VDC
or
ACPDXXSM2 24VDC
power supplies*. This
provides power for the LVOS-0-10-PWM-DIN and is required for
the station to operate. Use 16AWG / 1.31mm
2
wire between power
supply and stations using a daisy-chain topology.
Total
wire length
for all stations connected to power supply should not exceed 100ft
/ 30.5m.
*DIN Power Supply
LVOS-0-10-PWM-DIN
Stations Supported
PSU36-DIN – 36V DC 3.5A 130W Max
Supports up to 8 Stations
ACPDXXSM2 – 24V DC 2.5A 60W Max
Supports up to 4 Stations
Configuration
When the LVOS-0-10-PWM-DIN station is first connected to the
Station Bus, the diagnostic LED will blink twice followed by a pause.
In Design Center, click on Configure Stations, the Status LED will
blink 5 times followed by a pause. To finish configuring press any
button on the Station 3 times. The station may also be configured
by typing the serial number in the project file, using this method
the station will automatically be configured when the system is
programmed.
Diagnostic Information
The Status LED blinks evenly or flashes 2, 3, 4 or 5 times followed
by a pause to indicate status information.
Off: The station is not powered. A power connection has not been
made.
One Even blink: Station is operating correctly and is configured.
Two blinks: Station is operating correctly but is not configured.
Three blinks: Station is
not
communicating with the Main
Controller. Verify that station bus wiring conforms to Vantage
guidelines.
Four blinks: Station problem. Please contact the factory.
Five blinks: Configuration mode.
Firmware Upgradable From Design Center
1.
The station must always be configured and programmed to the system
in order to perform a firmware update.
2.
Click on
System | Update Firmware | Update DIN LVOS Firmware
.
3.
Select the checkbox for each DIN LVOS PWM station needing the
firmware upgrade.
4.
Complete the upgrade – wait for the process to finish.
Placing Station In Boot Code
If the application code is corrupted it may not be possible for Design
Center to connect to the DIN LVOS PWM station to update. If this
condition is suspected, place the DIN LVOS PWM station into boot code
and then update following the steps above.
1.
Remove DC voltage power to the station.
2.
Press and hold buttons 2 and 3 while DC voltage power is restored.
3.
All of the station’s load and status LED lights will flash in unison.
4.
While in this mode attempt the regular firmware update steps 2-4 again.
(Above -
Firmware Upgradable From Design Center
)
5.
When the firmware update is finished the update dialog box will display
a green checkmark and the station will reboot automatically.
Line Drawings


