3
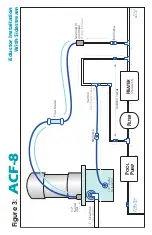
EDUCTOR WITH SIDESTREAM
(see Figure 3)
It may be desirable in some applications to install the venturi without the use of a booster pump.
The sidestream is created by using the pressure differential created across the pools filter and
heater. The sidestream is typically constructed of 1/2" pvc pipe and fittings. The sidestream inlet is
installed after the pools circulation pump but before the filter while the sidestream effluent is returned
after the heater. The sidestream flow and venturi must be selected to remove a minimum of 1.0 gpm
from the feeder at all times. Maximize venturi performance by locating the feeder as near as possi-
ble to the venturi.
This installation method will require the use of small control valves (typically 1/2" pvc ball valves, not
supplied) on the inlet and outlet sides of the feeder to regulate flow through the feeder. In the start
up and adjustment section of this manual the control valves will be used to ensure that the flow in to
and out of the feeder are the same. Excess suction can result in some air bubbles returning to the
pool and excess inlet flow can result in the feeder overflowing
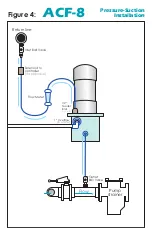
PRESSURE-SUCTION INSTALLATION
(see Figure 4)
The effluent water from the feeder can be returned into the suction side of the pool’s circulation. The
feeder inlet should be supplied with filtered pool water. Returning the water in front of the pump can
cause erratic controller readings. If a heater is present, corrosion or scaling can occur. Make suit-
able piping connections to the plumbing on the suction side of the pool’s circulation pump. In order
to facilitate proper suction and effluent flow from the feeder, the feeder should be located as close as
possible to the circulation pump and the feeder should be elevated above the level of the circulation
pump. This installation method may result in some air being drawn back into the circulation pump
and possibly returned to the pool through the plumbing. Additionally, if the circulation pump loses
prime or is turned off it may be necessary to close an isolation valve on the feeder discharge line to
facilitate pump start up.
This installation method will require the use of small control valves on the inlet and outlet sides of the
feeder to regulate flow through the feeder. In the start up and adjustment section of this manual the
control valves will be used to ensure that he flow in to and out of the feeder are the same. Excess
suction can result in some air bubbles returning to the pool and excess inlet flow can result in the
feeder overflowing.
FEEDER WATER SUPPLY
The water supply to the ACF-8 should be filtered and unheated water. An in-line strainer should be
used to prevent debris from entering the feeder and potentially fouling the flowmeter, solenoid
valves, mining nozzles and other small openings in the feeder.
In cases where there is insufficient pressure (10 psi minimum is required) to operate the feeder, sup-
ply water can be taken from between the pump and the filter. Be sure to use a strainer. The strainer
must be kept clean at all times in order to provide enough water flow and pressure to operate the
feeder.
An alternative installation method utilizing a potable water source for the feeder supply water can be
used. When using a potable water source for the feeder supply water, a pressure regulator should
be used to maintain an inlet pressure of 30 psi in addition to the in-line strainer. A backflow preven-
tion device may also be required by local regulations when using potable water. It is recommended
that a backflow prevention device be used on all installations where city water is used.


