background image

vM CT360  STEREO CD TRANSPORT


Controls 


Precautions 


Connections 


Maintenance and advice 


Technical Specifications 


  The digital outputs are clocked for the different digital inputs.  

By switching over between inputs, there can be a synchronicity moment occur where by the 
transport stays in the mute mode. In that situation, the CT360 can be reset by switching off with the 
power switch for approximately 10 seconds and then again to on. 


  The SPDif XLR, RCA and optical outputs are able to transmit digital stereo signals to converters 

capable to receive 16bit/44.1kHz. This is the standard CD format. 
 

  The Q-Link outputs send the DATA, LRCK and BCK from the CD transport to the DAC. The MCK 

master clock input must receive a frequency of 16.9344MHz from the DAC. 
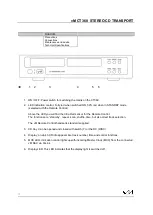
When this MCK is received, in the front display the indication LED (5) goes on. 


All audio CD’s, CD-R’s and CD-RW’s can be played without a problem only when they are 
produced following the Red Book protocol. 
 

  For your convenience you will find a red sticker, indicating the mains 

“phase”. The phase of your 

electricity system can be determined with a voltage seeker.  


  The transport must only be cleaned with a cloth, impregnated with a Ph-neutral cleaning fluid. And 

it must be mildly moist! NEVER use strong fluids and/or erasers. Before cleaning ALWAYS remove 
the power cord from its wall socket, by its plug not by its cord. 


  The optimum operating temperature is reached after approx. several hours of continuous play. 

Then it will be possible to start enjoying the superb van Medevoort audio qualities of this transport. 
Test this time in your own setup. 


  We strongly recommend that you use a high quality interconnect cable. E.g. the renowned van 

Medevoort Silver Cable. Also for the power cords. 


Содержание CT360D

Страница 1: ...C T 3 6 0 INSTRUCTION MANUAL...

Страница 2: ...cord and or the unit with moist or wet hands Never expose the unit to rain or moisture Never remove the casing There are no user serviceable parts inside Do not poke or put anything inside the unit P...

Страница 3: ...tput Left Right channels are not interchanged Make sure that the plug is fitted correctly Otherwise hum and or noise may be apparent DO NOT forget to read the respective manuals of the products you wi...

Страница 4: ...will find the Infra Red sensor for the Remote Control The functions are stand by repeat scan shuffle time but also direct track selection The vM Remote Control handset is standard supplied 3 CD tray...

Страница 5: ...9 7 8 7 OPEN Switch to open and close the CD tray In the display appears the actual status of the player 8 PREV NEXT To choose previous or next track 9 STOP Stops playing the CD 10 PAUSE Interrupts C...

Страница 6: ...ucts is as follows On always first the source then the pre amplifier followed by the power amplifier Off always first the power amplifier then the pre amplifier followed by the source With the Q Link...

Страница 7: ...named connectors on the converter For best audio results it is important to use four identical cables of good quality Take care to use the right signal direction of the cables Separate the MCK cable...

Страница 8: ...2 20 000 Hz Signal to noise ratio distortion 120 dB 0 002 Channel separation 100 dB Outputs connectors analog 2 RCA XLR Analog output RCA XLR 2 0Vrms 4 0Vrms Outputs connectors digital 4 Q Link XLR RC...

Страница 9: ...is received in the front display the indication LED 5 goes on All audio CD s CD R s and CD RW s can be played without a problem only when they are produced following the Red Book protocol For your co...

Страница 10: ...d disc remain To interrupt playing to restart push PLAY Search fast through the track forward Play a inserted CD Search fast through the track backward Stop all functions Plays CD tracks in random seq...

Отзывы: