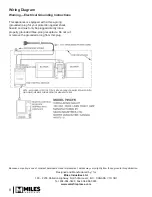
Valor Legend G4 Series Скачать руководство пользователя страница 8

8

Wiring Diagram

Warning—Electrical Grounding Instructions

This appliance is equipped with a three-prong 

(grounded) plug for your protection against shock 

hazard and must only be plugged directly into a 

properly grounded three-prong receptacle. Do not cut 

or remove the grounded prong from this plug.

Designed and Manufactured by / for

Miles Industries Ltd.

 190 – 2255 Dollarton Highway, North Vancouver, B.C., CANADA  V7H 3B1

Tel. 604-984-3496  Fax 604-984-0246

www.valorfireplaces.com

Because our policy is one of constant development and improvement, details may vary slightly from those given in this publication.

NOTE - ALL WIRING IS SPECIFIC TO THIS KIT AND SHOULD ONLY BE REPLACED WITH 
ORIGINAL EQUIPMENT WIRING FROM THE MANUFACTURER

Содержание Legend G4 Series

Страница 1: ...cavity Once installed the fan may be serviced from inside the firebox without removing the heater from the cavity 780 only The fan is designed for automatic operation to come on and off when the burne...

Страница 2: ...an mounting hole and apply the self adhesive wiring diagram label provided to the rear side of the fan access panel as shown 6 foot electrical cord Fan control wire module to receiver Wiring diagram F...

Страница 3: ...perated with the remote control system It has 4 speed levels On the remote control handset s display this icon represent the fan and this icon represents the speed One bar is low four bars is high 1 A...

Страница 4: ...b Below the gas valve turn the switch off O so the fireplace does not start accidentally c Remove the window the ceramic rocks or logs and the grate logs only d Remove the rear log support 3 screws Re...

Страница 5: ...to remove the fan control module remove the fan first The module is on the left hand side of the fan and it is held in place by a piece of Velcro a Pull the fan out of the enclosure as indicated in st...

Страница 6: ...the fireplace 2 screws and slide it out of the firebox d Pull the appliance out of the cavity You need access to the left hand side and the rear of the appliance 2 Remove the left side valve access pa...

Страница 7: ...within the enclosure to avoid any vibration when functioning 2 Removing the fan control module The module is held in place by a piece of Velcro Disconnect the power the fan and the receiver connector...

Страница 8: ...ve the grounded prong from this plug Designed and Manufactured by for Miles Industries Ltd 190 2255 Dollarton Highway North Vancouver B C CANADA V7H 3B1 Tel 604 984 3496 Fax 604 984 0246 www valorfire...

Страница 9: ...r s lectionnez la vitesse d abord Sur la manette de la t l commande appuyez sur le bouton SET plusieurs fois jusqu ce que l ic ne du ventilateur apparaisse et clignote Appuyez sur les deux boutons des...

Страница 10: ...le ventilateur collez l tiquette du sch ma des connexions sur le panneau d acc s au ventilateur tel qu indiqu Note le panneau d acc s au ventilateur est accessible de l int rieur de la bo te de foyer...

Страница 11: ...ignotera 3 Appuyez sur le bouton de la grande flamme pour activer le ventilateur et augmenter sa vitesse 4 Appuyez sur le bouton de la petite flamme pour r duire la vitesse du ventilateur ou pour l te...

Страница 12: ...llume pas accidentellement c Enlevez la fen tre les b ches ou pierres de c ramique et le porte b ches version b ches seulement Enlevez pour l entretien 780 Fen tre b ches pierres panneaux Support de b...

Страница 13: ...ntilateur enlevez d abord le ventilateur Le module est situ gauche du ventilateur et il est maintenu en place par une pi ce de Velcro a Sortez le ventilateur hors de son bo tier tel qu indiqu l tape 2...

Страница 14: ...pareil d Tirez l appareil hors de sa cavit Vous devez avoir acc s au c t gauche de l appareil et l arri re 2 Enlevez le panneau d acc s la soupape sur le c t gauche 5 vis 3 D branchez le ventilateur d...

Страница 15: ...pi ce de Velcro D branchez les bornes du cordon d alimentation POWER du ventilateur FAN et le fil du module au r cepteur Notez D branchez les bornes pince NE TIREZ PAS SUR LES FILS 3 Rebranchez et r i...

Страница 16: ...URER VIS DE MISE LA TERRE CORDON LECTRIQUE DE 6 PIEDS 1 9 M MIS LA TERRE BO TIER DU VENTILATEUR VENTILATEUR MODULE DE COMMANDE VENTILATEUR R CEPTEUR DE T L COMMANDE FOURNI AVEC LE FOYER NOTE LE FILAGE...

Отзывы: