


3
Connect
fan control
wire to
receiver
Fan
control
wire
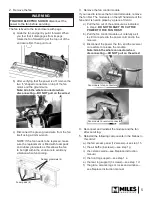
2.
Connect the fan to the receiver.
a) Pull the fan control wire from the inside back of
the appliance along to the receiver.
b) Detach the receiver from the
Velcro
and plug in
the fan control wire in the 6-pin connection at
the bottom of the receiver as indicated below.
Reinstall the receiver in the firebox.
3.
Plug the fan into an electrical outlet.
Connect the fan control
wire to the receiver here
Remote Control Receiver
Fan connector
CONNECT
FAN HERE
FASTER
SLOWER,
TO OFF
Fan icon
Fan speed
icon
Setting Fan
Fan Set indicated on handset display
Test the fan
The fan is operated with the remote control system. It
has 4 speed levels. On the remote control handset’s
display, this icon ( ) represent the fan and this icon
( ) represents the speed. One bar is low, four bars is
high.
1.
Add a 1 9 V battery to the remote control handset.
2.
On the remote handset, briefly press the SET
button to fan mode ( ). The fan icon flashes.
3.
Press the large flame button ( ) to activate the
fan function and increase its speed.
4.
Press the small flame button ( ) to decrease the
fan speed or to switch the fan OFF.
NOTE: 8 seconds after the fan has been set, the
remote handset will automatically go into
temperature control mode (TEMP). The fan
starts 4 minutes after the gas opens (from OFF
or from pilot) at maximum speed and goes to
the displayed level after 4 seconds. The fan
stops 10 minutes after the gas is OFF or at pilot.
on top
at bottom


