8
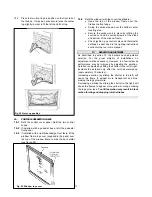
Fig.5 Window removal
4. SUPPLY GAS
The supply connection is
3
/
8
”NPT. Openings for the gas
supply are provided for rear or under-floor connection (see
figure 2).
5.
PACK CONTENTS
The complete appliance is contained in three packs. One
of the alternative base support and front designs will be
included - either pedestal with contemporary facia or Legs
with traditional facia (See pack 2).
Pack 1 - Main appliance unit
contains:-
1
Main appliance fitted with window.
4
Ceramic logs.
1
Pair ceramic firebox side walls.
1
Ceramic firebox back wall.
1
Decorative vent collar for appliance top.
1
Decorative vent collar for wall plate.
1
Wall plate with brackets.
1
Wall plate without brackets.
1
Gas supply inlet pipe.
1
Gas supply inlet elbow.
1
Exhaust port cover
8
Wall plugs (for wall plates).
8
Wood screws (for wall plates).
Pack 2 - Pedestal and contemporary facia alternative
contains:-
1
Pedestal unit.
1
Contemporary design front facia unit.
1
Ashlip unit.
4
#8 tapping screws (for fixing ashlip).
4
Machine screws (for fixing pedestal to main
appliance).
2
Wood screws (for floor fixing).
2
Plugs (for floor fixing).
or
Pack 2 - Legs and traditional facia alternative
contains:-
1
Base & legs unit.
1
Traditional design front facia unit.
1
Door retaining bracket.
1
Window frame top cover.
2
#10 tapping screws (for door retaining bracket).
4
Machine screws (for fixing base & leg unit to main
appliance).
2
Wood screws (for floor fixing).
2
Plugs (for floor fixing).
Pack
3 - Vent unit
contains:-
1
90º elbow vent.
1
Vent terminal unit.
1
Styrofoam support (for vent tube cutting).
4
#6 tapping screws (for vent securing).
1
Length of vent sealing tape.
1
Masking collar (for vent joint).
2
#8 tapping screws (for masking collar).
1
Outer vent shield.
7
#10 nuts & screws (for outer vent shield).
Take care when removing the contents from the packaging
to prevent damage. Check that all the contents are in the
packs and are undamaged.
6.
APPLIANCE PREPARATION
6.1
Remove the window & logs (see figure 5)
6.1.1
Natural Gas Appliances :
Detach the window unit
by removing the 8 knurled screws (“A”)
and knurled
nut (“B”) holding the sides and bottom of the window
frame.
LP Appliances :
Detach the window unit by
removing the 7 spring loaded screws holding the
sides and bottom of the window frame.
6.1.2
Lift the window unit up and forwards to unhook the
top. Put the window in a safe place.
6.1.3
Take the ceramic logs out of the firebox and store
safely.
6.2
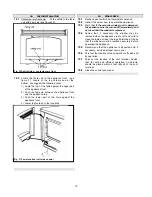
Check ignition electrode spark (see figure 6)
The pilot burner and electrode are at the right side of
the firebox.
Open the control access door. Turn the gas control
knob (the right hand knob) counterclockwise to “Ign”.
While turning pilot ignition sparks should be
activated twice. Check that the sparks are produced
at the pilot burner.
If no sparks are produced, check that the wiring is
secure and that the spark gap is 3.5 + 0.5 mm.
Fig.6 Pilot ignition system
Содержание Legend 936XN
Страница 6: ...6 WITH PLINTH WITH LEGS Fig 2 Dimensions clearances ...
Страница 15: ...15 ...


