


Installation
Install Ceramic Logs
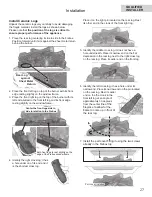
Unpack the ceramic logs very carefully to avoid damaging
the fragile material. Install the logs as shown below.
Please note that
the position of the logs is critical to
ensure proper performance of the appliance.
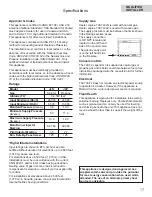
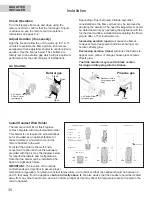
1. Place the rear log centering it side to side in the
fi
rebox.
Position forward until it sits against the sheet metal return
behind the burner.
2. Place the front left log on top of the burner with its front
edge resting slightly on the window frame.
3. Place the front right log on the top of the burner with its
left end abutted to the front left log and its front edge
resting slightly on the window frame.
4. Identify the right cross log; it has
a hole under on of its end and it
is the shortest cross log.
Both front logs to rest slightly on the
edge of the
fi
rebox window frame.
Center the front logs side to
side in relation to the
fi
rebox
Place it on the right pin located on the rear log. Rest
its other end in the crook of the front right log.
5. Identify the middle cross log. It does not have a
hole underneath. Place its narrow end on the
fl
at
depression in the rear log next to the right cross log
on the rear log. Place its wider end on the front log.
6. Identify the left cross log; it has a hole under its
narrow end. Place its narrow end on the pin located
on the rear log. Rest its wider
end on the the crook in the
front left log at an angle of
approximately 30 degrees
from the center
line of the
fi
replace to allow for the
fl
ame to come up in front of
the rear log.
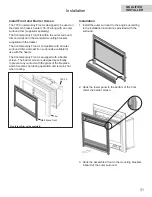
7. Install the port cover
fi
xing it using the two screws
already in the
fi
rebox top.
Rear Log
against
Sheet Metal
Return
Port cover installed
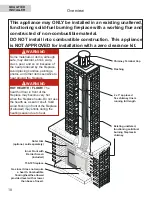
QUALIFIED
INSTALLER
27


