background image

Installation Planning

Existing Fireplace Preparation

A few points must be considered before inserting the 
739-72 into an existing 

fi

 replace cavity. Generally, no 

modi

fi

 cations are allowed to the existing 

fi

 replace that 

will compromise the integrity of the existing 

fi

 replace. 

Components that are bolted or screwed on such as 
dampers or ba

  es may be removed to accommodate 

the installation of the 739-72 engine. 

Cutting away 

any sheet metal parts of the existing 

fi

 replace 

to accommodate the installation of the 739-72 is 
prohibited

. Check with local authorities if in doubt.

Clean Fireplace and Chimney

Have the chimney swept and the 

fi

 replace cavity 

including ash dumps and clean-outs cleaned before 
installing the 739-72 heater and vent liners. Any 
creosote or soot residue remaining in the 

fi

 replace 

cavity chimney or clean-out may cause odors or 
stains once the 739-72 insert is installed. Consult with 
chimney sweep for information on how best to clean.

Installer—READ THIS FIRST

1.  YOU NEED TO KNOW FROM THE 

HOMEOWNER what accessories (surround, 
etc.) will be installed with this 

fi

 replace;

2.  Unpack the appliance, removing all items packed 

inside and around it. Recycle the packaging.

3.  Check that you have everything, using the Pack 

Content sheet. Also, check that you have:

• 

Fuel bed;

• 

Venting accessories;

• 

Gas conversion kit if necessary;

• 

Electrical accessories if necessary;

• 

Surround.

Existing Dampers

Factory-built, zero-clearance 

fi

 replaces will require the 

damper to be removed in order to install the vent liners. 
These dampers are usually bolted into place. Dampers 
in masonry 

fi

 replaces must be 

fi

 xed open and may 

remain in place.

Ash Retaining Curbs

Some 

fi

 replaces (particularly factory-built) have a 

raised curb at the front edge to retain ashes. Check the 
dimensions carefully to ensure the 739-72 engine will 

fi

 t 

behind any raised curb (some curbs may be removed 
separately from the refractory base).

4.  Clean cavity, chimney, ash dump, and clean-out.
5.  Carefully read the Installer’s Checkllist included 

with the 

fi

 replace for the installation sequence.

Only quali

fi

 ed licensed or trained personnel 

should install this appliance.

QUALIFIED 
INSTALLER

22

Содержание G3 Classic

Страница 1: ...etain this manual for future reference Please read this manual BEFORE installing and operating this appliance Do not store or use gasoline or other flammable vapors and liquids in the vicinity of this...

Страница 2: ...Check Operation 30 Adjust Aeration if necessary 30 Install Handset Wall Holder 30 Install Front and Barrier Screen 31 Wiring Diagram 32 Approved Venting Components 33 Warranty 34 Spare Parts 35 2 Tabl...

Страница 3: ...ries Clothing or flammable material should not be placed on or near the appliance This unit must be used with a vent system as de scribed in this installation manual No other vent sys tem or component...

Страница 4: ...isk individuals in the house Install an approved after market safety gate to keep toddlers young children and other at risk individuals a safe distance from the fireplace Keep the remote control hands...

Страница 5: ...ow Do not let children touch the glass or any parts of your fireplace even after it is turned o as it is still hot Use the barrier screen provided with the trim or a gate to reduce the risk of severe...

Страница 6: ...lly lighting the pilot See full lighting instructions on page 11 of this manual Introduction Thank You For purchasing a Valor by Miles Industries Your new radiant gas heater is a technical appliance t...

Страница 7: ...he wall switch malfunctions and will not turn o the fireplace wait 8 hours and the fireplace will automatically go to pilot You can access the controls inside your fireplace Alternately you can turn o...

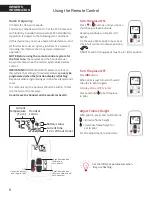
Страница 8: ...o set To communicate the handset should be within 15bfeet 4 5 meters of the replace Do not leave the handset on the mantel or hearth OFF turns the burner DQG WKH SLORW R DUJH DPH EXWWRQ DPHV XS VHWV K...

Страница 9: ...ishes the pilot This feature helps the consumer realize cost bene ts by automatically eliminating energy consumption during non heating months and limited use The programmed length of inactivity to ac...

Страница 10: ...gas 739PGK Conversion propane gas Other accessories 1265WSK Wall Switch Kit RBWSK Remote Battery Wall Switch Kit 755CFK Circulating Fan Kit Hearth Gate Hearth gates such as Cardinal s VersaGates are a...

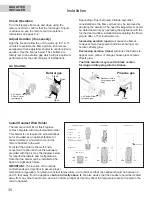
Страница 11: ...ollow LQ WKH VDIHW LQIRUPDWLRQ DERYH RQ WKLV ODEHO I RX GRQ W VPHOO JDV JR WR WKH QH W VWep 3 AUTOMA7 1 7 21 J RFDWH WKH SLORW J LQVLGH RI UHER 21 2 VZLWFK LQ 21 SRVLWLRQ 0 1 NQRE LQ 21 SRVLWLRQ VHW O...

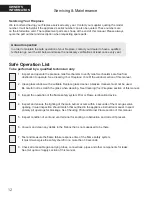
Страница 12: ...the flame safety system Pilot or Flame rectification device 4 Inspect and ensure the lighting of the main burner occurs within 4 seconds of the main gas valve opening Visual inspection should match th...

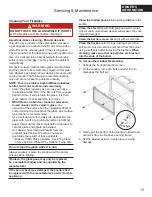
Страница 13: ...brasive to ceramic glass and should be avoided Our dealers have had good results from the products listed below We cannot however guarantee the results of these products Brasso Polish Plus by Kelkem C...

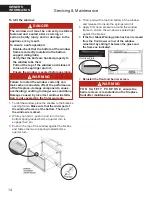
Страница 14: ...ed 7 Reinstall the front and barrier screen WARNING F O R S A F E T Y P U R P O S E ensure the barrier screen is re installed on the fireplace front after maintenance Servicing Maintenance Hot Glass P...

Страница 15: ...rom appliance to appliance depending on the type of installation and climatic conditions The appliance area must always be kept clear and free from combustible materials gasoline and other flammable v...

Страница 16: ...will extend the battery life Should the batteries lose power the control may be operated by manually turning the control knob at the valve or by turning o the valve at the switch To replace the batter...

Страница 17: ...0 m in USA installations must be in accordance with the current ANSI Z223 1 and or local codes having jurisdiction Heating value of gas in some areas is reduced to compensate for elevation consult you...

Страница 18: ...wood flooring in front of the fireplace if allowed may shrink during the heating season due to heat WARNING Some materials or items although safe may discolor shrink warp crack peel and so on because...

Страница 19: ...ter Trim or Surround sold separately X Y Dimensions Cavity Check that masonry step does not interfere with install dimensions or vent pipe If mantel is combustible see section Clearances for allowable...

Страница 20: ...that can ignite and burn whether flame proofed or not or plastered or unplastered Non combustible materials Material which will not ignite and burn Such materials are those consisting entirely of ste...

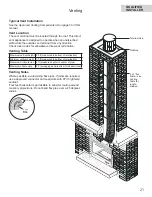
Страница 21: ...rmination Venting Table Maximum vertical height 40 ft measured to bottom of termination Minimum vertical height 10 ft measured to bottom of termination Maximum horizontal run 4 ft measured center to c...

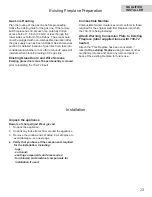
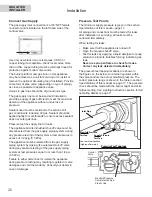
Страница 22: ...THIS FIRST 1 YOU NEED TO KNOW FROM THE HOMEOWNER what accessories surround etc will be installed with this fireplace 2 Unpack the appliance removing all items packed inside and around it Recycle the p...

Страница 23: ...of the firebox The access hole must be plugged with non combustible insulation after the gas supply line has been installed See Dimensions section for detailed location of gas inlet Also take into co...

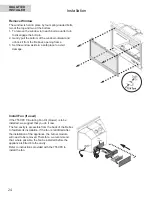
Страница 24: ...de in a safe place to avoid damage Install Fan if used If the 755CFK Circulating Fan Kit blower is to be installed we suggest that you do it now The fan cavity is accessible from the back of the fireb...

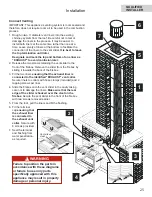
Страница 25: ...firebox 3 Fit the two liners ensuring that the exhaust liner is connected to the identified EXHAUST vent collar Secure liners to collars with hose clamps included and 2 tapping screws per liner 4 Sli...

Страница 26: ...sing its equipment shut o valve during any pressure testing of the gas supply piping system at test pressures equal to or less than 1 2 psi 3 5 kPa Failure to either disconnect or isolate the applianc...

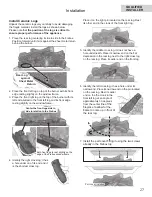
Страница 27: ...cross log Both front logs to rest slightly on the edge of the firebox window frame Center the front logs side to side in relation to the firebox Place it on the right pin located on the rear log Rest...

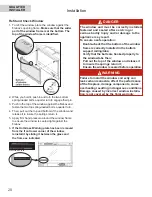
Страница 28: ...m the front lower corner of the window reinstall it by sliding it between the glass and the frame as indicated Hot Glass Plate WARNING Failure to install the window correctly can leak carbon monoxide...

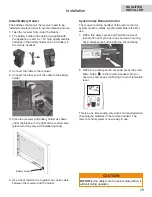
Страница 29: ...a heat resistant tie to gather any extra cable between the receiver and the holder Battery holder CAUTION DO NOT let the cable touch the burner plate above it will melt during operation Synchronize R...

Страница 30: ...uld be located away from any other heat source and not in direct sunlight as this may a ect the temperature sensor located in the remote handset Installation Check Operation Turn the fireplace flame u...

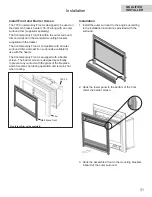
Страница 31: ...with the heater The Contemporary Front is equipped with a barrier screen The barrier screen is designed specifically to prevent any contact with the glass of the fireplace which becomes hot during ope...

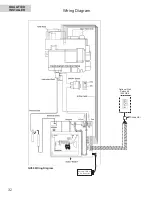
Страница 32: ...Optional Wall Switch Kit 1265WSK Connector Red Yellow GV60 Wiring Diagram Wiring Diagram Battery Holder 4 AA Batteries QUALIFIED INSTALLER 32...

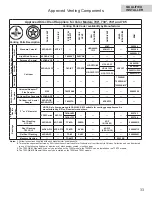
Страница 33: ...TA TM 4CTA 4DCAT33 Aluminum Flexible Liner 3 or 4 diameter NOTE 2 ply liner approved to CAN ULC S635 suitable for venting gas appliances As manufactured by Z Flex Flexmaster and others 2280 Series AF3...

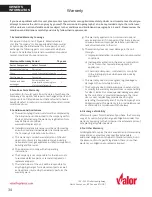
Страница 34: ...orm to all applicable codes including national and local gas appliance installation codes and building and re codes d The owner must comply with all operating instructions e The Company is not respons...

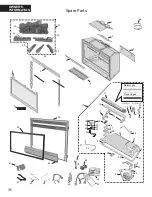
Страница 35: ...sure Plate 4001136 4 Port Cover 4001820 5 Log Support 4006177 6 Top Mounting Bracket 4000136AZ 7 Side Mounting Brackets 2 4000135AZ 8 Window Assembly 4001378 9 Hot Glass Warning Plate 4003093 10 Burne...

Страница 36: ...9 55 56 57 58 59 60 54 52 Natural gas Propane gas 18 20 25 21 22 23 24 19 10 11 12 13 14 15 16 17 26 27 28 29 30 31 32 33 34 35 36 37 38 39 40 42 41 14a 13a 47 48 49 43 44 45 46 50 61 natural gas prop...

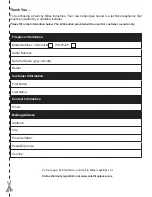
Страница 37: ...n provided will be used for customer records only Online Warranty registration at www valorfireplaces com Cut out page fill information and mail to Miles Industries Ltd Fireplace Information Model Num...

Страница 38: ...hut Thank you for choosing a Valor Product Postage needed Miles Industries Ltd 190 2255 Dollarton Highway North Vancouver BC V7H 3B1 Canada Fold here Online Warranty registration at www valorfireplace...

Отзывы: