background image


43


9. 

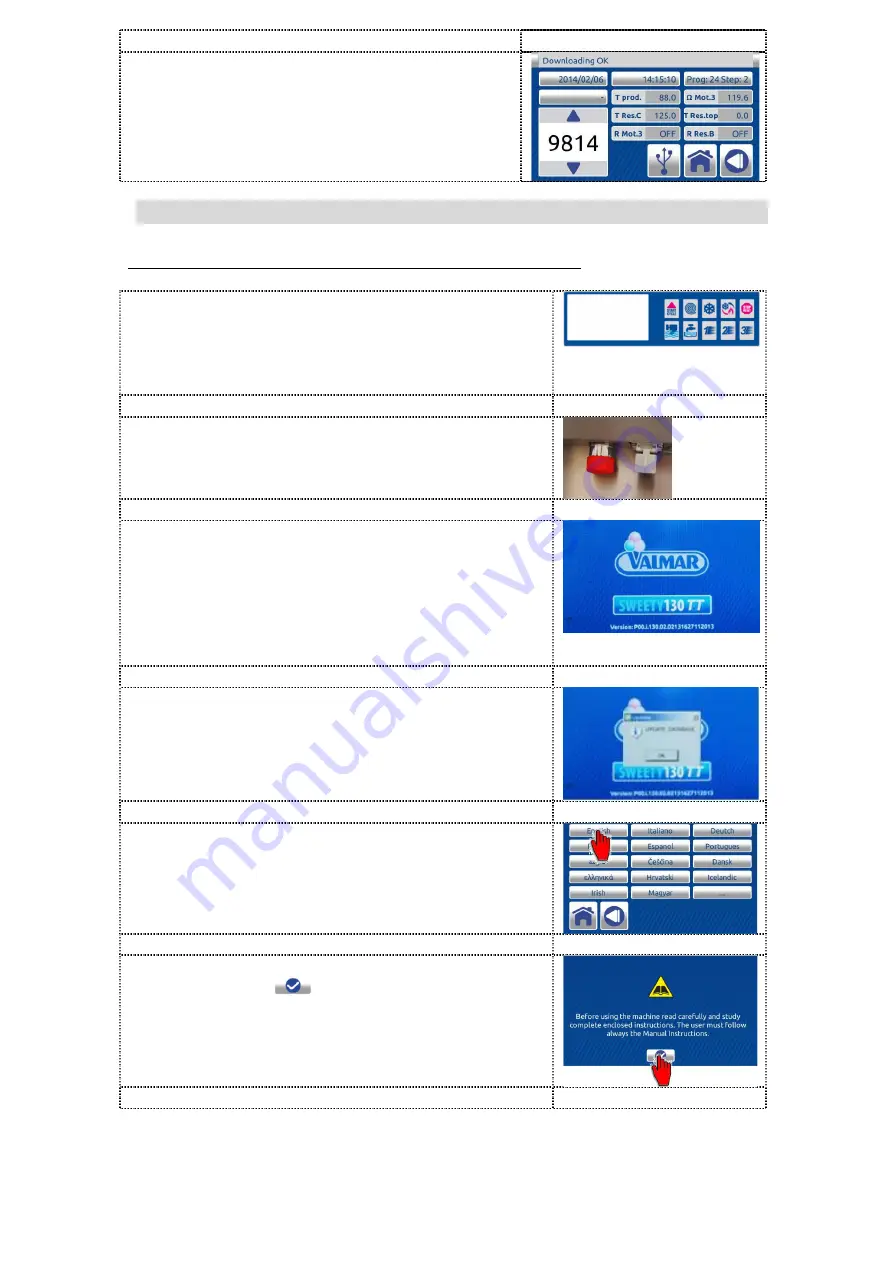
When the download is complete appears on 
the message bar message DOWNLOAD 
OK. Pull out the USB key.


7.6  UPLOAD OF NEW PROGRAM OR NEW SOFTWARE 


The program is uploaded only when the machine is OFF! 

 
1.  Make sure the machine is OFF before starting. 

This can you do if you pres red button (safety 
switch). Then Insert the USB key with new 
database, program, both of them or other. 


2.  Pull out the red button (safety switch) to switch 

ON the machine. 


3.  New data is uploaded automatically. After 

upload, the uploaded program and software 
version and the date of the last update are 
displayed. Automatic switch to the type and 
model screen. The screen shows the machine 
type and model. Then the notice - confirm 
screen is displayed 


4.  Press the confirm button OK to confirm the 

upload. Check if everything is updated (info 
menu screen). If this message not show the 
uploading does not completely concluded. 


8.  Then the LANGUAGE SELECTION screen is 

automatically displayed. Press the button 
corresponding to the desired language. The 
notice - confirm screen is displayed. 


5.  First carefully read the text and then press the 

confirm button 

 to confirm the language 

chosen. The HOME screen is displayed. 


Содержание SWEETY 60 TTi

Страница 1: ...VALMAR HANDLING OPERATING AND MAINTENANCE GUIDE OF THE APPLIANCES FOR THE PRODUCTION OF ICE CREAM Model SWEETY TTi Ver_SW_TT_001...

Страница 2: ...2...

Страница 3: ...FIRST USING OF THE MACHINE 37 7 4 LANGUAGE SELECTION 38 7 5 DATA DOWNLOAD with a USB key 39 7 6 UPLOAD OF NEW PROGRAM OR NEW SOFTWARE 43 8 PROGRAMS 44 9 MENU PROGRAMS 45 9 1 HOW ACCESS TO THE PROGRAM...

Страница 4: ...E ICE CREAM 61 13 5 PRODUCTION BASIN DISINFECTION 68 14 MAINTENANCE OF THE APPLIANCE 68 14 1 INSTRUCTIONS FOR PREVENTION OF INJURIES 68 14 2 PROBLEMS ERRORS AND TROUBLESHOOTING 68 14 3 REGULAR MAINTEN...

Страница 5: ...PASTEURIZATION AUTOMATIC PASTEURIZATION button for the automatic pasteurization at 85 C With quick key ONE ONE button for the automatic low pasteurization at 65 C With quick key TWO TWO button for th...

Страница 6: ...s which is expressed in the manual with symbols 1 1 SYMBOLS USED IN THE GUIDE This symbol represents important content in the manual You should study the text accompanied with this symbol carefully Di...

Страница 7: ...es CEE 1935 2004 and updates CEE 2023 2006 and updates CEE 72 2002 and updates and following standards EN ISO 12100 2 2003 A1 2009 EN 60204 2006 A1 2009 EN ISO 14121 1 2007 EN ISO 13857 2008 EN 61310...

Страница 8: ...perations simultaneous mixing and heating of the mixture untill the pre selected temperature max 115 C simultaneous mixing and cooling of the mixture to 4 C and maintaining the produced mass at a temp...

Страница 9: ...ifications such as the weight dimensions and power of the appliance are not mandatory for the manufacturer and may change The water consumption in cylinder depends on the incoming water temperature th...

Страница 10: ...ce after holding the cables or the water hose has lifted it If you have to attend to any work higher up above the appliance you should use a suitable ladder and not the appliance for support 3 2 UNLOA...

Страница 11: ...able manner and in compliance with standards on environmental safety 3 4 PLACING THE APPLIANCE ON THE GROUND Place the machine on a level solid surface with an adequate strength of at least 600 kg per...

Страница 12: ...e released from the condenser 4 2 WATER SUPPLY REQUIREMENTS Prior to connecting the appliance to the power source the temperature pressure and water flow from the water supply network must be checked...

Страница 13: ...must be installed in the immediate vicinity of the appliance where it must be easily visible accessible to the operator and appropriately marked Magnetothermic differential FUSES slot 3 mm of appropr...

Страница 14: ...WATER SUPPLY PORT The water outlet pipe is connected to the WATER OUTLET PORT and to the outlet pipe leading to the drain All these terminals have a diameter of 3 4 and are located on the backside of...

Страница 15: ...s applying in the country in which the appliance is being installed They must read the instructions carefully and above all thoroughly familiarize themselves with the sections on REQUIREMENTS AND COND...

Страница 16: ...maximum allowed on the identification plate or sticker see the section GENERAL FEATURES AND SPECIFICATIONS 6 OPERATING THE APPLIANCE The user operates the appliance standing in front of appliance This...

Страница 17: ...tive home screen DESCRIPTION 1 TUTOR MESSAGES help users giving them instructions and information about the processing They also provide information on any errors and give warnings on operations 2 POS...

Страница 18: ...function to enter the PROGRAM MENU 2 Use this function to enter MACHINE PARAMETERS 3 Use this function to enter LANGUAGE SELECTION 4 Function to be used only by Valmar technicians 5 Digit password to...

Страница 19: ...s gallons or water quantity 8 Press the BACK button to return to the previous screen 9 Press the HOME button to return to the main screen 10 For technician net connection By correct code you can acces...

Страница 20: ...number 7 Number of the software 6 MAC address media access control address 8 Version number of the firmware relay board 9 Total hours of the working 10 Total hours of the standbay 11 Press BACK to re...

Страница 21: ...en 11 Water flow calibration only sweety machine 12 Celsius Fahrenheit temperature setting 13 Save new settings 14 DOWN BUTTON decreased the actual value 15 ACTUAL VALUES 16 UP BUTTON increased the ac...

Страница 22: ...the button Factory default central European time zone Press to activate the hour button Set the hour on the display by using the arrows Confirm with the button Factory default AUT central European tim...

Страница 23: ...ume of the signal by using the arrows Confirm with the button Factory default value 100 Press the button Adjust the volume by using the arrows Confirm with the button Factory default value 1 Press the...

Страница 24: ...AND GASTRONOMY PRODUCTS Select the CUSTOM button to enter the list of customizable programs and programs for ice cream production in mode 2 mode 3 and mode 4 5 PROGRAM NAME 6 FACTORY MENU Select the F...

Страница 25: ...Program name and number 3 Selected program When pressed the button changes color and becomes black 4 Button UP to scroll the program list 5 Button DOWN to scroll the program list 6 NOT ACTIVE Press t...

Страница 26: ...11 Press HOME to return to the inactive home screen 7 1 4 Program list tekst screen 1 Program description text 2 Cursor UP and DOWN Use the arrows to scroll the text 3 Press BACK to return to the pre...

Страница 27: ...ME 5 FORCE ENGINE button Select this button to activate the high mixing for 10 seconds 6 HALF BASIN HEATING button Select this button to activate the heating only with heater which is positionated in...

Страница 28: ...screen click anywhere on the active home screen 7 1 6 Active program parameters screen DESCRIPTION 1 TUTOR MESSAGES help users giving them instructions and information about the processing They also...

Страница 29: ...e the value in active step When the actual step is finished the machine alerts us with an audile signal and the new note of the steep is show on TUTOR MESSAGE 7 1 7 Additional active programs screen D...

Страница 30: ...ogram description 12 STEP NUMBER 7 1 8 Water fill screen DESCRIPTION 1 Press the H2O reset button to reset water quantity If the button is grey the reset is not allowed 2 POSITION OF THE MACHINE stand...

Страница 31: ...e dispensing of the water Use it when you want have a pause or when you want to reset water quantity If the button is grey the stopping of the water filling is not allowed 10 Press the H2O START butto...

Страница 32: ...desired program For further information see the chapter Shortcut to program start All menu programs are started with the START CYCLE button The end of the cycle is notified by a beep and a light signa...

Страница 33: ...omatically until extraction i e until the end of the maximum time limit 5 Active program screen 7 2 1 2 Key CONTINUOUS MIXING The CONTINUOUS MIXING button activate the low mixing with the compressor O...

Страница 34: ...d at high speed for a short time e g when solid ingredients or liquid fats are added into the mixture when the set temperature is achieved during heating to micronize the mixture and to emulsify the m...

Страница 35: ...t 85 C with continuous mixing of the mixture in the production basin in trough the selected program 1 Press the button to start pre set program 02 2 The machine starts with automatic pasteurization cy...

Страница 36: ...flow from the lower water pipe outlet pipe irrespective at what phase the machine is Water flows when the key is pressed This operation you can use for cleaning the drainpipe 7 2 1 8 Key WATER FILL T...

Страница 37: ...ase 7 2 1 9 QUICK keys The quick button permitted easier and quicker access to the preselected program The quick button permitted easier and quicker access to the preselected program The quick button...

Страница 38: ...ice confirm screen is displayed 6 First carefully read the text and then press the confirm button to confirm the language chosen The HOME screen is displayed 7 The machine is ready for use with instru...

Страница 39: ...s the confirm button to confirm the language chosen The HOME screen is displayed 5 The machine is ready for use with instructions in the selected language 7 5 DATA DOWNLOAD with a USB key 7 5 1 Data d...

Страница 40: ...d user code 333333 6 Press the confirem or enter button to lock the access to operation on the machine 7 On the message bar appears message DOWNLOAD 8 When the download is complete appears on the mess...

Страница 41: ...the PARAMETERS screen 3 Insert the USB key into the relevant USB port 4 Press ERROR button to enter in the ERROR screen 5 Use the UP DOWN arrows to scroll the errors to see the informations details of...

Страница 42: ...e cycle customer 1 On inactive HOME page press the TOOLS button to enter in setting menu screen 2 Press the PARAMETERS button to enter the PARAMETERS screen 3 Insert the USB key into the relevant USB...

Страница 43: ...load the uploaded program and software version and the date of the last update are displayed Automatic switch to the type and model screen The screen shows the machine type and model Then the notice c...

Страница 44: ...wn is grey the changing is not allowed see chapter 7 1 6 Exemple Program custom pasteurize Program is composed from 6 steps Step 1 heating of the mixture to 45 C Step 2 heating of the mixture to 85 C...

Страница 45: ...menu Sorbet slush fruit sauce and topping menu Chocolate ice cream ganache chocolate sauce and topping menu Chocolate ice cream ganache chocolate sauce and topping menu Factory program menu Select on...

Страница 46: ...E PROGRAME 9 2 1 STARTING OF THE PROGRAMS with QUICK KEYS SHORTCUT BUTTONS For start program press desired shortcut button e g and then press green button start or double pressing on start button in p...

Страница 47: ...f you press the START CYCLE button you start the selected program 5 Press the START CYCLE button to start the displayed program 9 3 SETTINGS OF THE PROGRAMME shortcut button 9 3 1 CHANGING OF THE PROG...

Страница 48: ...ting the program press the CHANGE button to enter the following 6 Press the shortcut button e g to be linked to the selected program First carefully read the text and then press the OK button to confi...

Страница 49: ...g program and will be valid and used when running the program in future 9 4 2 CHANGING OF THE TEMPERATURE In actual step you can change desired temperature For this you can use two buttons If you pres...

Страница 50: ...e maintenance time is not allowed In the most programs the permeted changing of the maintenance time is saved See the relevant program info to check whether changes are stored If changes are NOT store...

Страница 51: ...press the button to enter language selection screen 2 11 To return to language selection screen 1 press the button 12 Press the button corresponding to the desired language The notice confirm screen i...

Страница 52: ...peration on the machine 1 On inactive HOME screen press the TOOLS button to enter in settings menu 2 Press the CODE button to enter in the PASSWORD screen 3 Enter the password user code 000000 4 Press...

Страница 53: ...press the LOCK button to enter in the PASSWORD screen 2 Enter the password user code 000000 3 Press the confirem or enter button to unlock the access to operation on the machine only when the machine...

Страница 54: ...single inactive home screen press the TOOLS button to enter in SETTINGS screen 5 Press the CODE button to enter in the PASSWORD screen 6 Enter the password user code 000000 7 Press the confirem or ent...

Страница 55: ...e operation In this case press the key STOP and allow 15 20 minutes for the engine to cool down After this time the appliance is again ready for normal programming and operating see the section OPERAT...

Страница 56: ...locked mixer which could harm the operator s or another person s well being switching off the MAIN SWITCH must immediately shut down the appliance Caution must be taken because the outlet valve and th...

Страница 57: ...h OFF We close the lid cover by pulling the lid lever back down in close position If the appliance was in mixing mode the appliance will continue the mixing mode after cover is closed Magnetic switch...

Страница 58: ...re are no other items or tools left in the production basin Just a cleaned and desinfected appliance can be used for mass preparation To get optimal results it is needed to have proper quantity and pr...

Страница 59: ...mass into the production basin and close the cover lid Press one of the keys and the display will show the program number P The appliance will produce the wanted mass baseing on the presetted program...

Страница 60: ...e still running and on display not show Er Door the appliance must be immediately stopped and shut down and hang a sign onto the appliance which says that the machine is out of order An authorized tec...

Страница 61: ...CONTACT WITH THE MIXTURE OF THE ICE CREAM All parts which come into contact with ice cream mixture must be cleaned before and after every use With regular cleaning practice you comply with standards...

Страница 62: ...the lid in counter clockwise direction and remove it Lift the lid lever and remove the lower part of the lid unscrew the plastic bolt take off the flue damper from the mixer extract the mixer from the...

Страница 63: ...accidental dropping remove the plastic insert optionaly Put the plastic foil sheet option that is supplied with the appliance between the mixer and plastic insert With this operation we facilitate th...

Страница 64: ...far as possible and turn it in counter clockwise direction Use both hands Pull out the piston from the outlet pipe Losen the valve locknut in counter clockwise direction and detach the outlet pipe as...

Страница 65: ...t is strictly forbidden to put plastic parts of the appliance into the dishwasher to clean them When cleaning the mixer use the brush that is supplied with the appliance it is recommended that rubber...

Страница 66: ...h hands and slowly and carefouly put it back in position into the basin When the mixer is back in proper position screw in clockwise direction the plastic bolt If necessary put the flue damper back on...

Страница 67: ...e cover cap onto the upper part of the lid With this the basin covel lid is back in posoition and ready to use re instal the outlet pipe assembly Put the outlet pipe assembly near the outler support a...

Страница 68: ...AINTENANCE OF THE APPLIANCE 14 1 INSTRUCTIONS FOR PREVENTION OF INJURIES Authorized servicing personnel may only perform removal of the top cover and side panels and any intervening actions inside the...

Страница 69: ...ror Cause Troubleshooting Appliance will not start up when switched on There is no power supply Check the power circuit Automatic fuses are disconnected Switch on the power fuses again Compressor star...

Страница 70: ...ion of the compressor unit the water flow stops when the appliance stops Water consumption increases if the temperature of cooling water exceeds 18 C 14 6 ENVIRONMENT TEMPERATURES BELOW 0 C Do not lea...

Страница 71: ...st include model of the appliance serial number of the appliance short description of the part factory code if possible quantity Spare part order example SPARE PART ORDER TYPE AND MODEL No 100338 SHOR...

Отзывы: