VALERII S&M GROUP PREMIUM 0503RH32K1200J Скачать руководство пользователя страница 5


Проверил: Р.Ч./.05.2017г.


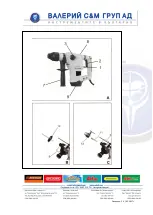
Using the dust collector (fig. B) 

The  dust  collector  is  used  for  drilling  into 

ceilings. 

*Side the dust collector (10) onto the shaft 

of  the  bit  and  mount  the  bit  as  described 

above in the drill chuck. 


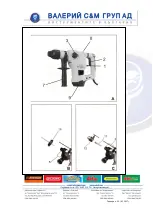
Mounting the side grip (fig. A) 

  * Loosen the side grip (7) 

  * Side the holder of the side grip over the   

drill chuck on the machine. 

  *Turn the side grip in de required position 

and tighten it firmly.   


Mounting the depth stop (fig. A) 

  The  depth  stop  is  used  to  limited  the 

maximum drilling depth. 

  * Loosen the side grip (7). 

  *  Insert  the  depth  stop  (6)  in  the  hole  in 

the holder of side grip. 

  *  Adjust  the  depth  stop  to  the  required 

drilling depth. 

  * Tighten the side grip firmly. 


Selecting the operating mode (fig. A) 

The  machine  must  be  set  to  the  required 

function  (drilling,  hammer  drilling  or 

chiseling) before use. 

  *  For  drilling  without  hammering  (in  soft 

stone,  wood  or  steel  )  you  turn  the 

hammer function switch (2) to position and 

the chisel function    switch (3) to position. 

  *  For  hammer  drill  (in  concrete  or  hard 

stone)  you  turn  the  hammer  function 

switch  (2)  to  position  and  the  chisel 

function switch (3) to position. 

*For  chiseling  you  turn  the  hammer 

function  switch  (2)  to  position  and  the 

chisel function switch (3) to position. In this 

position on the drill chuck does not rotate. 

Only set the hammer functions (2) 

and (3) when the machine is switched off. 


Instructions for use 

  *  Before  inserting  a  drill  bit  or  chisel, 

always grease the shaft. 

* When a cold machine is to be used for 

chiseling,  first  let  it  run  idle  for  a  few 

minutes  to  allow  the  grease  to  spread  in 

the mechanism. 

* If the machine does not hammer properly, 

first  check  if  the  switch  is  in  the 

hammering  position  and  if  the  drill  bit  or 

chisel is correctly fitted. 

* The separate chuck slight leakage of oil 

through  the  joints  of  the  housing.  In  this 

case, you need to tighten the bolts. 


Switching on and off (fig. A) 

* To switch on the machine, press the on 

/off switch (1).   

on / off switch. 


Checking  and  replacing  the  carbon 

brushes (fig. A) 

The carbon brushes must be checked on a 

Содержание PREMIUM 0503RH32K1200J

Страница 1: ...Проверил Р Ч 05 2017г ORIGINAL INSTRUCTION MANUAL ...

Страница 2: ...Проверил Р Ч 05 2017г ...

Страница 3: ...th he e t to oo ol l u un nd de er r d da am mp p a an nd d d da ar rk k w wo or rk ki in ng g c co on nd di it ti io on n O On nl ly y w wh he en n s sw wi it tc ch h i is s O OF FF F c ca an n y yo ou u p pl lu ug g i in n A Af ft te er r u us si in ng g p pl le ea as se e p pu ul ll l o ou ut t t th he e p pl lu ug g P Pl la ac ce e t th he e c co or rd d b be eh hi in nd d t th he e t to oo ol...

Страница 4: ...ving a bit or chisel first remove the mains plug from the socket An ordinary chuck can be mounted on the unit and is not included in the kit Using the separate chuck fig C With the separate chuck your machine is suitable for standard drill bits Select the drill without hammering function Insert the adaptor 11 in the drill chuck 4 Fasten the separate chuck 12 on the screw thread Tighten securely bu...

Страница 5: ...2 to position and the chisel function switch 3 to position For hammer drill in concrete or hard stone you turn the hammer function switch 2 to position and the chisel function switch 3 to position For chiseling you turn the hammer function switch 2 to position and the chisel function switch 3 to position In this position on the drill chuck does not rotate Only set the hammer functions 2 and 3 when...

Страница 6: ...achine does not require any special maintenance Regularly clean the ventilation slots TECHNICAL DATA Mains voltage 230V Mains frequency 50Hz Power input 1200W Speed under load r min 800 No of strokes under load min 4300 Drilling capacity in steel mm 13 wood mm 40 Impact strength J 5 5 Weight kg 5 5 Level of sound pressure measured sound pressure LPA K 3Db A 96 4 Dd A acoustic power LWA K 3db A 107...

Страница 7: ...Проверил Р Ч 05 2017г ...

Страница 8: ...Проверил Р Ч 05 2017г ...

Страница 9: ...ebuie să fie expusă la ploaie Vă rugăm să nu folosiți mașina într un loc de muncă umed și întuneric Numai atunci când comutatorul este în poziția OPRIT se poate conecta la o priză După utilizare vă rugăm să deconectați și să scoateți ștecherul P Pu un ne eț ți i c ca ab bl lu ul l î în n s sp pa at te el le e s sc cu ul le ei i e el le ec ct tr ri ic ce e î în n t ti im mp pu ul l f fu un nc cț ți...

Страница 10: ...u dalta din mandrină Înainte de a instala sau de a scoate burghiul sau dalta mai întâi deconectați și scoateți ștecherul din priză Dispozitivul poate fi montat pe o mandrină obișnuită care nu este inclus în kit Utilizare de mandrină suplimentară Fig C Cu mandrina suplimentară mașina dumneavoastră este potrivită pentru burghie standard Selectați funcția de găurire a ciocanului demolator Puneți adap...

Страница 11: ...ăurire fără demolare în piatră moale lemn sau oțel rotiți comutatorul pentru funcția de găurire 2 în poziție și comutatorul pentru funcția 3 pentru poziționare Pentru demolare în beton sau piatră dură rotiți comutatorul pentru funcția de demolare 2 în poziție și comutatorul pentru funcția dălții 3 pentru poziționare Pentru ungere rotiți comutatorul pentru funcția ciocanului demolator 2 în poziție ...

Страница 12: ... gresie pe mecanismul Închideți capacul CURĂȚARE ȘI ÎNTREȚINERE Mașina nu necesită întreținere specială Curățați în mod regulat orificiile de ventilare DATE TEHNICE Tensiunea de alimentare 230V Frecvența rețelei 50Hz Puterea consumată 1200W Viteză sub sarcină r min 800 Numărul loviturilor sub sarcină în min 4300 Capacitatea de găurire în Oțel mm 13 Lemn mm 40 Forța de impact J 5 5 Greutate kg 5 5 ...

Страница 13: ...Проверил Р Ч 05 2017г ...

Страница 14: ...Проверил Р Ч 05 2017г ...

Страница 15: ... де е и из зл ла аг га ан н н на а д дъ ъж жд д М Мо ол ля я н не е р ра аб бо от те ет те е с с и ин нс ст тр ру ум ме ен нт та а н на а в вл ла аж жн но о и и т тъ ъм мн но о р ра аб бо от тн но о м мя яс ст то о С Са ам мо о к ко ог га ат то о к кл лю юч чъ ът т е е в в п по оз зи иц ци ия я И ИЗ ЗК КЛ ЛЮ ЮЧ ЧЕ ЕН Н м мо ож же е д да а г го о в вк кл лю юч чи ит те е в в к ко он нт та ак кт та ...

Страница 16: ...лесен монтаж Нанесете малко количество грес върху бургията или секача Издърпайте патронника 5 назад и вкарайте накрайника на бургията или секача в патронника 4 Завъртете бургията или секача до края на патронника Освободете патронника 5 За да извадите бургията или секача издърпайте патронника 5 назад и махнете бургията или секача от патронника Преди да монтирате или извадите бургията или секача пър...

Страница 17: ...ика на машината Завъртете страничната ръкохватка в необходимото положение и я затегнете здраво Монтиране на дълбочинен ограничител фиг A Дълбочинен ограничител се използва за ограничаване на максималната дълбочина на пробиване Разхлабете страничната ръкохватка 7 Поставете ограничителя на дълбочината 6 В отвора в държача на страничната дръжка Регулирайте дълбочинния ограничител до необходимата дълб...

Страница 18: ...те Включване и изключване фиг A За да включите машината натиснете ключа за включване изключване 1 Проверка и подмяна на карбониеви четки фиг A Карбониевите четки трябва да се проверяват редовно Отстранете поставките за карбониевите четки 9 и почиствайте карбониевите четки едновременно В случай на износване сменете двете карбониеви четки едновременно Поставете държача на карбониевата четка След кат...

Страница 19: ...алягане звуково налягане Lpa K 3dB A 96 4 dB A Акустична мощност Lwa K 3dB A 107 4dB A Предприемeje подходящи мерки за защита на слуха Стойност на претегленото средно квадратично ускорение според EN 50144 ГАРАНЦИЯ Запознайте се с приложените гаранционни условия за гаранционните условия ОКОЛНА СРЕДА Ако машината ви се нуждае от подмяна след продължителна употреба не я поставяйте в битовите отпадъци...

Отзывы: