


Проверил: Р.Ч./.05.2017г.
drilling in concrete, stone, wood and steel
and for light chipping and chiseling
applications.
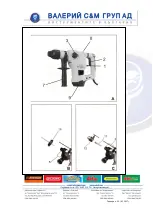
1 on/off switch
2 Switch hammer function
3 Switch chisel function
4 Chuck
5 Collar
6 Depth stop
7 Side handle
8 Cover lubrication point
9 Carbon brush holder
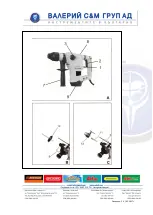
Mounting and removing a bit or chisel
(fig. A)
This tool uses drill bits and chisels with a
special tool holder system for quick and
easy mounting.
*
Apply a small amount of grease on the
bit or chisel shaft.
* Pull the collar (5) backward and insert
the shaft of the bit or chisel into the drill
chuck (4). Turn the bit or chisel into the
shaft is locked in the drill chuck.
* Release the collar (5).
*In order to remove the bit or chisel, pull
the collar (5) backward and remove the bit
or chisel from the drill chuck.
Before mounting or removing a bit or
chisel, first remove the mains plug from
the socket.
An ordinary chuck can be mounted on the
unit and is not included in the kit.
Using the separate chuck (fig. C)
With the separate chuck your machine is
suitable for standard drill bits.
* Select the drill without hammering
function.
* Insert the adaptor (11) in the drill chuck
(4).
* Fasten the separate chuck (12) on the
screw-thread. Tighten securely but do not
force.
* In order to remove the chuck, proceed in
the reverse order.
Use the separate chuck for drilling
without hammering exclusively.
If you use the chuck in another function it
will be damaged.
For inserting a drill bit in the separate
chuck proceed as follows:
* Open the chuck (12)
* Insert the drill into the chuck.
* Fasten the chuck by hand.
* Fasten the chuck firmly by inserting the
chuck key in one of the holes in the side of
the chuck and turning it clockwise.
* In order to remove a drill, proceed in
reserve order.
Before inserting or removing a drill,
always pull the plug from the wall socket.
Содержание PREMIUM 0503RH32K1200J
Страница 1: ...Проверил Р Ч 05 2017г ORIGINAL INSTRUCTION MANUAL ...
Страница 2: ...Проверил Р Ч 05 2017г ...
Страница 7: ...Проверил Р Ч 05 2017г ...
Страница 8: ...Проверил Р Ч 05 2017г ...
Страница 13: ...Проверил Р Ч 05 2017г ...
Страница 14: ...Проверил Р Ч 05 2017г ...


