VADDIO EasyMic MicPOD Series Скачать руководство пользователя страница 9


Page 9 of 11         


7. 

Now that we’ve confirmed communication to the EasyUSB Mixer/Amp, we’re going to confirm 
communication to the connected microphones: 

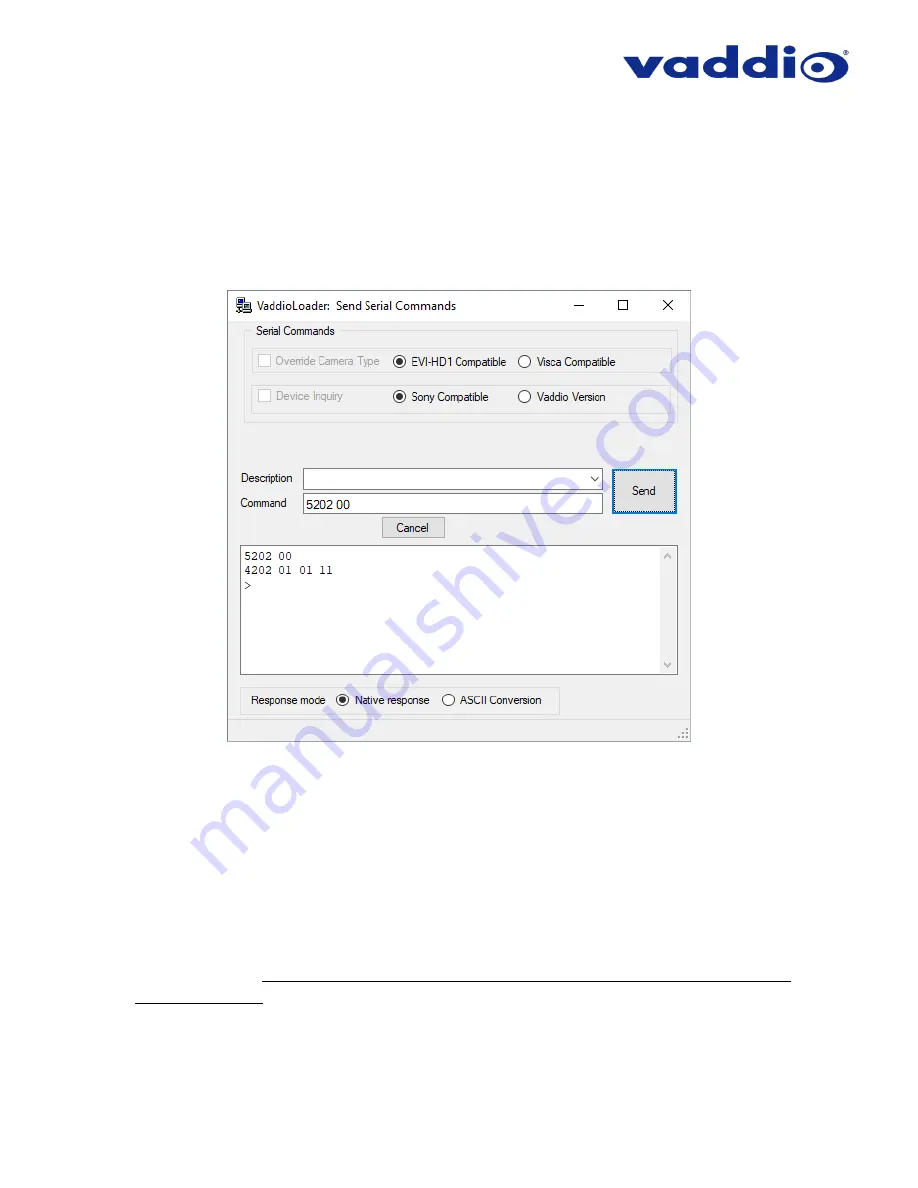
If you have a MicPOD connected to EasyMic Port 1, send the command 

5202 00

If you have a MicPOD connected to EasyMic Port 2, send the command 

5202 01

o

 Microphones should respond with 

4202

, followed by a 

01

 (for a table mic) or 

02


(for a ceiling mic), and the microphone

’s firmware version. 


In this example 

the connected EasyMic Table MicPOD in port 1 is on firmware version 1.11 


8.  If steps 6 & 7 worked as described, close the Serial Commands window. This will return you to 

the main Vaddio Loader window. 

9.  P

ut the EasyUSB Mixer/Amp into ‘firmware update mode’ by removing power and putting DIP 

switch 8 on the back of the unit in the ‘up’ position. 

10. Reapply power and wait about 15 seconds for the unit to finish booting. 
11. If you have two EasyMic MicPODs connected, disconnect one of them from the EasyMic ports 

on the back of the unit. It does not matter which port is currently connected for the update to 
happen, just that 

only one microphone is connected at a time during a serial MicPOD 

firmware update

12. From the product drop-down menu of Vaddio Loader, change the product to either EasyMic 

Ceiling Mic

POD or EasyMic Table MicPOD (depending on the unit you’re updating). 


Содержание EasyMic MicPOD Series

Страница 1: ...POD with keypad has changed from momentary to latching Added ability to update MicPOD firmware from the Web UI of compatible Vaddio products User Notes The firmware file and update process differs depending on the Vaddio product from which the connected MicPOD is updated See update instructions on the following pages for more details 06 15 2015 EasyMic 1 09 Notes New Features Added Interoperabilit...

Страница 2: ...date firmware from Update method AV Bridge MATRIX PRO Web UI ConferenceSHOT AV Camera Web UI EasyUSB Mixer Amp Vaddio Loader Using the table above find the product that you will be updating your EasyMic MicPOD s firmware from and navigate to the proper update method on the following pages Once your firmware has been properly updated it is recommended that you give yourself a high five for a job we...

Страница 3: ...OT AV Camera into a browser You can get the IP address for the AV Bridge MATRIX PRO from the front panel of the unit under Network Settings You can get the IP address for the ConferenceSHOT AV Camera by viewing the camera s USB stream and pressing the Data Screen button on the camera s remote The IP address will appear in the camera s video output 2 In the Web UI use the menu access button in the ...

Страница 4: ...the System page with the menu on the left of the page then select the peripheral tab within the System page If there is no Peripherals tab on the system page you will need to update firmware on your product AV Bridge MATRIX PRO must be on firmware version 2 0 0 or newer ConferenceSHOT AV Camera must be on firmware version 1 1 0 or newer ...

Страница 5: ...ou d like to update 6 When you re satisfied with your selections though when are any of us ever truly satisfied especially Mick Jagger select Begin Firmware Update to watch the magic happen 7 After about 2 minutes your firmware update will indicate that it was successfully completed Sit back and enjoy a job well done or update your other microphone ...

Страница 6: ...ss 1 Connect the PC and the EasyUSB Mixer Amp Plug the USB to Serial Adapter into a USB port on the PC Connect the Vaddio EZCamera Control Adapter to the USB to Serial Adapter via their 9 pin connectors Connect your Cat 5 or better cable to the RJ 45 port on the EZCamera Control Adapter Connect the other end of your Cat 5 or better cable to the RS 232 port on the EasyUSB Mixer Amp Example connecti...

Страница 7: ...Page 7 of 11 3 Select Audio under Product Type 4 From the drop down menu select EasyUSB Mixer Amp 5 Go to File Serial Commands A new Serial Commands window will open ...

Страница 8: ...ou should get a response from the unit that lists its current firmware version and a list of valid commands and responses If your query times out returns no response or returns a different response than expected contact Vaddio Technical Support to troubleshoot before proceeding ...

Страница 9: ... close the Serial Commands window This will return you to the main Vaddio Loader window 9 Put the EasyUSB Mixer Amp into firmware update mode by removing power and putting DIP switch 8 on the back of the unit in the up position 10 Reapply power and wait about 15 seconds for the unit to finish booting 11 If you have two EasyMic MicPODs connected disconnect one of them from the EasyMic ports on the ...

Страница 10: ...ware you downloaded from www vaddio com 14 Click Start to initiate the firmware update The squares in the bottom right corner should flash and the progress bar on the bottom should start to fill in If the MicPOD has a mute indicator that will also start to blink ...

Страница 11: ...AV Technologies ULC 2018 Milestone AV Technologies Page 11 of 11 15 Do not disconnect any cabling until Vaddio Loader indicates a successful firmware load In about 3 5 minutes your firmware update should be done 16 If you have more than one microphone return to step 11 and repeat the process for the other MicPOD unit 17 Remove power from the EasyUSB Mixer Amp 18 Reconnect all EasyMic MicPODs in th...

Отзывы: