background image

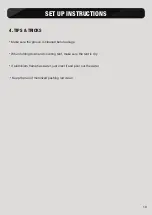
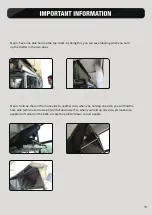
Step 1: take down the electric arm on the both sides.

Step 2: take out the 2 pcs 92cm poles from the pockets( there is one pocket at the below of tent)

12

Содержание E.BEX

Страница 1: ...E BEX 2 E BEX Manuel d utilisation...

Страница 2: ...NTE DE TOIT NE S OUVRE PAS CHANGEMENT D UN BRAS LECTRIQUE CARACT RISTIQUES TRUCS ET ASTUCES Rondelle Vis hexagonales crous enrob s Cl Allen en L Accessoires Stator en forme de U 15 P16 Vis M6x32 M6 Bl...

Страница 3: ...installer votre tente de toit Positionnez vos barres de toit selon les recommandations du constructeur automobile Positionnez votre tente de toit au centre du toit de votre v hicule et assurez vous qu...

Страница 4: ...de toit image 2 Faites glisser dans les rails les vis de mani re les placer de chaque c t des barres de toit Ins rez sur chacune des 8 vis les 4 pattes plates de fixation en arc et vissez fermement la...

Страница 5: ...veau du ch ssis un des 4 coins de la tente Votre tente est pr te pour s ouvrir lectriquement l aide de la t l commande ou de votre smartphone Une fois connect la tente connectez le c ble du bloc au c...

Страница 6: ...assurer que toutes les sangles sont d connect es Assurez vous que le courant est tabli entre votre v hicule et la tente appuyez sur le bouton UP de la t l commande pour d ployer votre tente Remarque L...

Страница 7: ...ent Vous pouvez alors la poser au sol et l utiliser montez l chelle afin d ouvrir le toit en ABS pour cela poussez doucement le toit vers le haut Les verrins hydrauliques vous assisteront et le toit s...

Страница 8: ...ppuyez sur le toit rigide pour l incliner vers le bas 3 b Tirez vers le haut les 2 pattes m talliques afin de d verrouiller l chelle 3 c Une fois d verrouill e pliez en 2 l chelle rabattez la et posit...

Страница 9: ...entre votre v hicule et la tente appuyez sur le bouton DOWN de la t l commande pour replier votre tente Remarque Le bouton UP ne fonctionnera pas tant que votre tente ne soit totalement repli e Appuy...

Страница 10: ...9 9 2 h Fermez les boucles en plastique de l chelle 2 i Verrouillez toutes les sangles crant es INSTRUCTIONS DE MONTAGE...

Страница 11: ...chaque utilisation afin que ses performances ne soient pas diminu es Assurez vous de bien a rer la tente et qu elle soit bien s che avant de la replier Veillez ce que les v rins des bras motoris s so...

Страница 12: ...d appuyer sur le bouton STOP pour arr ter le processus et ensuite sur DOWN ou UP selon ce que vous souhaitez faire V rifiez qu il n y ait aucun objet dans la tente et qu il n y ait rien qui ne g ne le...

Страница 13: ...e du bras lectrique l aide du tournevis cruciforme fourni des 2 c t s Faites attention ne pas vous blesser lors de cette op ration Etape 2 UTILISATION DU KIT MANUEL Prenez les 2 barres de 92cm de leur...

Страница 14: ...t cela il vous sera plus facile de d plier la tente Etape 4 A l aide de la barre de toit restante relevez la tente sur un c t R cup rez la premi re barre qui est tomb e suite la pouss e et r p tez l a...

Страница 15: ...S IMPORTANTES 1 Otez la partie en plastique sur le c t du cadre 2 Retirez le c ble de transmission blanc avec pr caution 3 D vissez le joint tanche 4 D branchez le joint tanche 14 CHANGEMENT D UN BRAS...

Страница 16: ...able de transmission du trou situ en haut droite Retirez le joint tanche Utilisez une grande cl hexagonale pour d visser l crou du cadre Installez la nouvelle tige motoris e Les tapes d assemblage son...

Страница 17: ...INTERIEUR 190g polycotton PU 2000mm SOL 600g Heavy PVC floor CADRE Alliage Aluminium MOTEUR 12VDC 28W pc 56W set TECHNOLOGIE 2 x T l commandes sans fil STRUCTURE Pour 2 personnes Dimensions int rieure...

Страница 18: ...Accessory list...

Страница 19: ...Screw M6x32 M6 Slider block M6 Flat Washer 6xL 100 cross screwdriver 8 10 open spanner 6mm L shape hexagonal wrench 5mm L shape hexagonal wrench 1 Screw M6x50 M6 Arc Washer...

Страница 20: ...fitted to your vehicle before installling the Roof Top Tent 1 b We recommend you place the Roof Top Tent in the load bearing position 1 c Adjust the tent to the roofs centre ensuring the rear door can...

Страница 21: ......

Страница 22: ...hts You just need to connect with the USB then the equipment can be charged Open the tent cover and run the power cord to your 12V socket If you want to use the power pack to drive the tent s motor yo...

Страница 23: ...5 Instructions continued on next page 2 e Wait a couple of minutes for the tent to set up automatically 2 f Hold the ladder and then pull down...

Страница 24: ...6 2 i Push the hard top up from bottom gently 2 j right side automatically 2 g The ladder will open slowly 2 h Pull on the ladder 180 degrees then it will lock automatically Put it on the ground...

Страница 25: ...NG DOWN YOUR ROOF TOP TENT 3 a Press the hard top from up to down 3 b Push the ladder lock up 3 c The ladder will unlock and it can now be folded down Notice Please do not push the lock of the ladder...

Страница 26: ......

Страница 27: ...9 2 h Lock the buckle on the ladder 2 i Lock all buckles around the base SET UP INSTRUCTIONS...

Страница 28: ...groove is cleaned before usage When folding down and covering tent make sure the tent is dry If aluminium frame has water just erect it and pour out the water Keep the rail of motorized pushing rod c...

Страница 29: ...E When the pushing rod is not workable and you forgot to bring the tools to replace the pushing rod you can use below method to hold up and take down your tents...

Страница 30: ...Step 1 take down the electric arm on the both sides Step 2 take out the 2 pcs 92cm poles from the pockets there is one pocket at the below of tent 12...

Страница 31: ...the shelter in the two sides 13 Step 4 hold up the tent from one side to another side when you hold up one side you will nd the back pole which used in step 3 will fall down itself so when you hold up...

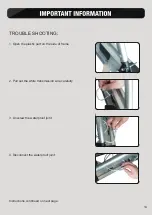
Страница 32: ...SHOOTING 1 Open the plastic part on the side of frame 2 Pull out the white transmission wire carefully 3 Unscrew the waterproof joint 4 Disconnect the waterproof joint Instructions continued on next...

Страница 33: ...above 6 Pull out the waterproof joint 7 Use big size hexagon wrench to screw off the nut on the frame 8 Use small size hexagon wrench to screw off the nut on the tent pole 8 Install the new motorize p...

Страница 34: ...r coating UPF50 Inner 190g polycotton PU 2000mm Floor Frame Alu Alloy Motor 12VDC 28W pc 56W set Technology 2 x Wireless remote control STRUCTURE Person 2 Inner tent size 200 L x 120 W x 110 85cm H Pa...

Отзывы: