background image

E

N

G

L

IS

H

14

IMPORTANT REMARKS

For any installation problem please contact our Customer Service
at the 39-0172.812411 operating Monday to Friday
from 8:30 to 12:30 and from 14:00 to 18:00

V2 S.p.A. has the right to modify the product without
previous notice; it also declines any responsibility to
damage or injury to people or things caused by improper
use or wrong installation.

m

PLEASE READ THIS INSTRUCTION MANUAL VERY 

CAREFULLY BEFORE INSTALLING AND PROGRAMMING
YOUR CONTROL UNIT.

• This instruction manual is only for qualified technicians, who 

specialize in installations and automations.

• The contents of this instruction manual do not concern the 

end user.

• Every programming and/or every maintenance service should 

be done only by qualified technicians.

AUTOMATION MUST BE IMPLEMENTED IN COMPLIANCE
WITH THE EUROPEAN REGULATIONS IN FORCE:

EN 60204-1

(Machinery safety. electrical equipment of 
machines, part 1: general rules) 

EN 12445

(Safe use of automated locking devices, test 
methods)

EN 12453

(Safe use of automated locking devices, 
requirements)

• The installer must provide for a device (es. magnetotermical 

switch) ensuring the omnipolar sectioning of the equipment 
from the power supply. The standards require a separation of 
the contacts of at least 3 mm in each pole (EN 60335-1).

• Installation requires mechanical and electrical skills, 

therefore it shall be carried out by qualified personnel only, 
who can issue the Compliance Certificate concerning the 
whole installation (Machine Directive 98/37/EEC, Annex IIA).

• The automated vehicular gates shall comply with the 

following rules: EN 12453, EN 12445, EN 12978 as well as 
any local rule in force. 

• Also the automation upstream electric system shall comply 

with the laws and rules in force and be carried out 
workmanlike. V2 S.p.A. declines any responsibility in case of 
automation upstream electric system not complying with the 
laws and rules in force and not carried out workmanlike.

• The door thrust force adjustment shall be measured by 

means of a proper tool and adjusted according to the max. 
limits, which EN 12453 allows.

• The use of JEDI in dusty, saline or explosive environment 

is forbidden

• The opener is designed for operation in dry rooms exclusively.

• For the safety and life of persons it is absolutely necessary to 

follow all instructions.

• Keep these instructions save for later reference

• Do not permit children to play with the automated garage 

door. Transmitters are to be kept safe and away from 
children!

• Only operate the door if the entire door area is in your field of 

view. Always be sure, that no persons or objects are located 
within traveling range of the door.

• Do not use the opener when service or adjustment work is 

required. A badly balanced door, or a faulty garage door 
system may cause injuries.

• Please inform all persons using the door system on how to 

operate it correctly and safely. Demonstrate and test the 
reversion (with a 50 mm high obstacle at max. 150 N) as well 
as the mechanical release. 

• For the safety of persons and objects a safety check has to be 

performed. Before finishing the initial operation make sure 
that the drive stops and reverses according to the valid norms 
(EN 12453) when hitting an obstacle (max. 150N force, 
equivalent to approx. 15 kg, more than 50 mm above 
ground). 

• This test and measurement of force may only be performed by 

a professional.
When hitting an obstacle the door has to stop and reverse 
(completely or partially, depending on the setting of the PCB). 
If the door does not run the correct path or if the door does 
not reverse when hitting an obstacle the programming of 
force and path has to be repeated. 
Then please repeat the test.
If the door after the performed corrections does not stop and 
reverse according to the valid norms, the door may not be 
operated automatically.

• Check regularly that the gate reverse when detected a 

40mm high obstacle 

• Check often the automation, particularly the cables, springs 

and mechanic parts for wear and tear, damages and 
unbalancing 

• The plug must be at easy reach, after the installation 

• The data on the plate of the product are written on the label 

put next to the connection terminal board 

• Permanently mounted auxiliary devices (such as push buttons 

etc.) should be mounted within view of the door. 
The distance between moving parts and the height must be at 
least 1.5 meters. It is essential that they are mounted out of 
reach of children!

• Affix warning signs indicating the risk of being caught in the 

door where they may be seen immediately or in the vicinity of 
the permanently mounted push button.

Содержание JEDI-700

Страница 1: ...ERATEUR ELECTROMECANIQUE POUR PORTES SECTIONNELLES ET BASCULANTES MOTOR DE TECHO ELECTROMEC NICO PARA PUERTAS SECCIONALES Y BASCULANTES MOTORREDUTOR ELECTROMEC NICO PARA PORTAS SECCIONADAS E BASCULANT...

Страница 2: ......

Страница 3: ...nte 65 12035 Racconigi CN Italia Dichiara sotto la propria responsabilit che l automatismo modello JEDI 700 JEDI 700 120V JEDI 1000 JEDI 1000 120V Matricola e anno di costruzione posti sulla targa dat...

Страница 4: ...to in locali asciutti Per salvaguardare l incolumit delle persone d importanza vitale rispettare tutte le istruzioni Conservare con cura questo manuale di istruzioni Non permettere ai bambini di gioca...

Страница 5: ...za nessun punto di attrito La porta deve essere adeguatamente bilanciata sia prima che dopo l automatizzazione fermando la porta in qualsiaisi posizione non deve muoversi eventualmente provvedere ad u...

Страница 6: ...nzione R fino alla posizione limite evidenziata dai due fori Q sul profilato guidacatena 4 Regolare la tensione della catena agendo sulla vite a testa esagonale con una chiave da 10 mm avvitare il dad...

Страница 7: ...mento sulla traversa superiore e sul soffitto per facilitare il posizionamento del profilato guida 2 3 Ancorare la staffa E alla traversa superiore della porta con dei tasselli G adatti al tipo di par...

Страница 8: ...o piano in caso contrario aggiungere degli spessori Collegare la barra forata L alla barra forata del braccio ad archetto utilizzando 2 bulloni 6x15 SBLOCCO DELL AUTOMAZIONE Per sbloccare l automazion...

Страница 9: ...ale di comando all interno di JEDI gi cablata E sufficiente inserire la spina nella presa di corrente per procedere con la programmazione dei parametri di funzionamento Per il collegamento degli acces...

Страница 10: ...ner premuto il tasto la porta apre o il tasto la porta chiude per raggiungere la posizione di massima chiusura Quando la porta raggiunge la posizione desiderata premere il tasto per salvare le imposta...

Страница 11: ...tri impostati tenere premuto per 5 secondi il tasto fino a quando i segmenti del display si accendono uno per volta fino visualizzare 0 mATTENZIONE se si modifica questo parametro necessario terminata...

Страница 12: ...disattiva Se viene attivata questa funzione quando il motore raggiunge i 2000 cicli di funzionamento il dispositivo emette dei BEEP Questo allarme pu essere utile per programmare degli interventi di...

Страница 13: ...Rilasciare il tasto e premere per 2 volte il tasto del telecomando il dispositivo emette un BEEP il display si spegne per confermare l avvenuta memorizzazione Premere e mantenere premuto il tasto Dopo...

Страница 14: ...ITALIANO 12...

Страница 15: ...Directive 2004 108 EC Radio Directive 99 05 EC Directive ROHS2 2011 65 EC The relevant technical documentation is available at the national authorities request after justifiable request to V2 S p A Co...

Страница 16: ...or operation in dry rooms exclusively For the safety and life of persons it is absolutely necessary to follow all instructions Keep these instructions save for later reference Do not permit children t...

Страница 17: ...easily without any friction The door must be properly balanced both before and after its automation stopping the door in any position it must not move carry out a balance weight adjustment if necessa...

Страница 18: ...the connecting section bar R to the end position indicated by the two holes Q on the chain guide section bar 4 Adjust the tension of the chain using the Allen head screw with a 10 mm Allen wrench tur...

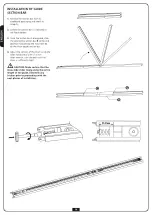
Страница 19: ...actly half its height mark the reference points on the upper crossbeam and on the ceiling to facilitate positioning of the guide section bar 2 3 Fasten the bracket E to the upper crossbeam of the door...

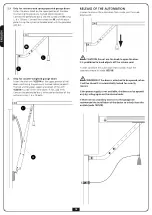
Страница 20: ...in the same plane If not add shims Connect the perforated bar L to the perforated bar of the arch arm using 2 6 x 15 bolts RELEASE OF THE AUTOMATION In order to release the automation from inside pul...

Страница 21: ...The control panel inside JEDI is already cabled You just need to plug it in the electrical outlet to proceed with operational parameter programming To connect the photocells and the START button plea...

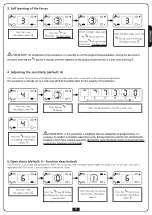
Страница 22: ...nd then repeat the programming operation 1 Setting the open limit switch mPLEASE NOTE The open limit switch must be stored prior to the close limit switch If this procedure is used erroneously to set...

Страница 23: ...parameters set press and hold the key for 5 seconds until the segments of the display illuminate one at a time until showing 0 mPLEASE NOTE if this parameter is modified then on completion of programm...

Страница 24: ...ance alarm default 0 function deactivated If this function is activated the device emits BEEPs when the motor reaches 2000 operational cycles This alarm may be useful for scheduling maintenance operat...

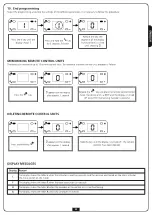
Страница 25: ...fter approx 1 second Release the key and press the remote control button twice the device emits a BEEP and the display is turned off to confirm memorising has been successful Press and hold key 0 appe...

Страница 26: ...ENGLISH 24...

Страница 27: ...ue est disposition de l autorit comp tente sur demande motiv e l adresse suivante V2 S p A Corso Principi di Piemonte 65 12035 Racconigi CN Italie La personne autoris e signer la pr sente d claration...

Страница 28: ...mportant de respecter toutes les consignes afin d assurer en toutes circonstances la s curit des personnes S il vous plait conservez ces instructions Jouer avec la porte motoris e doit tre fait imposs...

Страница 29: ...s aucun frottement La porte doit tre bien balanc e soit avant que apr s l automatisation en arr tant la porte en n importe quelle position ne doit pas bouger ventuellement il faut tablir une r gulatio...

Страница 30: ...jusqu la position limite mise en vidence par deux trous Q sur le profil guide cha ne 4 R gler la tension de la cha ne en intervenant sur la vis t te hexagonale l aide d une cl de 10 mm Visser le d jus...

Страница 31: ...rence sur la traverse sup rieure et sur le plafond pour faciliter le positionnement du profil de guidage 2 3 Ancrer l trier E la traverse sup rieure de la porte avec des chevilles G appropri es au ty...

Страница 32: ...paisseurs Relier la barre perc e de L la barre perc e du bras petit arc en utilisant 2 boulons 6x15 DEVERROUILLAGE DE L AUTOMATISATION Pour d verrouiller l automatisation de l int rieur il suffit de t...

Страница 33: ...int rieur de JEDI est d j c bl e Il suffit d ins rer la cheville dans la prise de courant pour proc der avec la programmation des param tres de fonctionnement Pour le branchement des photocellules et...

Страница 34: ...u fin de course d ouverture mATTENTION le fin de course d ouverture doit tre m moris avant du fin de course de fermeture Si cette proc dure est utilis e erron ment pour configurer le fin de course de...

Страница 35: ...nc e pendant 5 secondes la touche jusqu quand les segments de l afficheur s allument un par un jusqu visualiser 0 mATTENTION si l on modifie ce param tre il est n cessaire une fois termin e la program...

Страница 36: ...activ e Si cette fonction est activ e quand le moteur atteint les 200 cycles de fonctionnement le dispositif met des BIPS Cette alarme peut tre utile pour programmer des interventions d entretien Pour...

Страница 37: ...onde environ 0 s allume l cran Rel cher la touche et presser 2 fois la touche de la t l commande le dispositif met un BIP et l cran s teint Presser et maintenir enfonc e la touche Apr s 1 seconde envi...

Страница 38: ...FRAN AIS 36...

Страница 39: ...a est a disposici n de la autoridad competente bajo petici n fundada en V2 S p A Corso Principi di Piemonte 65 12035 Racconigi CN Italia La persona autorizada para firmar la presente declaraci n de in...

Страница 40: ...e hacerse funcionar en espacios bien secos Para la seguridad de las personas es vital che cada instrucci n sea respectada Por favor conserven estas instrucci nes A los ni os no debe ser autorizado jug...

Страница 41: ...n ning n punto de roce La puerta tiene que estar adecuadamente equilibrada tanto antes como despu s de la automatizaci n parando la puerta en cualquier posici n no tiene que moverse eventualmente proc...

Страница 42: ...posici n l mite indicada por dos perforaciones Q sobre el perfil guardacadena 4 Regule la tensi n de la cadena actuando sobre el tornillo de cabeza hexagonal con una llave de 10 mm enrosque la tuerca...

Страница 43: ...erencia sobre la transversal superior y sobre el techo para facilitar el posicionamiento del perfil gu a 2 3 Ancle el soporte E a la transversal superior de la puerta con los tacos G adecuados al tipo...

Страница 44: ...en caso contrario agregue separadores Conecte la barra perforada L a la barra perforada del brazo en arco utilizando dos pernos 6x15 DESBLOQUEO DE LA AUTOMATIZACION Para desbloquear la automatizaci n...

Страница 45: ...l interior del JEDI ya est cableada Es suficiente insertar la clavija en la toma de corriente para proceder con la programaci n de los par metros de funcionamiento Para la conexi n de las fotoc lulas...

Страница 46: ...rrido de apertura mATENCI N El tope de recorrido de apertura debe ser memorizado antes del tope de recorrido de cierre Si este procedimiento se utiliza incorrectamente para programar el tope de recorr...

Страница 47: ...ntenga pulsado durante cinco segundos el bot n hasta que se enciendan los segmentos de la pantalla uno por vez hasta visualizar 0 mATENCI N Si se modifica este par metro es necesario concluida la prog...

Страница 48: ...r defecto 0 funci n desactivada Si se activa esta funci n cuando el motor alcanza dos mil ciclos de funcionamiento el dispositivo emite un zumbido Esta alarma puede ser til para programar las interven...

Страница 49: ...en la pantalla Suelte el bot n y pulse dos veces el bot n del telecomando el dispositivo emite un zumbido y la pantalla se apaga para confirmar la memorizaci n ocurrida Pulse y mantenga pulsado el bot...

Страница 50: ...ESPA OL 48...

Страница 51: ...i o da autoridade competente a pedido motivado junto V2 S p A Corso Principi di Piemonte 65 12035 Racconigi CN Italia A pessoa autorizada a assinar a presente declara o de incorpora o e a fornecer a d...

Страница 52: ...dever possibilitar s crian as que elas brinquem com o port o automatizado Mantenha o emissor manual afastado das crian as Opere o port o apenas se poder visualizar a respectiva rea total Tenha aten o...

Страница 53: ...m nenhum ponto de atrito A porta deve ser adequadamente equilibrada quer antes quer depois da automatiza o ao parar a porta em qualquer posi o ela n o deve mover se eventualmente cabe regular os contr...

Страница 54: ...rfilado de jun o R at a posi o limite evidenciada pelos dois furos Q no perfilado guia da correia 4 Regular a tens o da correia agindo no parafuso hexagonal com uma chave de 10 mm parafusar a porca at...

Страница 55: ...de refer ncia na travessa superior e no teto para facilitar o posicionamento do perfilado guia 2 3 Ancorar o estribo E na travessa superior da porta com os cal os G aptos para o tipo de parede m nimo...

Страница 56: ...escentar umas cunhas Ligar a barra furada L com a barra furada do bra o em arco utilizando 2 parafusos com porcas 6x15 DESBLOQUEIO DA AUTOMA O Para desbloquear a automa o pelo lado de dentro suficient...

Страница 57: ...ndos no interior de JEDI j est cablado Basta inserir a ficha de cabo na tomada de corrente para proceder com a programa o dos par metros de funcionamento Para a liga o das c lulas fotoel ctricas e do...

Страница 58: ...so de programa o 1 Programa o do fim de curso de abertura mATEN O o fim de curso de abertura deve ser memorizado antes do fim de curso de fecho Se este processo for utilizadoerroneamente para programa...

Страница 59: ...r premida por 5 segundos a tecla enquanto os segmentos do display se acendam um de cada vez at visualizar 0 mATEN O se este par metro for modificado ser necess rio depois de terminada a programa o efe...

Страница 60: ...o n o activa Se esta fun o for activada quando o motor completar 2000 ciclos de funcionamento o dispositivo emite alguns BEEP Este alarme pode ser til para programar algumas interven es de manuten o P...

Страница 61: ...e premir 2 vezes a tecla do telecomando o dispositivo emite um BEEP e o display se apaga para confirmar que ocorreu a memoriza o Premir e manter premida a tecla Ap s 1 segundo aproximadamente se acend...

Страница 62: ...PORTUGU S 60...

Страница 63: ...n zust ndigen Beh rden auf begr ndete Anfrage zur Verf gung bei V2 S p A Corso Principi di Piemonte 65 12035 Racconigi CN Italien Folgende Person ist autorisiert die Inkorporationserkl rung zu unterze...

Страница 64: ...ed ist nur f r den Betrieb in trockenen R umen bestimmt Zum Schutz der Unversehrtheit der Personen ist es von grundlegender Wichtigkeit alle Hinweise zu befolgen Vorliegendes Benutzerhandbuch sorgf lt...

Страница 65: ...und schlie en lassen Das Tor muss sowohl vor als auch nach der Automatisierung entsprechend ausbalanciert werden Bei Anhalten des Tors in welcher Position auch immer darf sich dieses nicht bewegen ev...

Страница 66: ...indungsprofilteil R bis zu den beiden an der Kettenf hrung markierten L chern Q gleiten lassen 4 Die Spannung der Kette regulieren indem man die Sechskantschraube mit einem 10mm Schl ssel verstellt di...

Страница 67: ...um das Positionieren des F hrungsprofils zu erleichtern 2 3 B gel E am oberen Quertr ger des Tors mit f r den Wandtyp geeigneten D beln G min 8 mm verankern 2 4 Profilteil A am B gel unter Verwendung...

Страница 68: ...alls Unterlegscheiben verwenden Lochstange L mit der Lochstange des Bogenarms unter Verwendung der beiden 6x15 Bolzenschrauben verbinden FREIGABE DES AUTOMATIONSMECHANISMUS Zur Freigabe des Automation...

Страница 69: ...uerung im Inneren des JEDI ist bereits verkabelt Es reicht aus den Stecker in die Steckdose zu stecken um die Programmierung der Funktionsparameter vorzunehmen F r den Anschluss der Fotozellen und des...

Страница 70: ...Programmierprozedur zu wiederholen 1 Einstellung des Endanschlags beim ffnen mACHTUNG der Endanschlag beim ffnen ist vor dem Endanschlag f r das Schlie en zu speichern Wenn diese Prozedur f lschliche...

Страница 71: ...rameter speichert Taste 5 Sekunden gedr ckt halten bis sich die Displaysegmente einzeln nacheinander einschalten und 0 angezeigt wird mACHTUNG wenn dieser Parameter ver ndert wird ist es notwendig nac...

Страница 72: ...t Wenn diese Funktion aktiviert wird nachdem der Motor 2000 Umdrehungen erreicht hat gibt die Vorrichtung einen BEEP Ton ab Dieser Alarm kann n tzlich sein um Wartungseingriffe zu programmieren Zum Un...

Страница 73: ...play 0 angezeigt Taste loslassen und 2 mal die Taste der Fernbedienung dr cken die Vorrichtung gibt einen BEEP Ton ab und das Display schaltet sich aus um die erfolgte Speicherung zu best tigen Taste...

Страница 74: ...DEUTSCH 72...

Страница 75: ...in navolging van een gemotiveerd verzoek dat ingediend wordt bij V2 S p A Corso Principi di Piemonte 65 12035 Racconigi CN Itali Degene die geautoriseerd is tot het ondertekenen van deze verklaring v...

Страница 76: ...is verboden de JEDI in een stoffige omgeving en in een zoute of explosieve atmosfeer gebruiken De aandrijver is alleen voor werking in droge vertrekken gerealiseerd Om de persoonlijke veiligheid te g...

Страница 77: ...n De poort moet op passende wijze uitgebalanceerd zijn zowel v r als na de automatisering door de poort in ongeacht welke positie te stoppen mag de poort zich niet bewegen Zorg zonodig voor een afstel...

Страница 78: ...huiven die aangeduid wordt door de twee gaten Q op het kettinggeleiderprofiel 4 Regel de spanning van de ketting door met een sleutel van 10 mm aan de schroef met zeskante kop te draaien draai de schr...

Страница 79: ...op de bovenste dwarsbalk en op het plafond om de positionering van de geleiderrails te vergemakkelijken 2 3 Veranker beugel E aan de bovenste dwarsbalk van de poort met pluggen G die geschikt zijn vo...

Страница 80: ...egen Sluit de stang met gaten L aan op de stang met gaten van de arm met het boogje met gebruik van de 2 bouten 6 x 15 mm DEBLOKKERING VAN HET AUTOMATISME Om het automatisme te deblokkeren volstaat he...

Страница 81: ...entrale binnenin de JEDI is reeds bekabeld Het volstaat de stekker in het stopcontact te steken om over te gaan tot de programmering van de werkparameters Voor de aansluiting van de fotocellen en de S...

Страница 82: ...ling van de eindschakelaar van de opening mLET OP de eindschakelaar van de opening moet bewaard worden voordat de eindschakelaar van de sluiting bewaard wordt Indien deze procedure verkeerd gebruikt w...

Страница 83: ...bewaren houd de toets gedurende 5 seconden ingedrukt tot de segmenten van het display n voor n ingeschakeld worden tot 0 weergegeven wordt mLET OP indien men deze parameter wijzigt is het nodig na de...

Страница 84: ...7 8 Onderhoudsalarm default 0 functie niet actief Indien deze functie geactiveerd wordt wanneer de motor de 2000 werkcycli bereikt laat het systeem PIEPTONEN horen Dit alarm kan nuttig zijn om onderh...

Страница 85: ...lay ingeschakeld Laat toets los en druk 2 keer op de toets van de afstandsbediening Het apparaat zal een PIEPTOON laten horen en gaat uit ter bevestiging van de plaatsgevonden bewaring Druk op toets e...

Страница 86: ...NEDERLANDS 84...

Страница 87: ......

Страница 88: ......

Отзывы: