background image


13 


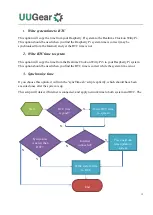
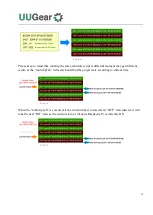
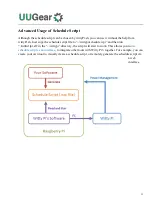
flow chart below shows what this script actually do: 

4.


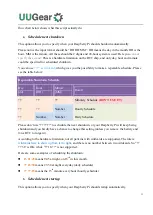
Schedule next shutdown


This option allows you to specify when your Raspberry Pi should shutdown automatically. 

Please notice the input format should be “DD HH:MM”. DD means the day in the month, HH is the 
hour, MM is the minute. All these should be 2 digits and 24-hour system is used. Here you 

can not 

specify the second

. This is a hardware limitation on the RTC chip, and only day, hour and minute 

could be specified for scheduled shutdown. 

You can use

 “??” as wildcard

, which gives you the possibility to make a repeatable schedule. Please 

see the table below: 

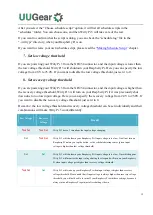
Repeatable Shutdown Schedule 

Day 
(dd) 

Hour 
(HH) 

Minute 
(MM) 

Result 

?? 

?? 

?? 

Minutely Schedule 

(DON’T USE IT!)


?? 

?? 

Number 

Hourly Schedule 

?? 

Number 

Number 

Daily Schedule 

Please don’t use “?? ??:??” to schedule the next shutdown, or your Raspberry Pi will keep being 
shutdown and you hardly have a chance to change this setting (unless you remove the battery and 
force RTC to forget it). 

According to the hardware limitation, not all patterns with wildcards are supported. The rule is: 

wildcards have to show up from let to right

, and there is no number between two wildcards. So “?? 

??:38” is OK, while “?? 16:??” is not supported. 

Here are some examples of scheduling the shutdown: 


15 21:45

 means 9:45 at night, on 15

th

 in this month. 


?? 23:30

 means 23:30 at night everyday (daily schedule) 


?? ??:15

 means the 15

th

 minute every hour (hourly schedule) 

5.


Schedule next startup


This option allows you to specify when your Raspberry Pi should startup automatically.   

Содержание Witty Pi 3

Страница 1: ...Copyright 2019 UUGear s r o All rights reserved Witty Pi 3 Realtime Clock and Power Management for Raspberry Pi User Manual revision 1 03...

Страница 2: ...ty Pi 3 on Raspberry Pi 8 Input Voltage 10 Software Usage 11 1 Write system time to RTC 12 2 Write RTC time to system 12 3 Synchronize time 12 4 Schedule next shutdown 13 5 Schedule next startup 13 6...

Страница 3: ...populated 3 Pin Header P2 24 The Unpopulated 7 Pin Header P3 24 Frequently Asked Questions FAQ 27 What I2C Address is Used by Witty Pi 3 27 What I2 C Registers Are Provided by Witty Pi 3 28 What GPIO...

Страница 4: ...accessing the Internet Raspberry Pi knows the temperature thanks to the sensor in RTC chip You can schedule the startup shutdown of your Raspberry Pi You can even write a script to define complex ON O...

Страница 5: ...nfiguration very quickly The picture below shows how is Witty Pi 3 look like 1 Micro USB connector as DC 5V power input 2 XH2 54 connector as higher voltage DC power input 3 Unpopulated 3 pin header c...

Страница 6: ...3 What is in the Package Each Witty Pi 3 package contains Witty Pi 3 board x 1 CR2032 battery x 1 M2 5 x 11mm Copper Standoff x 4 M2 5 screws x 8...

Страница 7: ...Battery CR2032 for time keeping Power In DC 5V via micro USB or DC5 3V 26V via XH2 54 connector better no higher than 8V without additional heat sink Output Current Up to 3A for Raspberry Pi and its...

Страница 8: ...card on your Raspberry Pi and access its file system via a card reader You need to edit the config txt file as mentioned above in the boot volume to change the GPIO pin used by 1 Wire interface or you...

Страница 9: ...schedule script running Usually you don t need to run it manually as it will be executed after the system is up If there is a schedule script in use it will schedule the next shutdown and next startu...

Страница 10: ...s removing the wittypi directory you should also remove the etc init d wittypi file There are some dependencies such as wiringPi i2c tools etc which may be installed during the software installation I...

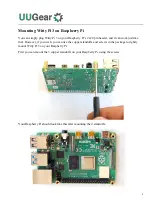
Страница 11: ...nd it can work just like that However if you wish you can use the copper standoffs and screws in the package to tightly mount Witty Pi 3 on your Raspberry Pi First you can mount the 3 copper standoffs...

Страница 12: ...3 can remember the time even after you cut its power The RTC only draws about 4uA current from the battery to keep the time so the battery can last years After mounting Witty Pi 3 on your Raspberry P...

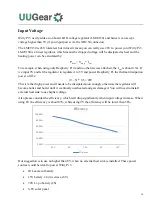
Страница 13: ...rry Pi the thermal dissipation power will be 9 5 0 5 2W This is rather high power and it needs to be dissipated soon enough otherwise the regulator will become hotter and hotter until it eventually ov...

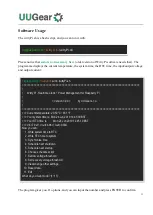
Страница 14: ...wittyPi sh pi raspberrypi wittypi sudo wittyPi sh Witty Pi Realtime Clock Power Management for Raspberry Pi Version 3 00 by UUGear s r o Current temperature 29 50 C 85 1 F Your system time is Mon 24 J...

Страница 15: ...Witty Pi 3 to your Raspberry Pi system This option should be used when you find the RTC time is correct while the system time is not 3 Synchronize time If you choose this option it will run the syncTi...

Страница 16: ...HH Minute MM Result Minutely Schedule DON T USE IT Number Hourly Schedule Number Number Daily Schedule Please don t use to schedule the next shutdown or your Raspberry Pi will keep being shutdown and...

Страница 17: ...wo wildcards So 12 is OK while 15 25 is not supported If you input an unsupported pattern Witty Pi 3 will try to change it to the closest one that could be supported You will see the message on the co...

Страница 18: ...specify the recovery voltage from 2 0V to 25 0V If you want to disable the recovery voltage threshold just set it to 0 Remarks the low voltage threshold and recovery voltage threshold can be set indi...

Страница 19: ...nger Here you can input number from 0 to 255 If you input 0 the white LED will not blink at all Dummy load duration This parameter will decide how long the dummy load should draw current from the powe...

Страница 20: ...eduled startup time scheduled shutdown time currently used schedule script low voltage threshold recovery voltage threshold you can choose this option Once you select this option the software will dis...

Страница 21: ...run the runScript sh file which loads the schedule script schedule wpi file If the current time doesn t reach the END time defined by the schedule script the next shutdown and next startup will be sch...

Страница 22: ...et different result as the runScript sh will search and find the proper state according to current time When the runScript sh is executed if the current time is located at an OFF state instead it will...

Страница 23: ...oop It could be ON or OFF and you should define at least one ON and one OFF states in the loop The ON and OFF states are used in pair You should also specify the duration of each state You can do so b...

Страница 24: ...because there is a WAIT at the end of the line The parameter M15 is here only to make sure the next OFF state can be calculated correctly and next shutdown can be scheduled properly Once you use WAIT...

Страница 25: ...ready to go http www uugear com app wittypi scriptgen This web application allows you to visually create the schedule script it immediately generate the final schedule script on the right You can als...

Страница 26: ...e script file to wittypi schedule wpi and then run runScript sh in the wittypi directory the script will start to work This allows you to use schedule script as an interface to integrate other tools w...

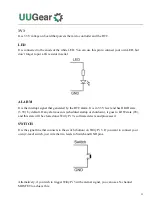
Страница 27: ...s an unpopulated 7 pin header and you can decide to use male or female header here This header breaks out some useful signals and is very helpful for extension and integration The pins from left to ri...

Страница 28: ...in 3 3V level and has HIGH state 3 3V by default If any alarm occurs scheduled startup or shutdown it goes to LOW state 0V and this state will be cleared once Witty Pi 3 s software detects and proces...

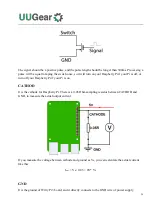
Страница 29: ...turn off your Raspberry Pi if your Pi is on CATHOD It is the cathode for Raspberry Pi There is a 0 05 Ohm sampling resistor between CATHOD and GND to measure the actual output current If you measure t...

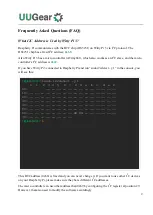
Страница 30: ...have Witty Pi 3 connected to Raspberry Pi and run sudo i2cdetect y 1 in the console you will see this This RTC address 0x68 is fixed and you can never change it If you want to use other I2 C devices o...

Страница 31: ...D 0x20 Read only 1 Integer part for input voltage 0 255 0 Read only 2 Decimal part multiple 100 times for input voltage 0 99 0 Read only 3 Integer part for output voltage 0 255 0 Read only 4 Decimal p...

Страница 32: ...ight up the white LED 0 255 100 Read Write 14 The delay multiple 10 before power cut default 50 5 seconds 0 255 50 Read Write 15 Recovery voltage threshold multiple 10 times 255 disabled 0 255 255 Rea...

Страница 33: ...g interval to 1 second using value 6 Remarks although the register at address 9 is writable changing the I2C slave address is more than writing an I2 C register You will need to modify the software ac...

Страница 34: ...25 11 SCLK 23 24 CE0 8 GND 25 26 CE1 7 0 SDA 0 27 28 SCL 0 1 5 GPIO 21 29 30 GND 6 GPIO 22 31 32 GPIO 26 12 13 GPIO 23 33 34 GND 19 GPIO 24 35 36 GPIO 27 16 26 GPIO 25 37 38 GPIO 28 20 GND 39 40 GPIO...

Страница 35: ...dress you will need to change the I2 C address used by Witty Pi s micro controller and change the software accordingly If the Other Hardware doesn t use any GPIO pin that used by Witty Pi and it doesn...

Страница 36: ...r the operating system is up If these scripts are not automatically executed for any reason Witty Pi 3 will cut the power of Raspberry Pi In this case the first place to check is the etc init d wittyp...

Страница 37: ...the given 10 seconds Witty Pi will take it as a shutdown command lights up the white LED and then shutdown the system There are many factors that might cause the GPIO pin unstable and the most common...

Страница 38: ...n Date Description 1 00 2019 06 14 Initial revision 1 01 2019 06 24 Add information for Raspberry Pi 4B 1 02 2019 07 10 Add description of provided I2C registers 1 03 2019 07 28 Information for confli...

Отзывы: