USSC
6
NOTE: DIAGRAMS & ILLUSTRATIONS NOT TO SCALE
OPERATION AND
MAINTENANCE
WARNING:
WHEN PURGING THE
GAS LINE, THE GLASS FRONT MUST
BE REMOVED.
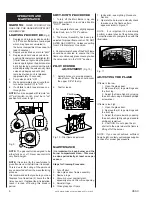
1.
Depress and turn gas valve knob (A)
to "off". Wait sufficient time to allow gas
which may have accumulated in
the burner compartment to escape. (At
least 5 minutes.)
2.
Depress valve knob and turn to "pilot".
3.
Depress and hold valve knob while
pushing Piezoelectric spark lighter (B).
[If pilot does not light using the piezo-
electric spark lighter, the pilot can also
be lit by placing a match near the pilot
while depressing the valve knob] Hold
valve knob depressed until pilot
remains lit when knob is released
(approximately 10 seconds).
4.
Turn valve knob to "ON".
5.
Wait approximately one minute then
turn burner switch (C) to "ON".
6.
If unit fails to start, repeat steps one
through five.
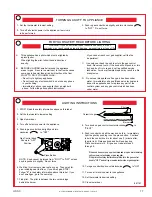
LIGHTING PROCEDURE
(Fig.9)
NOTE: If unit is equipped with remote "on-
off" wall switch, switch must be in "on"
position for burner to light.
NOTE: The gas control is designed to be
either fully on or off. Never use control to
vary flame height.
NOTE: It is normal for the new furnace to
give off some odor the first time it is burned.
This is due to the curing of the paint and
any undetected oil from the manufacturing
process.
It is recommended that you burn your new
fireplace for at least two (2) hours the first
time you use it. If optional fan kit is installed,
leave it turned off during this break-in
period.
A
B
C
PI
LOT
O
F
F
PILOT
O
N
S
it
E
A
TP TH
TP
TH
O
F
F
PILOT
O
N
S
it
on
off
on
off
Fig. 9
2. For complete shut down, slightly depress
Valve Knob, turn to "OFF" position.
3. The Burner Assembly has been pre-
adjusted for proper flame control. DO NOT
ALTER GAS ORIFICE. Unless converting
from LP to Natural or Vice Versa.
4. Periodic visual checks of the Pilot Flame
should be conducted to ensure that the
flame is continuously present except when
the valve knob is in the "OFF" position.
1. To turn off the Main Burner only, use
Main Burner switch or turn Valve Knob to
"PILOT" position.
SHUT-DOWN PROCEDURE
PI
LOT
O
F
F
PILOT
O
N
S
it
E
A
TP TH
TP
TH
Fig. 10 - Pilot flame adjustment
PILOT BURNER
ADJUSTMENT
(Fig. 10)
1.
Adjust pilot key to provide properly
sized flame. The flame should cover
the upper 3/8" of the tip.
2.
Test for leaks.
It is important to keep burner and the
burner compartment clean. This must
be done periodically, at least once per
season.
Steps for Cleaning Procedure:
1. Turn off pilot.
2. Open glass door frame assembly.
3. Remove logs.
4. Vacuum burner compartment,
especially around the orifice opening.
5. Reinstall logs.
6. Close glass door frame.
MAINTENANCE
7. Ignite pilot - see Lighting Procedure
Section.
8. Operate the burner and visually check
to make sure the flame pattern
appears similar to Figure 11.
NOTE: It is important to periodically
perform a visual check of the pilot and the
burner flame and to compare then with this
illustration.
Fig. 11
ADJUSTING THE FLAME
If flame is too low:
1. Open the glass door.
2. Remove the (2) top small logs and
the front log.
3. Adjust the flame higher by closing
the air shutter using a standard phillips
screwdriver.
If flame is too high:
1. Open the glass door.
2. Remove the (2) top small logs and
the front log.
3. Adjust the flame lower by opening
the air shutter slightly using a standard
phillips screwdriver.
4. CAUTION: Do not open the air
shutter to the point where the flame is
lifting off of the burner.
NOTE: If you cannot achieve sufficient
flame height, contact your local gas supplier
to check for proper gas pressure.
Pilot Key


