Page 17
RS-232 Interface
The RS-232 interface appears on a DE9F connector on the rear panel. The connector is wired as a DCE device. A
command interpreter accepts ASCII commands (described in Appendix B) over the RS-232 and Ethernet interfaces.
The RS-232 port operates at 38.4kbps, 8N1 (8 data bits, no parity, 1 stop bit), hardware handshake. In most
situations, no handshake is required, and the RTS and CTS pins can be left open. The USL supplied ferrite block
should be clipped on to the cables adjacent to the connectors to comply with FCC and CE emission requirements.
See Appendix A for the connector pin out.
Ethernet Interface
The JSD-100 includes a standard 10/100Mbps Ethernet interface. The same automation commands (described in
Appendix B) are available on TCP connections to port 10001 on the Ethernet interface. The JSD-100 accepts up to
5 simultaneous TCP connections, allowing multiple control and monitor devices to be used. The Ethernet interface
also includes a web server. System status and basic control are available on internally generated web pages.
System status is also available over SNMP. The JSD-100 also includes a Network Time Protocol (NTP) client that can
be used to keep the internal real time clock accurate. Use a CAT5 or better Ethernet cable to connect the JSD-100
to the control network. The USL supplied ferrite block should be clipped on to the cable adjacent to the connector
to comply with FCC and CE emission requirements.
USL Link
The USL Link is an RS-485 bus used to interface the JSD-100 to other USL devices such as the JSDV-100 remote
volume control (discussed later in this manual). The USL supplied ferrite block should be clipped on to the cables
adjacent to the connectors to comply with FCC and CE emission requirements. See Appendix A for the connector
pin out.
7.
Graphical User Interface Configuration
System Configuration using the Graphical User Interface
The graphical user interface (GUI) allows for configuration and monitoring of the JSD-100.
7.1
GUI Installation
The GUI runs under Windows® XP or Windows® 7 operating systems. Insert the supplied CD and follow the on-
screen instructions.
Note: The first release of the driver package will not work on Windows 7. The new WinUSB driver is a native USB
interface that is being used in this GUI application release.
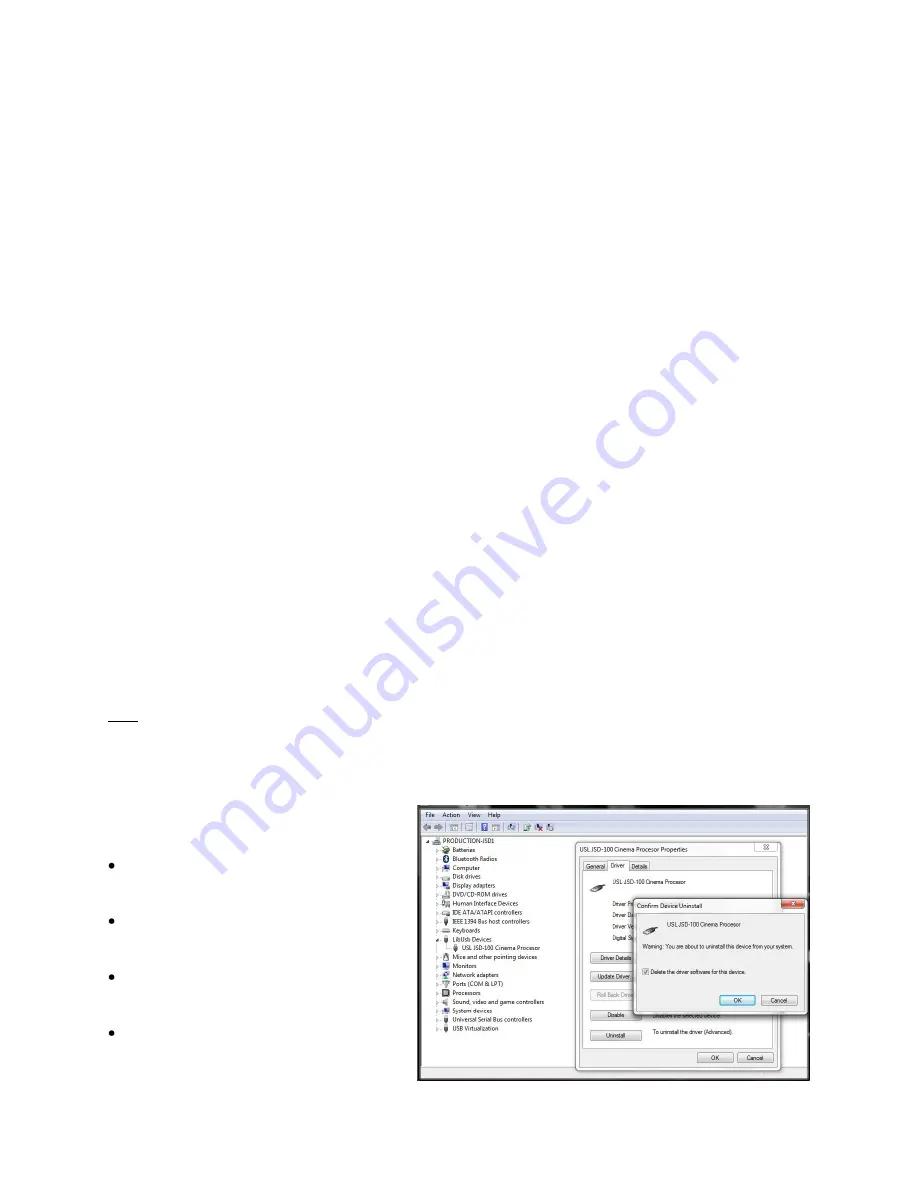
USB Driver Removal
To remove the previous JSD-100 USB driver installation, the JSD-100 must be connected to the computer and by
using Device Manager, the driver will be
uninstalled using the following steps below:
Power on the JSD-100 and when startup is
complete, connect the USB cable to the
computer.
Run device manager and locate the “LibUsb
Devices” entry and select the USL JSD-100
Cinema Processor.
Right click the mouse to open the
properties dialog and then activate the
“Uninstall” button.
On Windows 7, check the delete option,
and then proceed by activating the “OK”
button.


