background image

                                              Operation Manual 

                                                                                                  -

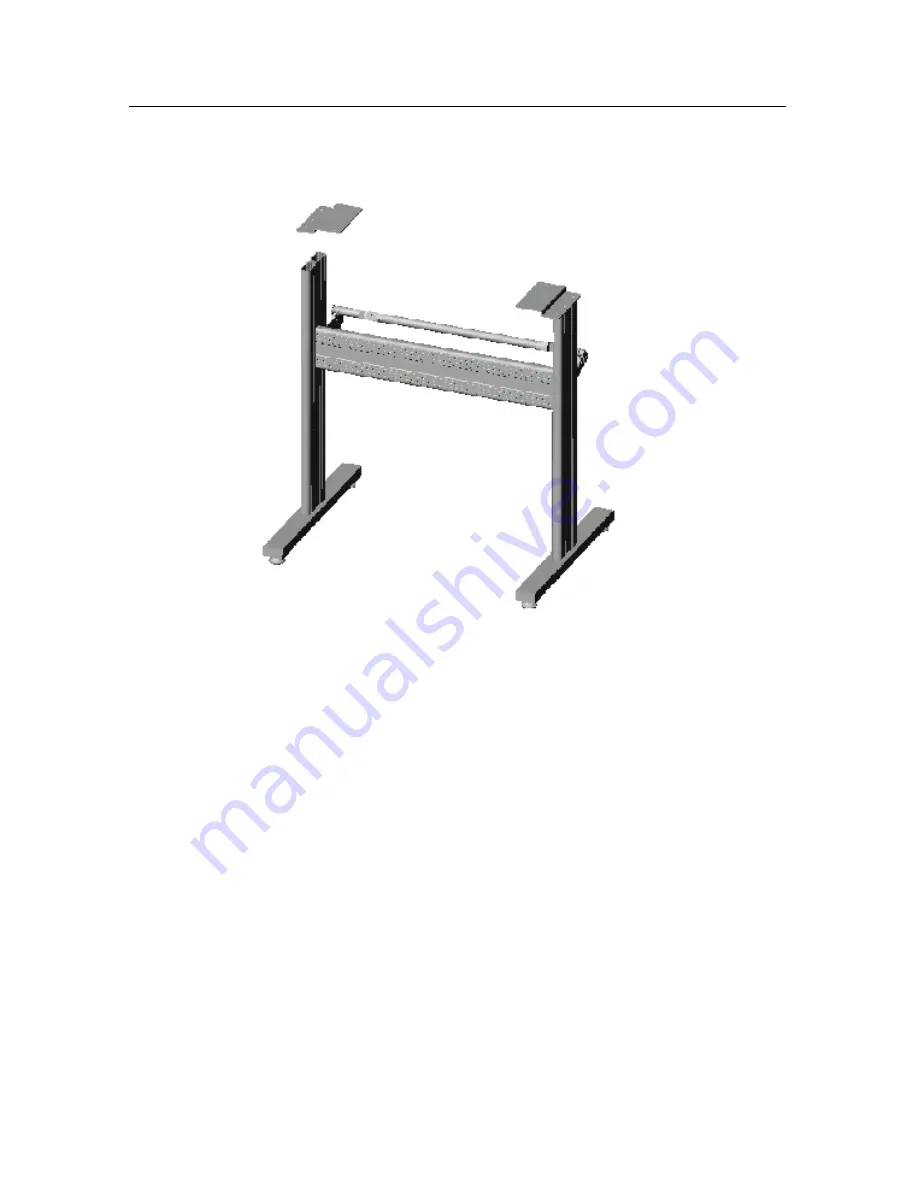
2-4 Assembly of machine stand 

     Referring to the following drawing: 


Step 1: Rotate the stand pillars into screw thread-holes in the pillar bars, and then 
connect the pillar bars to left and right columns with screws respectively. 

Step 2: Connect the crossbeam to left and right columns with screws. 

Step 3: Join the paper hanger to the inside of the left and right columns with screws. 

Step 4: Join the connection board to the top of the left and right columns with 
screws. 

Step 5: Lay down the four pillars of main machine, place the machine on the 
connection board, and then insert the pillars into the connection board to connect to 
the main machine. 

Step 6: Place the paper-roller on the roller of paper hanger.         

Содержание LaserPoint 2

Страница 1: ...Cutting Plotter Operation Manual...

Страница 2: ...tarting to use it Please turn off the power quickly if you encounter any problems and refer to this manual or contact your dealer Special Declaration 1 Manufacturer keeps the right of changing product...

Страница 3: ...4 Chap4 Firstly testing when energized 5 Chap5 Controlling panel operation 6 Chap6 Cutter and plotter 8 Chap7 Loading paper 9 Chap8 Lift up adhere 10 Chap9 After work over 11 Chap10 Using life of the...

Страница 4: ...om dropping foreign matters into cracks such as pins little screws etc Please pull down the power plug if not using during a long time Don t pull the cable with power when it is connected to the compu...

Страница 5: ...A set of parts of machine stand 2 2 Accessories NO Item Quantity 1 Power cord 1 2 Operation manual 1 3 Cutter holder 1 4 Cutter 3 5 Plotter holder 1 6 Refill 1 7 Serial communication cable 1 8 Parall...

Страница 6: ...he crossbeam to left and right columns with screws Step 3 Join the paper hanger to the inside of the left and right columns with screws Step 4 Join the connection board to the top of the left and righ...

Страница 7: ...r bracket 3 Cutter holder 4 Carriage of cutter bracket 5 Cover of guide 6 Pinch roller 7 Pressure setting knob 8 Controlling panel 9 Right cover 10 Pillar 11 Socket of parallel port 12 Socket of seria...

Страница 8: ...bracket 3 Cutter holder 4 Carriage of cutter bracket 5 Cover of guide 6 Pinch roller 7 Controlling panel 8 Right cover 9 Pillar 10 Socket of serial port 11 Socket of parallel port 12 Power socket 13...

Страница 9: ...the RESET key please At the same time of turning on the switch cutter bracket will be raised about 1 5 to 2 mm And pressing any direction key will make it fall down If all goes on as the above that pr...

Страница 10: ...lights flash up at the same time that means to be in copy state 2 Speed lights Red light directive of high speed on means to be at the speed of four high grades and off means at four low speed grades...

Страница 11: ...last file in the memory 5 Pressure regulation The pressure setting knob is at the right side of machine and it is continuously adjustable Generally we adopt the smaller cutting force To ensure the be...

Страница 12: ...nt speed state Afterwards before automatically returning to the last screen pressing once can increase speed one grade and if keeping pressing it speed will be increased quickly When speed reaches to...

Страница 13: ...Origin Current and if stop operating the panel the screen will keep displaying it The data from the computer cannot be received as long as to confirm this function over with ENTER key B Under the dyna...

Страница 14: ...y with care then push the cutter to the bottom with a flexile plastic or rubber but don t damage the blade tip 2 Rotate the shell of the cutter holder and make the out stretching length of the blade t...

Страница 15: ...see as showing 1 Pinch roller is in the place out of the scope of the pattern 2 Pinch roller is 10 to 50mm away from the edges of the paper On some special situation the middle pinch roller can be use...

Страница 16: ...2 Get rid of the useless part with tweezers you can easily do this if you add a side frame around the pattern when cutting 3 Adhere a special over pasted film on the cut pattern and stroke it with a...

Страница 17: ...ssible Note 1 More longer the out stretching length of the cutter more shorter the using life Please avoid cutting off the bottom layer during the process of cutting 2 The more cutting force the short...

Страница 18: ...capacity 1MB Repeatability 0 127mm Motor type Step motor driven by detailed constant current Interfaces 1 RS 232 serial port 2 CENTRINIC parallel port Byte form 8 data bit 1 stop bit Commands set DM P...

Страница 19: ...ay be resulted from the too small tool compensation value Why does the machine plot abnormally 1 Software setting is not matched to the machine so you must adopt proper commands sets or set proper too...

Страница 20: ...reset it 2 The off line light yellow and the set up light green light up alternatively every second or light up at the same time once Now the machine starts transmitting data instead of cutting pleas...

Отзывы:

Похожие инструкции для LaserPoint 2