background image

E S P A Ñ O L

15

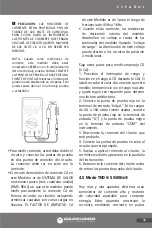
  PRECAUCIÓN: LAS FUNCIONES DE 

CORRIENTE ESTÁN PROTEGIDAS POR UN 
FUSIBLE DE 600 VOLTS DE CAPACIDAD. 
PARA EVITAR DAÑO AL INSTRUMENTO, 
LAS FUENTES DE CORRIENTE QUE TENGAN 
VOLTAJES DE CIRCUITO ABIERTO MAYORES 
DE 600 VOLTS CD O CA NO DEBEN SER 
MEDIDOS.

NOTA: Cuando tome mediciones de 
corriente, este medidor debe estar 
conectado en SERIE con el circuito (elemento 
del circuito) bajo prueba. NUNCA CONECTE 
LAS PUNTAS DE PRUEBA A TRAVES DE UNA 
FUENTE DE VOLTAJE mientras el interruptor 
giratorio está establecido en Amperes. Esto 
puede causar daño al circuito bajo prueba 
o al Medidor.

• Para medir corriente, usted debe dividir el 

circuito y conectar las puntas de prueba 
en dos puntos de conexión del circuito. 
La conexión debe ser en serie con la 
corriente.

• El circuito de medición de corriente CA en 

este Medidor es de SISTEMA DE VALOR 
root-mean-square (raíz cuadrada media) 
(RMS- REAL) así que este medidor puede 
medir precisamente la corriente CA de 
formas de onda no sinoidal incluyendo 
armónicas causadas por varias cargas no 
lineales. EL FACTOR DE AMPLITUD CA 

de este Medidor es de 3 para el rango de 
frecuencia de 45Hz a 1KHz.

• Cuando mida corriente, las resistencias 

de derivación interna del medidor 
desarrollan un voltaje a través de las 
terminales del medidor llamado “voltaje 
de carga”. La disminución de este voltaje 
puede afectar a los circuitos de precisión 
o mediciones.

Siga estos pasos para medir amperaje CD 
(ó CA):
1. Posicione el interruptor de rango y 
función en el rango A CD deseado (ó CA). Si 
usted no sabe el valor de corriente que será 
medido, siempre inicie con el rango más alto 
y ajuste según sea requerido para obtener 
una lectura satisfactoria.
2. Conecte la punta de prueba roja en la 
terminal de entrada “mAμA” (sí los rangos 
de 4A o 10A están siendo usados, conecte 
la punta de prueba roja en la terminal de 
entrada “A”) y la punta de prueba negra 
en la terminal de entrada “COM” del 
instrumento.
3. Desconecte la corriente del circuito que 
será probado.
4. Conecte las puntas de prueba en serie al 
circuito que será probado.
5. Vuelva a aplicar corriente al circuito, la 
corriente medición aparecerá en la pantalla 
del instrumento.
6. Desconecte la corriente del circuito antes 
de retirar las puntas de prueba del circuito.

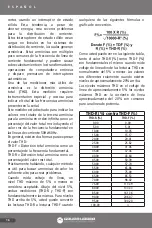
4.5 Modo THD @ 50/60Hz®

Hoy más y más aparatos eléctricos usan 
suministros de corriente alta y motores 
de velocidad ajustable para conservar 


energía. Estos aparatos conservan la 
corriente emitiendo corriente en pulsos 

Содержание UD85

Страница 1: ...tienda y siga las instrucciones de seguridad contenidas en este documento antes de operar esta herramienta WARNING Read understand and follow the safety rules in this document before operating this to...

Страница 2: ...rfase con una computadora personal 5 3 Dise o de su propio Software 6 MANTENIMIENTO Y PARTES DE REEMPLAZO 24 6 1 Mantenimiento General 6 2 Reemplazo de Bater a 6 3 Prueba de fusible s 6 4 Reemplazo de...

Страница 3: ...puntas de prueba mantenga sus dedos lejos de los contactos de las puntas Siempre agarre la punta detr s de los protectores de dedos en las puntas Use un adaptador de corriente si mide cualquier corrie...

Страница 4: ...cuatro veces por segundo 2 GR FICA DE BARRAS ANALOGA La gr fica de barras proporciona una representaci n an loga de lecturas y se actualiza 20 veces por segundo La gr fica de barras de 41 segmentos s...

Страница 5: ...e referencia HI alto Usando los botones de las flechas y registre el valor de referencia HI alto con el cual usted quiere comparar sus lecturas Use el bot n HOLD para seleccionar el signo Una vez que...

Страница 6: ...sted presiona un bot n inadecuado en el modo de registro el medidor emitir dos tonos beep consecutivos para hacerle saber que la funci n del bot n no funciona en el modo de registro Para salir de este...

Страница 7: ...ando en la LCD por 1 d gito cuando el medidor est en el modo de edici n 11 Elige entre CD y CA elige entre C y F en el modo de temperatura Presione el bot n DC AC para elegir entre CD y CA cuando mida...

Страница 8: ...ba roja es conectada en esta terminal para medir la corriente en funcion de amperaje de 4A o 10A CA CD 19 mA A terminal de entrada de miliamperes microamperes La punta de prueba roja es conectada en e...

Страница 9: ...de prueba de continuidad 31 Mostrada cuando el bot n REC ha sido presionado 32 MAX Valor m ximo en el modo de registro El valor mostrado es la lectura m xima tomada desde que el modo de registro fue s...

Страница 10: ...funci n ON mientras sostiene el bot n de HOLD Uso de las puntas de prueba Use solamente el mismo tipo de puntas que las suministradas con el medidor Estas puntas de prueba est n consideradas para 1200...

Страница 11: ...D de un amplificador en la presencia de una se al CA MIDA EL VOLTAJE CA PRIMERO Observe la capacidad de voltaje CA reci n medido y seleccione un rango de voltaje CD que sea el mismo o mayor que el ran...

Страница 12: ...sponible l nea a l nea es aproximadamente 832V CA 480V x 1 732 podr a resultar un peligro de descarga el ctrica debido a que se excede la capacidad normal de este medidor 4 2 Medici n de Resistencia o...

Страница 13: ...Es la disminuci n de voltaje a trav s de una resistencia igual para un valor de escala completo C Es la corriente a trav s de un corto circuito en las terminales de entrada 4 2 1 Medici n de resisten...

Страница 14: ...ctura digital es la misma en ambas direcciones el dispositivo probablemente est en corto Si la pantalla indica en ambas direcciones el dispositivo est probablemente abierto Siga estos pasos para verif...

Страница 15: ...45Hz a 1KHz Cuando mida corriente las resistencias de derivaci n interna del medidor desarrollan un voltaje a trav s de las terminales del medidor llamado voltaje de carga La disminuci n de este volta...

Страница 16: ...o un porcentaje de la frecuencia fundamental THD R Distorsi n total arm nica como un porcentaje del valor rms total Pr cticamente hablando cualquier m todo es til para buscar arm nicas de valor los su...

Страница 17: ...n AC DC por 2 segundos otra vez El s mbolo desaparecer y el medidor regresar a las funciones CA El s mbolo desaparece y el medidor regresa a sus funciones en CA 4 6 Medici n de capacitancia PRECAUCI N...

Страница 18: ...ATURA ANTES DE TOMAR MEDICIONES QUE NO SEAN TEMPERATURA EL INSTRUMENTO Y O EQUIPO SE PUEDEN DA AR SI LAS ADVERTENCIAS ANTERIORES NO SE SIGUEN Este medidor mide directamente la temperatura usando un te...

Страница 19: ...obtenga una lectura de temperatura m s baja Cuando mida temperaturas cercanas a la temperatura ambiente tome la lectura cuando la pantalla est m s estable Siga los siguientes pasos para medir tempera...

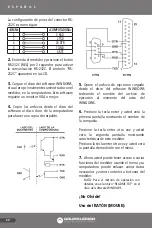
Страница 20: ...do 5 Opere el archivo de ejecuci n cargado desde el disco del software WINDOWS tecleando el nombre del archivo de ejecuci n al momento del aviso del WINDOWS 6 Presione la tecla enter y usted ver la pr...

Страница 21: ...do ESC activa al medidor para iniciar la medici n cuando el men desaparece DETENER MEDICI N Activa el medidor para detener las mediciones y aparece el cuadro inicial otra vez si aparece el men desapar...

Страница 22: ...asa de Transmisi n 4800 baudios Bit de Informaci n 8 Bit de Detenci n 1 Paridad Ninguna 5 3 2 Transmitir formato de datos STX 1 BYTE F2H ID 1 BYTE 0 9H POSICI N 1 BYTE RANGO 1 BYTE ESTATUS 7 BYTE DATO...

Страница 23: ...SE 2 Interrupt Identification Register define LCR COMBASE 3 Line Control Register define MCR COMBASE 4 Modem Control Register define LSR COMBASE 5 Line Status Register define MSR COMBASE 6 Modem Statu...

Страница 24: ...e diodos 2 Encienda el medidor 3 Para probar F2 15A 600V inserte un cable de prueba en la terminal de entrada V Hz CAP y haga que tengan contacto el cable con la terminal de entrada A La pantalla debe...

Страница 25: ...gts 75 mV A Funci n Continuidad VOLTAJE DE PRUEBA DE CIRCUITO ABIERTO 1 2 V ENTRADA Aproximadamente 100 Funci n Ohms Rango Resoluci n Precisi n Observaciones 400 0 1 0 5 10 dgt VOLTAJE DE CIRCUITO ABI...

Страница 26: ...M 750 V 1 V 2 5 5 dgts 3 5 5 dgts Aprox 10 M Funci n Amperes CA 45 Hz 1 KHz Rango Resoluci n Precisi n Observaciones 400 A 4000 A 40 mA 400 mA 0 1 A 1 A 0 01 mA 0 1 mA 1 0 5 dgts 100 V A 1 2 mV mA 4 A...

Страница 27: ...18 C o 28 C 65 F o 82 F Tipo de bater a 9V NEDA 1604 6F22 006P Vida de bater a Sin iluminaci n de fondo normalmente 200 horas alcalina Con iluminaci n de fondo normalmente 150 horas alcalina Tama o H...

Страница 28: ...on 5 2 Interfacing the Meter with a Personal Computer 5 3 Designing your Own Software 6 MAINTENANCE AND REPLACEABLE PARTS 48 6 1 General Maintenance 6 2 Battery Replacement 6 3 Fuse s Test 6 4 Fuse s...

Страница 29: ...g the test leads keep your fingers away from probe contacts Always grip behind the finger guards on the probes Use a current clap if measuring any current above 10 Amps International Symbols WARNING D...

Страница 30: ...automatically after 60 seconds to extend battery life To turn off the back light even before 60 seconds press the HOLD button for 2 seconds again 4 Automatically captures a stable reading beeps to ack...

Страница 31: ...d down the RANGE button for 2 seconds The AT symbol turns back on When the range is changed manually the Recording Percentage Compare Relative and Hold modes are disabled Press the HI LO button to ena...

Страница 32: ...exists the model Press the arrow button to shift the blinking number position to the left by 1 decimal point when the Meter is in the Editing mode When the blinking number is at the very right the num...

Страница 33: ...C AC button for 2 seconds again The symbol disappears This feature is typically found in much more expensive power analyzing meters 13 OFF Power to the Meter is turned off 14 ROTARY SWITCH Describes f...

Страница 34: ...thermocouple adapter is plugged into this terminal 25 AC Displayed when AC measurement function is selected 26 Negative Polarity Automatically indicate negative inputs 27 AT Displayed when the Auto Ra...

Страница 35: ...mps mA Milliamperes 1 x 10 3 Amps A Microamperes 1 x 10 6 Amps Ohms K Kilohm 1 x 10³ Ohms M Megohm 1 x 10⁶ Ohms Hz Hertz 1 cycle sec KHz Kilohertz 1 x 10³ cycles sec 42 RC 232C TERMINAL The standard D...

Страница 36: ...tely measure AC voltage of non sinusoidal wave forms including harmonics caused by various non liner loads For an AC Voltages or current Meter CREST FACTOR expresses its ability to respond to non sinu...

Страница 37: ...ry important that you do not exceed the maximum AC RMS rating of this Meter 750V AC To find the RMS voltage lineto line on a 3 phase power line multiply the rated line to ground voltage by the square...

Страница 38: ...and current available for each resistance measurement range All values are typical RANGE OPEN CIRCUIT VOLTAGE A FULL SCALE VOLTAGE B SHORT CIRCUIT CURRENT C 400 1 2 V 200mV 740 A 4 K 320mV 60 A 40 K 3...

Страница 39: ...a silicon diode about 0 6V Judge the semiconductor device as follows If the digital reading in one direction shows a value and the reading in reverse direction shows an overload the device is good If...

Страница 40: ...hese steps to measure DC or AC Amps 1 Set the function and range switch to the desired DC A or AC A range If you do not know the value of the current to be measured always start with the highest range...

Страница 41: ...the same For THD R readings to THD F readings using either the following formula or conversion chart As you can see from this table both THD R and THD F values are essentially the same when measuring...

Страница 42: ...e probably unstable due to environmentally induced electrical noise and floating capacity of the test loads Therefore directly connect the object to be measured to the input terminals Bar graph does n...

Страница 43: ...perature measurement range of the K type thermocouple supplied with this Meter is 40 C to 1 370 C 40 F to 2 498 F Measurement techniques for the best accuracy Choosing a Proper Thermocouple Probe The...

Страница 44: ...computer by using its bi directional RS 232C serial interface cable and its WINDOWS software supplied as optional accessories along with this Meter 5 2 Interfacing the meter with a Personal Computer...

Страница 45: ...Meter NOTE For the operation method in details refer to the README TXT file in the WINDOWS software diskette Don t Forget MOUSE usage LEFT KEY SHORT KEY short press on the DMM button RIGHT KEY LONG K...

Страница 46: ...GRAPH DISPLAY Select Graph Scale to draw the graph with the data and the press ESC to autosave the graph on SCREEN PCX if GRAPH DISPLAY will be selected after having entered in the other measurement...

Страница 47: ...1 1 COMPARE KEY 1 0 0 0 EDIT KEY 1 0 0 1 CAPACITANCIA F 1 0 1 0 FRECUENCIA Hz 5 3 4 A sample Program FICOM H The following program is an example of a C language program which helps users to understan...

Страница 48: ...ICING NOT COVERED IN THIS MANUAL SHOULD ONLY BE PERFORMED BY QUALIFIED PERSONNEL TO AVOID ELECTRICAL SHOCK DO NOT SERVICE UNLESS YOU ARE QUALIFIED TO DO SO Periodically wipe the case with a damp cloth...

Страница 49: ...pecifications Accuracy is given as of reading number of least significant digits at 18 C to 28 C with relative humidity up to 80 for a period of one year after calibration Function Volts DC Range Reso...

Страница 50: ...V 1 mV 10 mV 0 1 V 0 75 3 dgts INPUT IMPEDANCE Approx 11 M 750 V 1 V 0 75 5 dgts Approx 10 M Function Volts AC 45Hz 400KH Range Resolution Accuracy Remarks 4 V 40 V 400 V 1 mV 10 mV 0 1 V 6 5 dgts INP...

Страница 51: ...erating temperature 0 C to 45 C 32 F to 113 F Relative humidity 0 to 80 0 C to 35 C 32 F to 95 F 0 to 70 35 C to 45 C 95 F to 113 F Temperature coefficient 0 05 x Specified Accuracy C 18 C or 28 C 64...

Страница 52: ...s casos a Cuando la herramienta se haya utilizado en condiciones distintas a las normales b Cuando el producto hubiera sido alterado de su composici n original o reparado por personas no autorizadas p...

Отзывы: