14
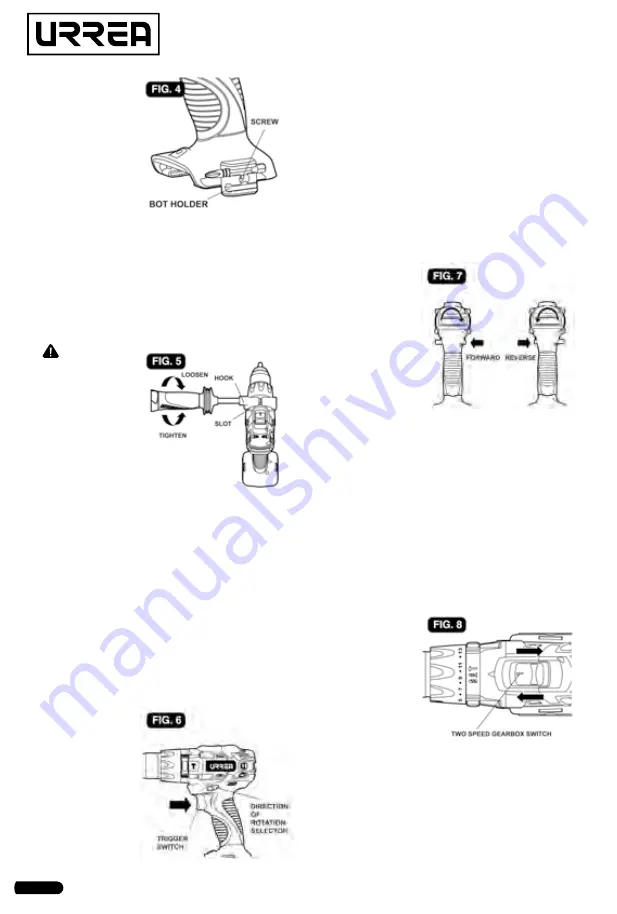
3. Insert the
screw (included)
and tighten the
screw securely
with a screw-
driver (not in-
cluded). The bit
holder can be
positioned on
either side of the
tool.
To remove the bit holder:
1. Remove the battery from the tool.
2. Use a screwdriver to loosen the screw that at-
taches the bit holder to the hammer drill.
3. Remove the screw and the bit holder.
INSTALLING AND REMOVING THE SIDE HANDLE
(FIG. 5)
WARNING:
To reduce the
risk of injury,
always use a side
handle when
using this tool.
Always hold it
securely.
Ensure that side
handle is tight-
ened securely
before each use.
To install the side handle:
1. Remove the battery from the tool.
2. Loosen the side handle grip until the hooks
are far enough apart to fit into the slots on the
gear-case ring.
3. Position the side handle on the left or the
right side of the tool.
4. Slide the hooks into the slots as far as the
hooks will go.
5. Tighten the side handle grip until it is secure.
To remove the side handle:
1. Remove the battery from the tool.
2. Loosen the side handle grip until the side
handle can be
removed.
VARIABLE-SPEED
TRIGGER SWITCH
(FIG. 6)
1. To turn the
hammer drill ON,
press the trigger
switch.
2. To turn the
hammer drill OFF, release the trigger switch.
3. The variable-speed trigger switch delivers
higher speed with increased trigger pressure
and lower speed with decreased trigger pres-
sure.
ELECTRIC BRAKE
When the trigger switch is released, it activates
the brake to stop the chuck quickly. This is es-
pecially useful in the repetitive driving and re-
moval of screws.
DIRECTION-OF-ROTATION SELECTOR (FIG. 7)
The direction of
bit rotation is
reversible and is
controlled by a
selector located
above the trig-
ger switch. With
the hammer drill
held in the nor-
mal operating
position:
1. Position the direction-of-rotation selector to
the left of the tool for forward rotation.
2. Position the direction-of-rotation selector to
the right of the tool for reverse rotation.
3. Setting the direction-of-rotation selector in
the OFF (center-lock) position helps reduce the
possibility of accidental starting when not in
use.
NOTICE: To prevent gear damage, always allow
the hammer drill to come to a complete stop
before changing the direction of rotation.
TWO-SPEED GEARBOX SWITCH (FIG. 8)
Your tool is
equipped with
two separate
speed ranges:
speed 1 (low
speed) and speed
2 (high speed).
Speed 1 provides
high-torque and
slower drilling
speeds for heavy
duty-work or for driving screws.
Speed 2 provides faster speeds for drilling and
lighter work. To change speeds, slide gearbox
switch, to the high or low position.
NOTICE: Do not change speeds when the tool
is running. Always allow the drill to come to a
complete stop before changing speeds.
Содержание RB1120
Страница 18: ...18 Notas Notes...
Страница 19: ...19 Manual de usuario User s manual Notas Notes...


