background image

16


DS1092-006 

INSTALLATION 


1. 

Vor dem Verkabeln sicherstellen, dass alle anzuschließenden Einheiten von der Versorgung getrennt 
sind. 

2. 

Das Objektiv auf die Kamera montieren. 

3. 

Die Kamera an die anderen Vorrichtungen der Anlage anschließen, indem Sie ein zugelassenes 
Koaxialkabel mit 75 Ohm verwenden. 

4. 

Die Kamera an die Versorgung anschließen und das Einschalten der Led überprüfen. 

5. 

Die notwendigen Einstellungen durchführen (siehe nachfolgenden Abschnitt). 

VERWENDUNG DER STEUERUNGEN UND VOREINSTELLUNGEN 


1. 

Gegenlicht-Kompensation:

 Ein ausgewählter Gegenstand mit starkem, von hinten kommenden Licht 

erscheint normalerweise dunkel und im Vergleich zum Rest des Bildes schlecht sichtbar. Um diesem 
Problem abzuhelfen und einen guten Ausgleich zu erzielen, den Schalter 

BLC

 des Dip-Switches auf 

Position 

BLC

 stellen. 

2. 

Automatische Steuerung des Lichteinfalls:

 Durch Positionieren des Schalters 

ES

 des Dip-Switches in 

der Position 

ES

 wird die Geschwindigkeit der elektronischen Klappe abhängig von den 

Lichtbedingungen der Umgebung automatisch variiert. 

e

Beachten 

Wird fluoreszierendes Licht eingefangen, kann die Verwendung der automatischen Steuerung der 
Geschwindigkeit der elektronischen Klappe zum Flackern des Bilds führen. 

DIESE FUNKTION NICHT BEI OBJEKTIVEN MIT AUTO-IRIS VERWENDEN. 

3. 

Automatische Steuerung der Verstärkung: 

Um ein scharfes und geräuschloses Bild zu gewährleisten, 

ist es unter jeden Lichtbedingungen dringend erforderlich den Abblendschalter (Automatic Gain 
Control - 

AGC

) auf die 

NOR

 Position zu stellen. Wird die Kamera in extrem unterschiedlichen 

Lichtverhältnissen genutzt, schalten sie den Abblendschalter AGC auf 

AGC

 und vermeiden sie jede 

Regulierung, die ein unterbelichtetes Bild zur Folge hat. 

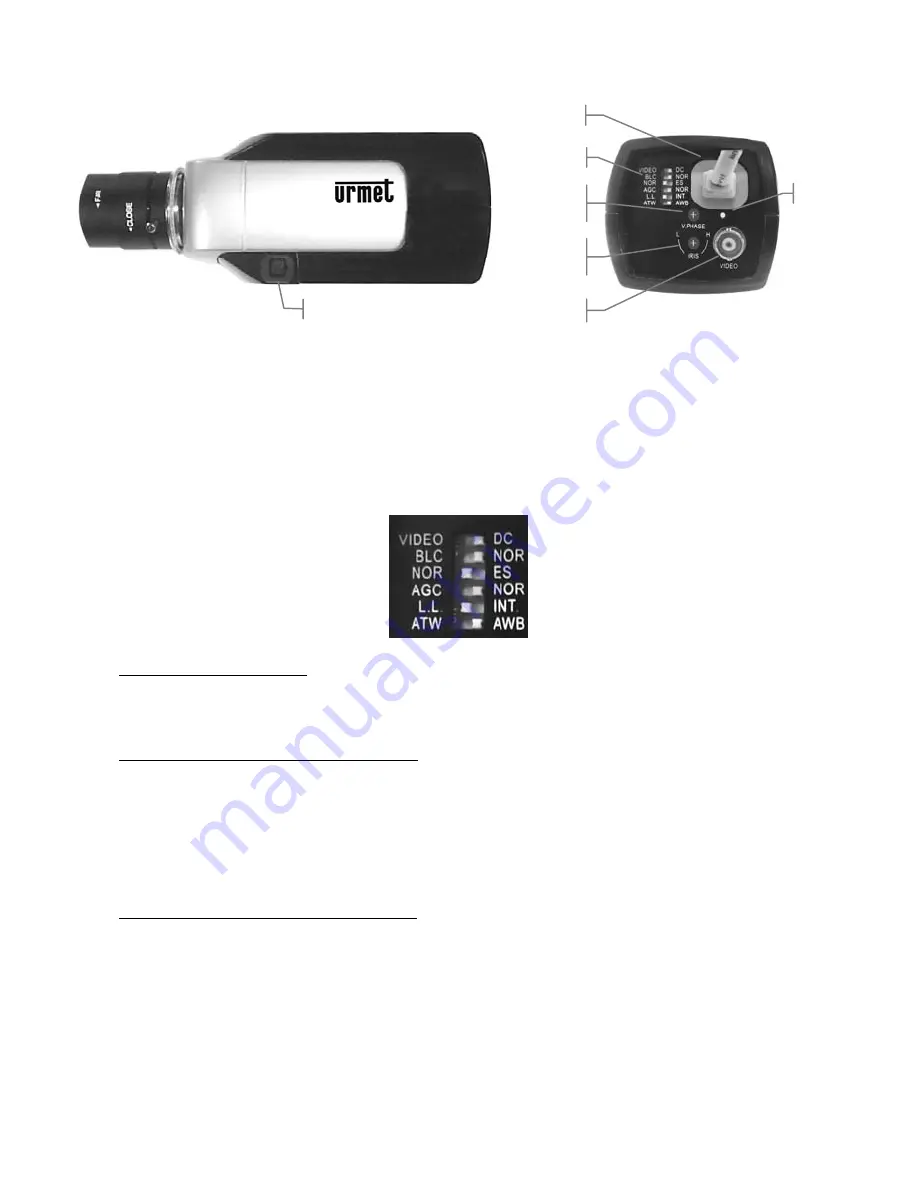
DIGITAL CCD CAMERA

Dip Switch

Phase - 
Einstellung


Led 


Level - 
Einstellung


Verbinder AUTO-IRIS 

Versorgung 100÷240Vac

Video-Ausgang

Содержание 1092/102

Страница 1: ...COLOUR CAMERA 1 3 100 240Vac CAMERA EN COULEURS 1 3 100 240Vca FARBKAMERA 1 3 100 240Vac C MARA TV COLOR 1 3 100 240Vca Sch Ref R f Karte Ref 1092 102 MANUALE D USO INSTRUCTIONS MODE D EMPLOI GEBRAUCH...

Страница 2: ...rsi solo ad un centro di assistenza tecnica autorizzato CARATTERISTICHE TECNICHE Tipo di sensore CCD 1 3 Elemento sensibile 752 pixel orizzontale x 582 pixel verticale Sistema di scansione 2 1 interla...

Страница 3: ...enti Se l obiettivo del tipo C interporre tra telecamera ed obiettivo l adattatore fornito a corredo Quando si usa la telecamera in ambienti in cui l illuminazione varia necessario prevedere l uso di...

Страница 4: ...terruttore ES del dip switch sulla posizione ES la velocit dell otturatore elettronico viene automaticamente variata in funzione delle condizioni di illuminazione dell ambiente eNota Bene Quando s inq...

Страница 5: ...te di alimentazione Le telecamere che utilizzano la stessa rete di alimentazione possono essere sincronizzate tra loro Per un ulteriore regolazione di fase agire sul regolatore V PHASE Se non si doves...

Страница 6: ...ed service centre for repairs TECHNICAL SPECIFICATIONS Type of sensor 1 3 CCD Sensitive element 752 pixels horizontal x 582 pixels vertical Scanning system 2 1 interlaced CCIR V 50 Hz H 15 625 kHz Hor...

Страница 7: ...int the camera towards reflecting objects In the case of a C type lens insert the adapter ring provided between the CCTV camera and the lens When the CCTV camera is used in variable lighting condition...

Страница 8: ...FUNCTION WITH AUTO IRIS LENSES 3 Automatic gain control in order to ensure sharp and noiseless pictures in any light condition it is strongly recommended to keep the Automatic Gain Control dip switch...

Страница 9: ...white balancing Possible selections AWB ATW AWB the 1092 102 camera implements an automatic white balancing circuit which is capable of correcting the colour tones as environmental light conditions ch...

Страница 10: ...er uniquement un centre apr s vente agr par le constructeur CARACTERISTIQUES TECHNIQUES Type de capteur CCD 1 3 El ment sensible 752 pixels horizontal x 582 pixels vertical Syst me de balayage 2 1 int...

Страница 11: ...rs des sujets r fl chissants Si l objectif est du type C interposer l adaptateur livr de s rie entre la cam ra et l objectif Si la cam ra est install e dans des endroits dont l clairage varie il est n...

Страница 12: ...de l exposition en positionnant l interrupteur ES du commutateur sur ES la vitesse de l obturateur lectronique varie automatiquement en fonction des conditions ambiantes d clairage eRemarque L utilisa...

Страница 13: ...e dip switch de s lection INT LL dans la position LL pour que la camera soit synchronis e sur la fr quence du secteur Pour un ajustage compl mentaire r glez l aide du potentiom tre V PHASE Si cette fo...

Страница 14: ...turen wenden Sie sich bitte nur an ein autorisiertes Zentrum des technischen Kundendiensts TECHNISCHE EIGENSCHAFTEN Sensorart CCD 1 3 F hlglied 752 Pixel horizontal x 582 Pixel vertikal Scannersystem...

Страница 15: ...flektierende Gegenst nde Ist das Objektiv des Typs C zwischen die Kamera und das Objektiv den in der Lieferung enthaltenen Adapter setzen Wird die Kamera in Umgebungen mit wechselndem Lichteinfall ver...

Страница 16: ...ische Steuerung des Lichteinfalls Durch Positionieren des Schalters ES des Dip Switches in der Position ES wird die Geschwindigkeit der elektronischen Klappe abh ngig von den Lichtbedingungen der Umge...

Страница 17: ...nter ihnen zu einer Instabilit t des Bildes f hren K nnte Wird der Micro Schalter LL INT auf LL gestellt synchronisiert sich die Kamera mit der Netzspannungs Frequenz Eine weitere Phaseneinstellung er...

Страница 18: ...do ESPECIFICACIONES T CNICAS Tipo de sensor 1 3 CCD Elemento sensible 752 pixels horizontal x 582 pixels vertical Sistema de escaneado 2 1 entrelazado CCIR V 50 Hz H 15 625 kHz Resoluci n horizontal 4...

Страница 19: ...o es de tipo C colocar entre la c mara TV y el objetivo el adaptador entregado con el equipo Cuando se usa la c mara TV en ambientes en los que var a la iluminaci n es necesario prever el empleo de un...

Страница 20: ...eniente 2 Control autom tico de la exposici n colocando el interruptor ES del interruptor dip en la posici n ES la velocidad del obturador electr nico var a autom ticamente de acuerdo con las condicio...

Страница 21: ...n LL la c mara genera los sincronismos partiendo de la se al de alimentaci n red Para ajustar la c mara utilizar el potenci metro V PHASE Si no se ha visto obligado a realizar este ajuste colocar el...

Страница 22: ...22 DS1092 006...

Страница 23: ...DS1092 006 23...

Страница 24: ...9 810 http www urmetdomus com e mail info urmetdomus it FILIALI 20151 MILANO V Gallarate 218 Tel 02 380 111 75 Fax 02 380 111 80 00043 CIAMPINO ROMA V L Einaudi 17 19A Tel 06 791 07 30 Fax 06 791 48 9...

Отзывы: