background image

4

Displaying the Settings:

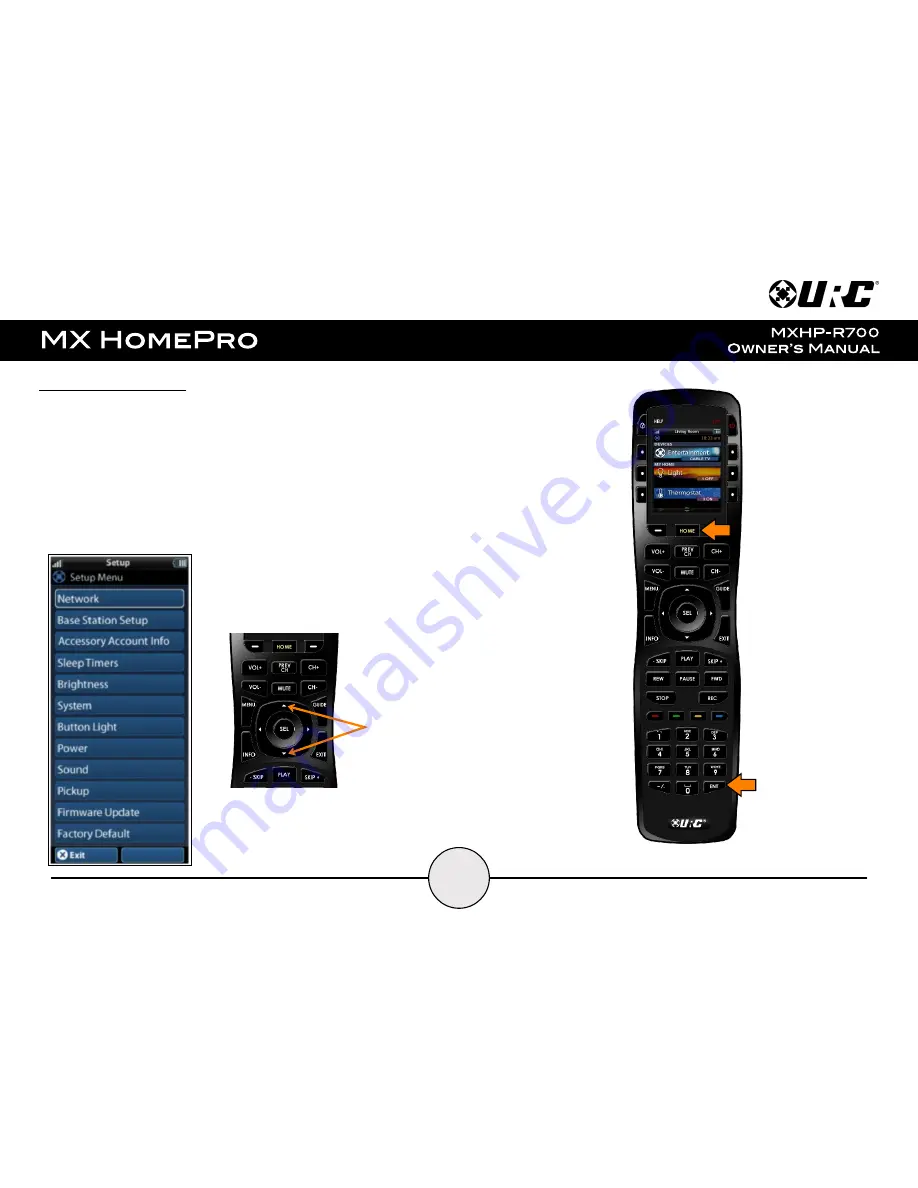
Entering the Settings Menu is accomplished by pressing and holding the Home and
Enter (ENT) buttons simultaneously for three (3) seconds.

Use the 

Up

 and 

Down

 buttons to 

navigate

 between items on the Settings Menu. To

select, press the button on the side of the LCD screen or the 

Select

 (SEL) button when

the item is highlighted.

Shown below is an expanded view of the MXHP-R700’s Settings Menu, 

not all options

on this image are available on the screen at once

.

Up

 and 

Down

 navigation buttons

reveal the entire list on the
Settings screen.

Содержание MX HomePro MXHP-R700

Страница 1: ......

Страница 2: ...SIONS MADE IN THIS MANUAL The information in this manual is subject to change without prior notice MXHP R700 Owner s Manual 2018 Universal Remote Control Inc URC Control the Experience is a registered trademark of Universal Remote Control Inc Table of Contents Congratulations 1 Features and Benefits 1 Parts List 1 Before Getting Started 2 Connecting the Lithium Polymer Battery 2 Using the Charging...

Страница 3: ...Meta data Feedback Experience real time two way feedback right on the remote s LCD screen when used with compatible Z Wave smart devices Enjoy this same feedback when used with URC s ever expanding list of 3rd party products Button LED Backlighting Use your remote with ease regardless of lighting conditions thanks to the MXHP R700 s LED button backlighting Pick Up Sensor Lifting the remote immedia...

Страница 4: ...t URC Technical Support This remote communicates exclusively through 2 4 GHz Wi Fi using b g n signals Connecting the Lithium Polymer Battery When getting ready to add the remote to the system or replacing a battery perform the following steps 1 Press the spring lock down to open the remote cover 2 Place the battery included into the compartment making sure to align the contacts on the battery and...

Страница 5: ...buttons to move throughout the menu Press any button adjacent to the screen to select an activity or device Press the Home button to return to the previous page and select a new device or activity The Volume and Mute buttons are always available regardless of what screen is displayed The Home button always displays the Home Menu pages The Up and Down buttons are used to navigate through a menu scr...

Страница 6: ...own buttons to navigate between items on the Settings Menu To select press the button on the side of the LCD screen or the Select SEL button when the item is highlighted Shown below is an expanded view of the MXHP R700 s Settings Menu not all options on this image are available on the screen at once Up and Down navigation buttons reveal the entire list on the Settings screen ...

Страница 7: ...s connected to From this screen it is possible to scan for different Wi Fi networks select a network to connect to and enter any custom settings Base Station Hub Setup This menu displays all of the hubs that are currently connected to the network Remember hubs are identified by their Wired MAC Address This can be found on the underside of a hub refer to MX HomePro MXHP H500 Owner s manual ...

Страница 8: ...ion Guide The Accessory Account info item allows the entry of a URC TRF ZW account username and password 6 The screens displayed at the right show how this looks when the Accessory Account information has been entered and verified Contact your smart home professional installer to acquire Z Wave home lighting comfort and security products for use with your MX HomePro system ...

Страница 9: ...this screen allows for the settings of each Sleep Timer value Once the Sleep Timers are adjusted press Save The Go Back button returns the remote s to the Setup Menu and preserves the last saved setting Brightness This item allows the user to adjust the brightness of the LCD screen s backlight Use the and buttons to decrease or increase the LCD s brightness Once complete press Save Pressing Go Bac...

Страница 10: ...ess by using the and buttons to do so Once adjusted press Save Pressing Go back reverts to the remote s last saved setting System This menu displays data about the remote s operating system memory and other information Press the More button to view further system information or press Go Back to exit to the previous menu 8 ...

Страница 11: ...e and buttons to do so Once adjusted press Save Pressing Go back reverts to the remote s last saved setting Sound Through this menu adjusting the sound on button presses can be changed Press the adjacent hard buttons to increase or decrease the button volume Once adjusted press the Save button Pressing the Go Back button returns to the remote s last saved setting ...

Страница 12: ...to adjust the sensitivity of the remote when reacting to being picked up Increase or decrease the sensitivity using the and buttons Once adjusted press the Save button Pressing the Go Back button returns to the remote s last saved setting ...

Страница 13: ... any available firmware update When available the screen displays as seen on the right Select Yes to begin the updating the remote s firmware Select No to return to the previous menu When the firmware updates successfully this screen is displayed as confirmation ...

Страница 14: ...tem requires re programming Select Yes starts the factory reset process This should only be done when instructed by URC Technical Support or by the smart home professional installer Selecting No returns the user to the previous screen Exit When completed with adjusting any user settings select Exit to return the remote to normal operation ...

Страница 15: ...sion Interference Statement This equipment has been tested and found to comply with the limits for a Class B digital device pursuant to part 15 of the FCC Rules These limits are designed to provide reasonable protection against harmful interference in a residential installation This equipment generates uses and can radiate radio frequency energy and if not installed and used in accordance with the...

Страница 16: ...s 1 This device may not cause harmful interference 2 This device must accept any interference received including interference that may cause undesired operation Any changes or modifications not expressly approved by the party responsible for compliance could void the authority to operate equipment The antenna s used for this transmitter must not be co located or operating in conjunction with any o...

Отзывы: